Week 12 – Oliver

Last week I wasn’t at coding so I missed out on the 2-sensor line-following session so I caught up on that today. We joined up our line-following code with the ‘find the can’ code from 2 weeks ago to make a piece of code that can do the whole course. This course will not be the course we do in the Robocup Junior next year, instead, we will be doing the Senior course in which you have to reach up to a platform to get the can and there is a harder line following course. Here is a picture of my code:

Some problems I had today were stopping the infinite loop and getting the robot to move again once it had got out of the loop. I solved this by changing the loop type to a colour sensor loop so it exited out of the loop when it detected grey.

Week 10 – Oliver

This week at coding we came up with a better solution for our find the can code. If the robot was pointing straight towards the can my code made it go forward 2 wheel rotations, turn clockwise for 1 rotation and then repeat the old code. I also made the robot slowly go up to 50 speed when it is pushing the can so the sudden jerk didn’t make the robot go skewed. This meant that some parts of my pseudocode:

(Newer) Pseudocode:
1. When the robot reaches the green area, stop moving.
2. If the can is in the robot's field of view then go forward 2 rotations, otherwise go to 4.
3. Turn 1 rotation clockwise and continue.
4. Turn on axis anticlockwise until an object is detected within a range of 60cm. (can)
5. Turn 1 degree at a time anticlockwise until the can is not detected while counting number of degrees.
6. Halve the number of degrees turned and turn clockwise that number.
7. Move forward, 3.5 rotations, increasing the speed of the robot each time.

This is my pseudocode turned into Mindstorms code:

Some problems that I had were the robot’s ultrasonic sensor having a very wide range of vision, meaning that the algorithm that I had made got confused by the can being straight in front of the robot.

This is my programming in action for the find the can part:

Next week we will do a line follower with 2 sensors and join that onto our find the can code.

WORD OF THE DAY: Cancatervate – Heaping things into a pile.

Week 9 – Oliver

This week we used maths and logic blocks to make sure the robot hits the can perfectly and has no chance of missing it. I had to use a maths block, variable and loop to make a counter to get the can in the dead centre.

(New) Pseudocode:
1. When the robot reaches the green area, stop moving.
2. Turn on axis anticlockwise until an object is detected within a range of 60cm. (can)
3. Turn 1 degree at a time anticlockwise until the can is not detected while counting number of degrees.
4. Halve the number of degrees turned and turn clockwise that number.
5. Wait 2 seconds then move forward for 3.5 rotations.

We made this extra part because the robot frequently used to miss the can. The old program worked but Richard said that we can’t go up to the course like we did today and say “my robot can’t detect that” and move the can.

Some problems that I faced were connecting the variables to the math and movement blocks and getting the loop in the right place. I couldn’t copy the original code because the infinite loop would mess up the robot from getting the can.

We didn’t need to add the bumper attachment because the robot always hit the can straight on with our new algorithm. We measured how far it was to the farthest point of the green circle from where the line following course finished and made the robot only go slightly more than that.

This is my final code:

WORD OF THE DAY: Sesquipedalianism. The tendency to use long words.

Week 8 – Oliver

This week we were asked to write some pseudocode and then a program to find the can in our line-following mission that we are going to do in the Robocup Junior next year. Here is my pseudocode:

Pseudocode:
1. When the robot reaches the green area, stop moving.
2. Turn on axis anticlockwise until an object is detected within a range of 30cm. (can)
3. If the can is not detected move forward 2 wheel rotations and go back to 2.
4. When can is detected move forward while the can is being detected.
5. If the can is not detected stop and go back to 2.

At first, I thought it would be not too hard. The pseudocode seemed simple enough, although there was a few “return to” parts that are hard to execute in Mindstorms. My original code could detect the can by spinning around anticlockwise until it found the can but would not move forward until the can was moved out of the way. The reason it did this was that I had mixed up the larger than and less than symbols in a loop.

I then realised that when the robot moved forward and crashed into the can, the ultrasonic sensor banged into the can. This must have messed up the sound waves, because the robot started turning again. Because the sensor couldn’t detect the can if it was straight up against it, I decided to make a bar to keep the can away from the sensor so it could still be detected. I had finished making it but unfortunately we ran out of time so I couldn’t attach it onto the robot.

My finished code is below:

And now for (drum roll please…) The Word of the Day: Batrachomyomachy – A pointless argument.

Week 7 – Oliver

This week at coding we used the ultrasonic sensor. The ultrasonic sensor sends out high-pitched sound waves that we can’t hear to detect where a wall is. This will be used when we have to detect the tin can and push it out of the green circle. First we made a simple program to go towards the wall until it was 20cm away, then stop. Unfortunately, I had downloaded the Home Edition onto my laptop so I had to download the Student Edition, taking out a bit of coding time.

The “20cm away from wall” code.

The next challenge was to use “The Force” to control the robot. The pseudocode was: If the robot is more than 20cm away from the hand move forward, otherwise move backwards. We wondered why the code was not working, but we worked out that our sensor had to be plugged into port 4 to work because that was the default of the ultrasonic block.

Our next challenge was to use the exact same code from the previous challenge, except making the robot stop and stay still if it was between 15 and 20 centimetres away from our hand. For this we needed to use nested switch blocks, which is one switch block inside another.

An interesting thing that we found with the EV3 lessons site was that there was a discrepancy between their comments and the solution for the code. They had got the greater than and less than signs mixed up, making the comments not make sense.

This is last weeks result with our line follower. It is following the course that we will be doing for the Robocup Junior.

WORD OF THE DAY – Discrepancy – an instance of inconsistency or difference.


Week 6 – Oliver

🙂 This week at coding we made a simple line follower that (surprise, surprise) followed a line. It wasn’t at all simple to make it though.

We had two challenges. Our first was to make a line follower that successfully followed lines using white and black. Our second was to make our robot stop running the program if the touch sensor was pressed.

At first, I tried to use the Reflected Light Intensity block to see if the light that was on the line was more or less than 50. This did not work because of the ambient light making the numbers mixed up. My idea was to make the robot follow the edge of the line, but it was too complicated for me and I didn’t understand it. We will do that sort of code in future weeks.

I then decided to use the Compare Colour mode. This detects what colour the colour sensor is seeing, then reports it to the code. If the sensor detects black then the robot turns right 35 degrees, and on white it turns left 35 degrees.

This session took a lot of trial and error and a lot of mistakes. In the end I learned a lot about the language and how it works. My final result is down below. 😉

WORD OF THE DAY: Hunt-and-peck. Using only one or two fingers to type on a computer keyboard.

Week 5 – Oliver

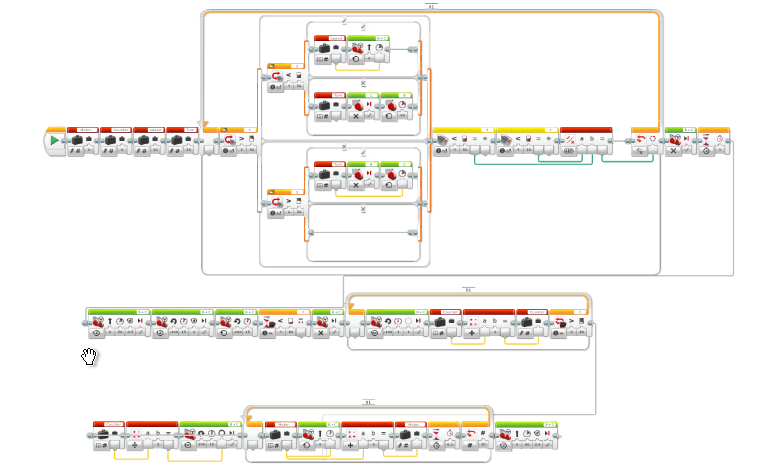
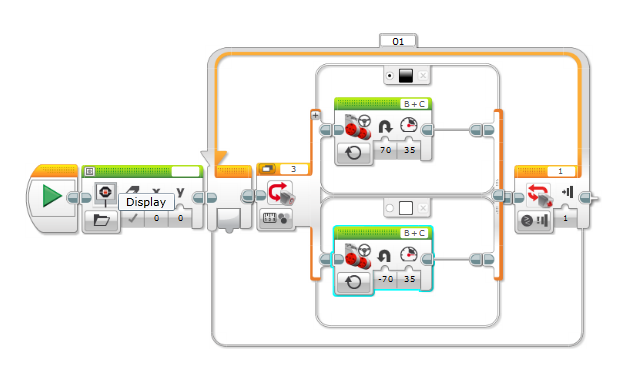
This week Richard had a challenge week with me and James only. We had a list of pseudocode instructions to make the robot follow, shown below:

1. Move forwards in a straight line
2. If a red, green or a yellow tile is detected stop and wait for one second
3. If the tile is red, stay stopped
4. If the tile is yellow, move forwards until it is not yellow and go back to 1
5. If the tile is green, wiggle side to side 3 times and go back to 1

This is a lot harder than it may seem. We had to use many different block types to make the program work, and I feel like I have learned something new to try on my robot at home.

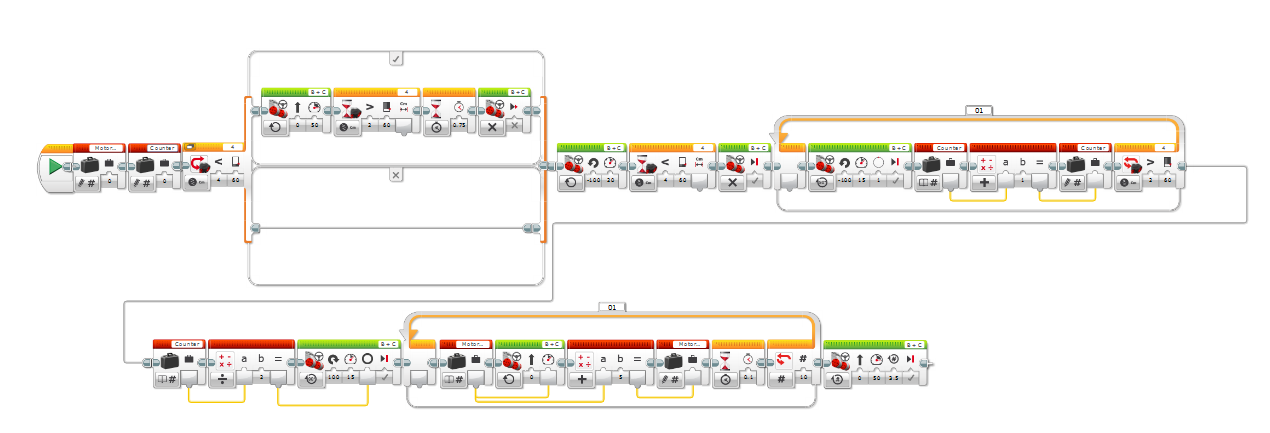
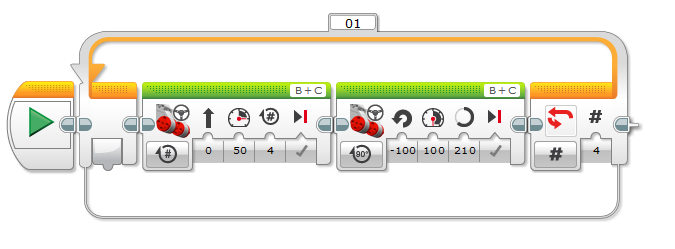
My code is still not perfected, but this is my unfinished result. I have written step by step of how my program works:

  1. Move forward until one of the three colours is found.
  2.  Wait 1 second.
  3. If the colour is red then stop motors, say “RED” and then go back to the beginning.
  4. If the colour is not red then if the colour is yellow then;
  5. Until the colour is not yellow move forward then go back to 1.
  6. If the colour is not red nor yellow and it is green then stop motors, run the My Block called “The_Wiggles” and then go back to 1.

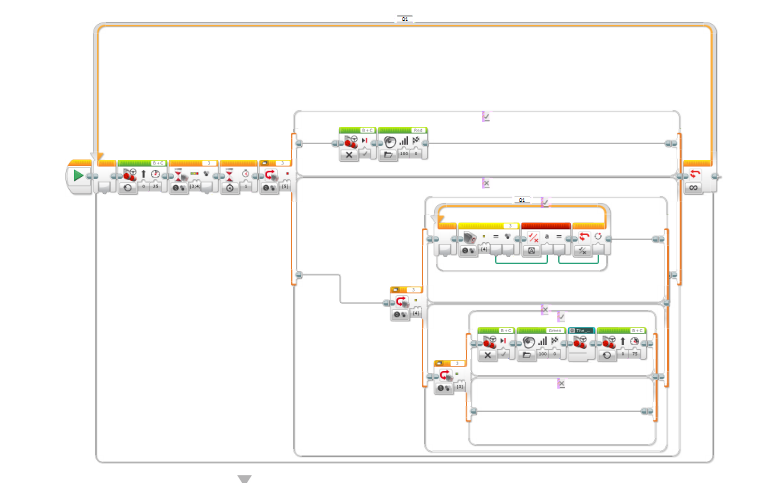
I have used Nested Loops (loops inside each other) in my program. Right now, it does not work, so I wonder if I choose a different format of laying out my code it would work better? I am going to try that next week.
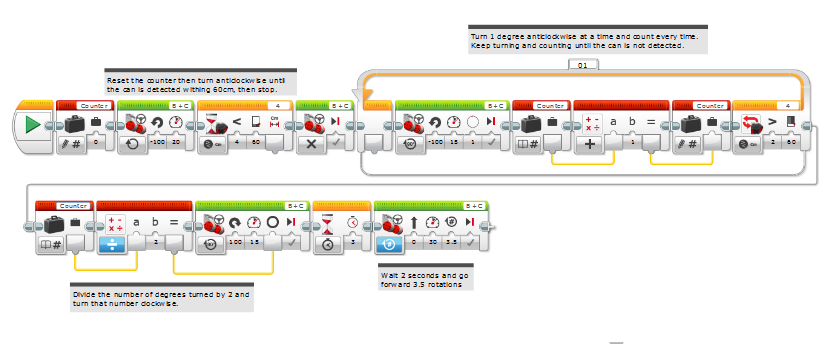
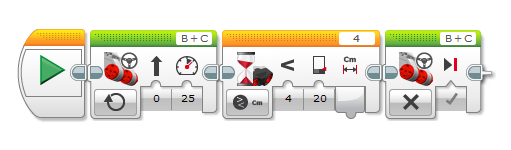
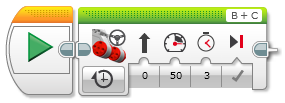
My Wiggle Block

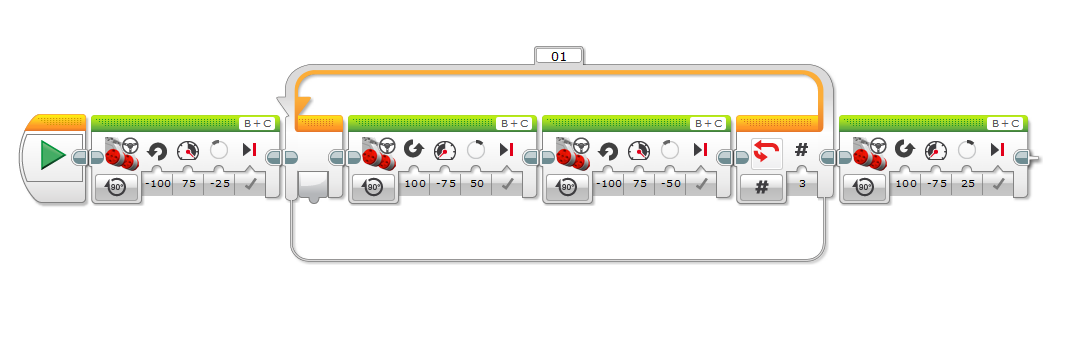
This My Block starts by turning the robot 25 wheel degrees left by moving the wheels. It then repeats turning 50 wheel degrees left and right 3 more times. Then it finally finished by turning 25 wheel degrees right.

WORD OF THE DAY: Petrichor The smell when rain and soil combine.

Week 3 – Oliver

Today at coding we discussed pseudocode.

Pseudocode is like a simpler form of any programming language, used by programmers to picture in their mind what they want the robot to do.

We were given examples of “How to make a Peanut Butter and Jam Sandwich.” We had to give very detailed examples, or something would go wrong.

Sandwich pseudocode example.

We were also given a pseudocode example to try out on the EV3. The steps were:

  1. Move forward 4 wheel rotations
  2. Turn left 90 degrees.
  3. Repeat steps one and two 3 more times.

It was a lot harder than we expected it to be and required a lot of trial and error. Eventually, we decided to use Port View to get an accurate result, but even that wasn’t perfect. Our result for the turning was 210±5 rotational degrees (allowing for the wheels to slip slightly).

The final result.

WORD(S) OF THE DAY: REVERSE POLISH NOTATION. A way of doing mathematical equations without the need of brackets.

Example: 1 3 6 12 9 + is equal to 31.

Week 2 – Oliver

This week at robotics we focused on the coding element. We made the robot move forward for 3 seconds and then back for practice, then started doing more complicated things.

The code for going forwards and backwards.

We used trial and error to get to a green line and back, and we had to try a lot of times before we got it to work.


The final result is here, where we used rotations.


Then we moved on to the colour sensor, where we had to go to the green part of the line-following route and stop when we got to it. The colour green was the wrong shade, so the robot just went past it. Next week we will adjust the setting so that the different setting of green will work.

We also discussed that the method that was used to find the number of rotations to the green line was not foolproof, and if the wheels were bigger or smaller the distance travelled would be more or less.

Hourglass dropdown menu


WORD OF THE DAY: SPORADIC. This word means that something is temperamental, or something only sometimes works.

Week 1 – Oliver

Last week we looked at Richard’s LEGO Mindstorms line follower. It did not get around the course, and this week we will modify it to get around the course better.

We set up the website for blogging our weekly achievements (this website) and all have our own accounts.

This week we adjusted the position of the sensor and changed the codes for higher speed and more aggressive turning. The position of the sensor moving towards the centre helped line following because the triangle between the wheels was smaller. Increasing the turning aggressiveness made the robot stray off the line, causing it to fail the course.

We also looked at how Richard bought our domain name and EV3 software and observed the code. Next week we will write our own code from scratch using the software.

QUOTE OF THE DAY: Learning to code is like learning a new language.