Welcome to the children’s website about their journey to enter a RoboCup Junior competition in New Zealand.
Their aim is to compete in the Rescue Challenges. One of the requirements of being in the competition is listed in the Rescue Rules as:
7.1.2. All teams must maintain a logbook detailing the design, development and construction of the robot and its programs.
This website will be their means to achieve this. It will allow them to keep a record for themselves while, at the same time, allowing them to share what they are doing with family, friends, and the school. It will also give them some experience of using WordPress as a platform.
Some of our aims are to:
Examine different line following algorithms from very basic to more advanced
Critically evaluate how each algorithm performs and use observation of the robots behaviour to go back to their code and make iterative changes to see if improvements can be made
Develop strategies to make changes on the fly, during competition time, if the robot fails the task, for any reason.
Learn documentation skills and ways of managing code history.
We hope you enjoy following their progress 🙂
Update – September 19th, 2019:
Today we went to the Regional Taranaki Robocup Junior competition held at the TET Stadium in Stratford. James competed in the Junior Rescue competition. Sara and Oliver competed in the Senior Rescue competition.
The children should all feel very proud of what they achieved coming 1st in each of the competitions 🙂 The wins would have made them eligible for the National Robocup competition. However, due to unforeseen circumstances, the Nationals were held two weeks prior to our Regionals.
The competition was a wonderful learning opportunity for everyone to see how the competition is run and to experience the realities of everything not exactly going to plan despite lots of testing in our own environment.
When things didn’t go right, the children showed wonderful resilience and were able to make some code changes on the fly which resulted in a perfect last run for the Senior competition.
A huge thank you to Sandy for all the organising she did to get us to the competition and to Fabiano and Marie for helping with transport and supporting us all.
Update – September 3rd, 2019:
The children have worked really hard over the last few months. Today is the first time that they all got their code working to a competition standard where the robots autonomously performed everything they were required to in their grade of the competition. Sarah and Oliver in the Senior competition and James in the Junior competition. They should feel very proud of themselves. The two videos, below, speak for themselves!
The files consisted of a .ev3b file, a .ev3 file, a .rtf file and a .rbf file. The .ev3b file includes the My Blocks necessary for the project (there are lots of them). Without the ev3b file, we would have to copy and paste the data from the My Blocks into new ones of the same name or re-open them. The .ev3 file is simply the program, like every other program in the editor. The .rtf file is a Rich Text File. EV3 Firmware Release v1p1 uses the .rtf extension to enable the files to be downloaded using the standard LEGO MINDSTORMS EV3 software. The .rtf extension is intended to be used for files containing text so using if for the executable program is a work-around. It is an executable program, compiled from C++ that implements an efficient solving algorithm that can find much shorter solutions than the older NXT MindCuber variants. The .rbf file is a script file that installs a program on the EV3 to run the code from the programs menu.
And the robot was built. The cube-turning arm was complete, the spinning base was constructed, and the robot’s brain attached with all it’s 32 million bits of memory filled with cube-solving patterns. It was perfect and good to go… or was it?
We placed the cube in the base and pressed the robot’s button The colour sensor went to work, scanning the faces of the cube. But when the arm went to flip it, it couldn’t get a grip on the cube and the colour sensor ended up scanning the same face again and getting confused. However the robot tried to twist and turn, the cube was never solved.
We got to work. We would change the arm so it was lower and got more of a grip on the cube. But, just as the plan was laid out so carefully in our head, the bell rang outside and our plans were postponed until next week.
Wait and see…
Fact of the Day: Earth is the only planet not named after a god. Does that mean the planet called GJ 581g is also a god..?
Hi guys. This will be the last time I blog about the line follower.
I am very happy with my code and it works all the time. I feel very confident about the competition and I hope I’ll do really well.
On the competition day I won’t have Dad to give me things to think about so I’ll have to work by myself. I’m OK about that though.
I did another run through on my main code for the competition and it worked. The reason I did a double check was if somehow the robot failed on competition day we would not finish the course.
That’s all for today so I’ll now leave you with my next steps, word and phrase of the day.
Indolence: Avoidance of activity or exertion; laziness
A person who never made a mistake never tried anything new – Albert Einstein
Next steps: To figure out a Rubic cube using the Mindstorm
This week was our last week before the Robocup Junior competition. Our code can navigate around the entire course, as you saw in the video last week, quite reliably. This week we adjusted the can-finder to have the counter code in front of the motor code, so it had to run through that before turning.
This week, we were asked to research and write a blog post about what we were going to do after our line-following work was finished. We decided that we could make a Rubik’s Cube solver (MindCub3r). I have found the following tutorials for how to make them:
These would be a good guide to follow and then convert them into our own ideas. We could also make a program to scramble a Rubik’s cube by trying to make a pseudorandom number generator, or make a program to turn the cube into a specific pattern, like the video below:
This Rubik’s cube solver not only solves the cube but makes cool patterns too!
Making a Rubik’s cube solver would be challenging, because of the 3-dimensional virtual map created by the colour sensor. We would then have to write an algorithm to solve it using the twists and turns of the cube, in the EV3 block code. This an explanation of the algorithm online Rubik’s cube solvers use to solve cubes: Ruwix – The Rubik’s Cube Algorithm
We also could learn how to make a PID (Proportional Integral Derivative) line follower for next years competition with 1, or even 2, sensors (See: 2-Sensor EV3 PID Line Follower,) make a Lego brick sorter that sorted the bricks into colours and shapes (see: EV3 Brick Sort3r), and even possibly expand on this into weights.
Finally, I would like to say a big thank you to Richard for helping us with our coding for the past 2 terms and last year, for giving us suggestions and challenges that improved our programming knowledge and giving up his time to come in to teach us. It’s been a long line for us to follow, but you programmed us well and we managed to get to the end!
Fact of the Day: 👾 The sound of E.T. walking in the film was made by someone squishing their hands in jelly. 👾
Today our task was to navigate around the watertower. We had to find our way without touching the watertower, and efficiently and reliably. We had to write pseudocode for the task, turn it into code and comment it.
This was my first pseudocode attempt:
Original pseudocode:

if watertower within 15cm:
    turn right
    go forward 1 wheel rotation
    turn left
    go forward 1 wheel rotation
    turn left
    go forward 1 wheel rotation
    turn right
else:
    keep following line
When converted to code, however, the problem was that the robot never turns exactly 90° when it turns left or right. This meant that when the robot turned right at the end and rejoined the line, it rarely lined itself up right and ended up continuing through the white.
The other problem with this code was that the robot tried to detect the watertower too soon. This meant that it found it too far back, and crashed into it when it tried to rejoin the line. I changed this to 7cm instead of 15, which let the robot get close but not close enough to knock it. I also tweaked the amount the robot moved forward to go around the can, from 1 full wheel rotation (360°) to 420° and 710°.
The biggest change I made was adding the last line: go forward until right sensor is on black, then turn right. This fixed the first problem of the robot not lining up with the line correctly when it finished, by only turning when the right sensor was on black.
I wrote this pseudocode, then converted it into code again:
Revised pseudocode:

if watertower within 7cm:
    turn right
    go forward 420
    turn left
    go forward 710 wheel degrees
    turn left
    go forward right sensor is on black
    turn right
else:
    keep following line
There was one problem with this new code, as Richard noticed: the robot did a little wiggle as it found the line again. When I looked closer, I noticed that while the robot stopped when the right colour sensor was on black, when it turned back onto the line, the left sensor was on black. This caused it to turn left again. To fix this, I replaced the last line, turn right, with the following lines
turn right until left sensor is on black
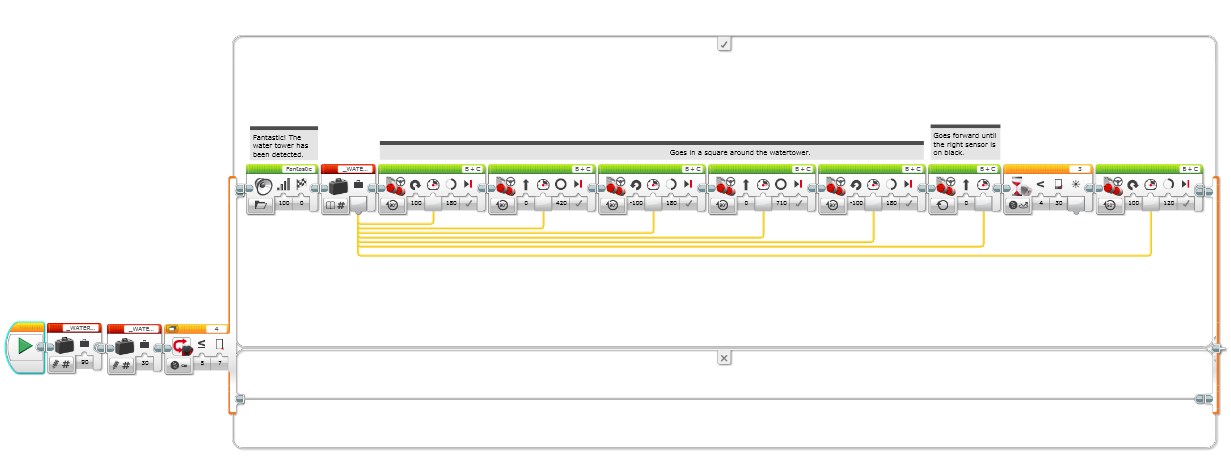
This meant that the robot did not have to do a wiggle to orient itself on the line. This is what the pseudocode looked like converted into code:
1. The first part of the code sets the variables:
WATERTOWER_TURNSPEED, which controls how fast the turns are made
WATERTOWER_SPEED, which controls how fast the robot moves.
I decided to only make use of 1 variable, because I used the same turnspeed as in my main line-follower program.
2. The switch block determines if the watertower is within 7 cm of the Ultrasonic sensor. If it is, then it replies true and goes through the watertower code, otherwise it repeats back to the main line-follower.
3. If the switch block replies true, then a sound is played. I used ‘Fantastic.’ The program then fetches the WATERTOWER_SPEED variable and feeds it into all of the move blocks to set their speed. Then the robot goes in a square around the watertower using move blocks.
4. The robot sets both motors to move forward at the speed determined by the variable. The wait block prevents the robot from stopping until it finds the right sensor on black.
5. The robot then uses another wait block to turn until it finds the left sensor on black, then returns to the normal loop.
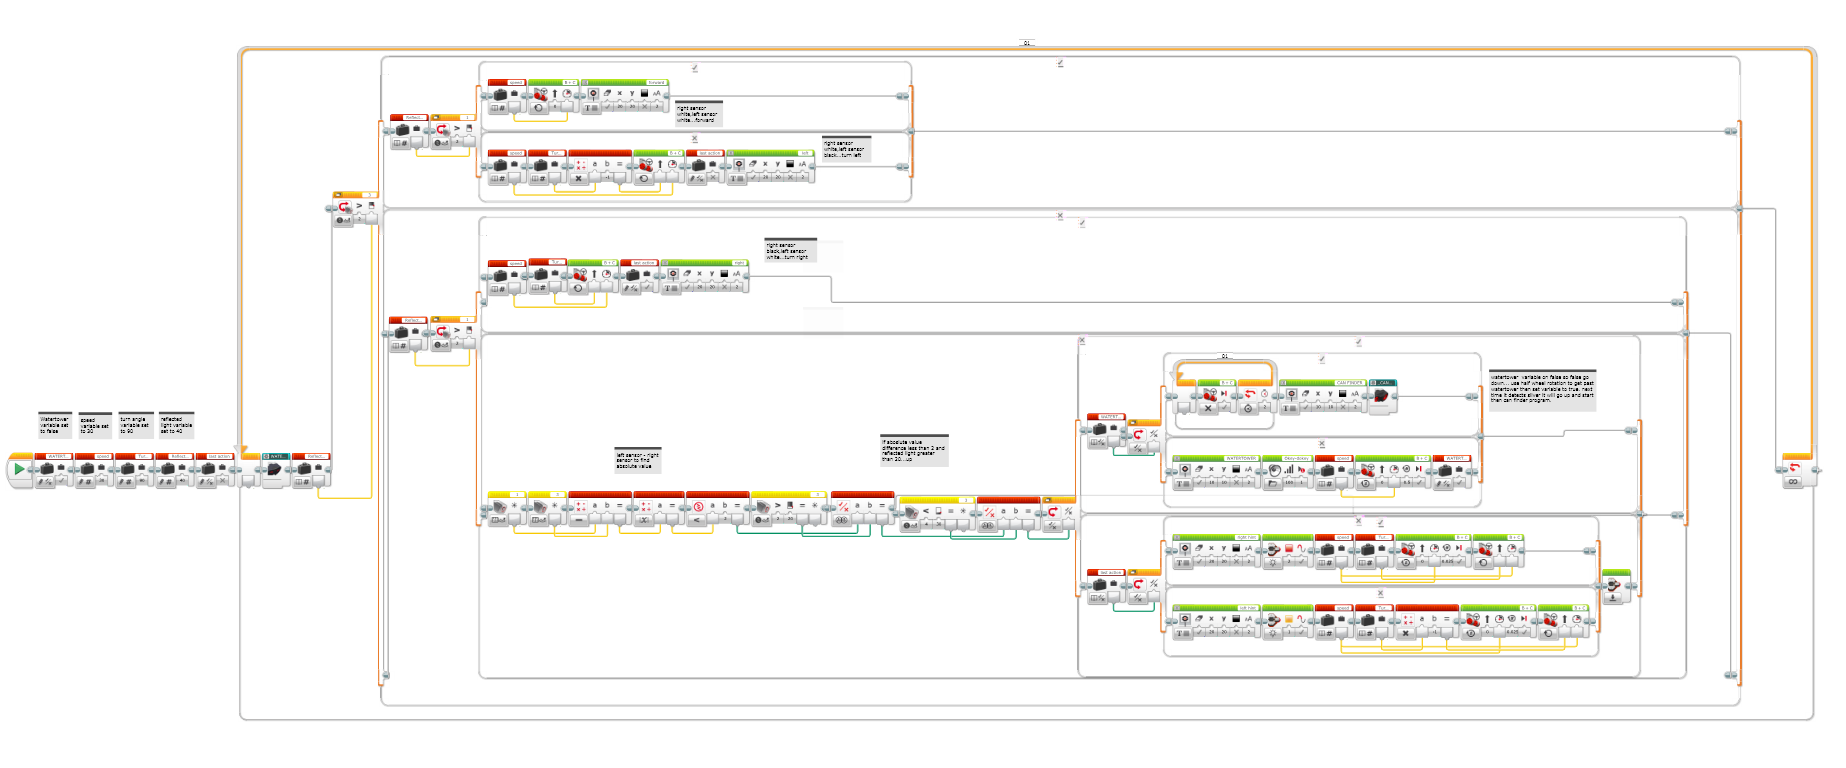
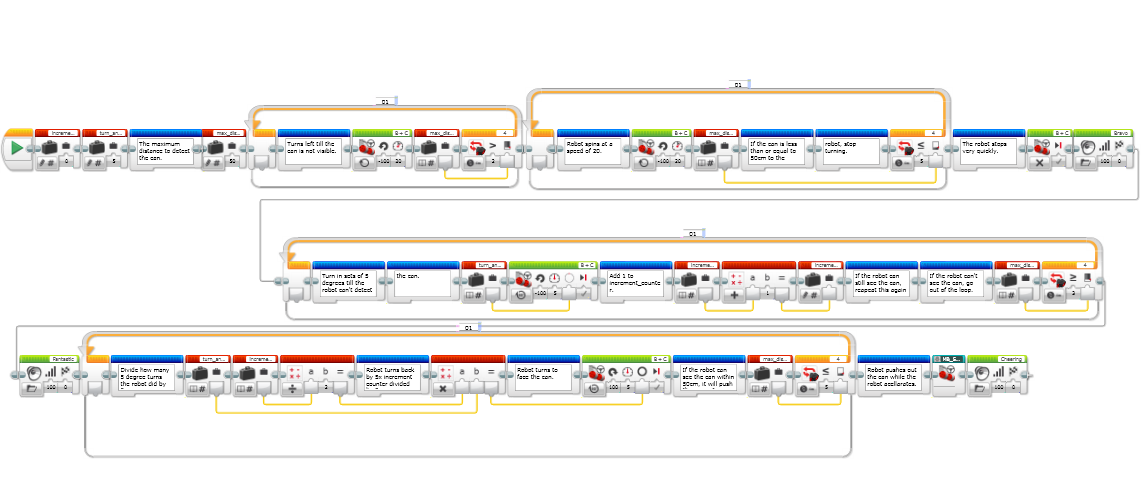
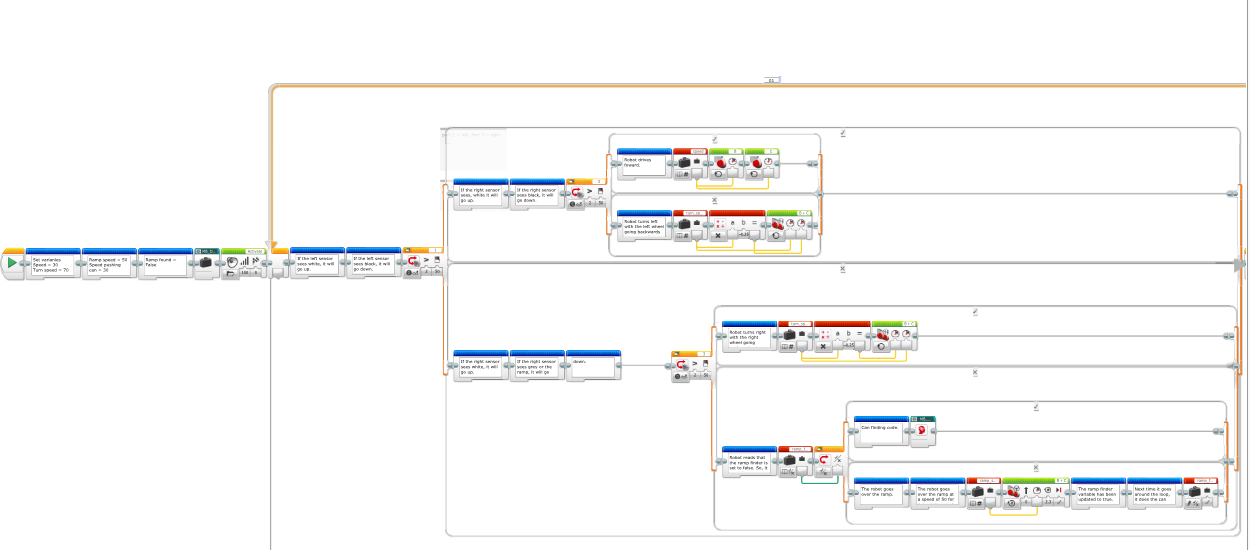
This is the code we have made so far for the Robocup:
I am now using the same code as Sara, if it looks familiar.
As in the watertower code, I am setting the vairables at the start. One of the variables, watertower found, is set to true. I will explain this later. The code then enters an infinite loop, than checks through the watertower code. If no watertower is detected, then the robot checks the reflected light intensity of sensor 3 (the right sensor), if it is higher than 40, the robot assumes that sensor is on white and takes the top path, otherwise it takes the bottom.
If the robot takes the top path then the same question is asked again, but this time for the sensor 1 (the left sensor). If the answer is yes again, both sensors are on white and that means that the robot doesn’t need to turn and can go forward.
If the answer for the second question is no, then the right sensor is on white and the left sensor is on black. This means the robot must turn left to get both sensors on white and the robot on the line.
However, if the answer to the first question is no, then the second question is asked again. If the answer to the second question is yes, then the right sensor must be on a colour that reflects less than 40% of the light shone at it, and the other sensor is on a colour that reflects more. This means that the right sensor is on black and the left sensor is on white, which means that the robot has to turn right to get back on track.
But what if the answer to both questions is ‘no?’ This means that both sensors are on a surface that reflects less that 40% of the light shone at it. This is where the fourth branch of code comes in. There are 2 reasons why less than 40% of the light shone is received – a hint, or silver.
By using an algorithm that subtracts the sensor values from each other then uses the absolute value (removes the negative sign if there is one and turns a negative number into a positive number), the robot is able to decide whether it is on a hint or on silver.
Silver/hint detector
Imagine the left sensor has a reflected light value of 56 and the right sensor’s value is 70. The program would find the answer by finding the reflected light from the sensors, in our case 56 and 70, and puts their results into the red block (a math block). The math block then subtracts the first sensor from the second (56-70) and finds the answer (-14). That answer is then put into the next red block, which finds the absolute value. (absolute value ignores the – sign. So negative numbers become positive numbers and positive numbers stay positive numbers.) In our case the absolute value would be 14. The next math block checks whether the absolute value is less than or equal to 2. Then, the yellow blocks check whether the sensors values are less than 20.
If both answers are yes, and the numbers are within 2 of each other and less than 20, than the robot has found silver and goes onto the can finder. Otherwise, it has found a hint. In our case, with the ABS at 14, the robot has found a hint.
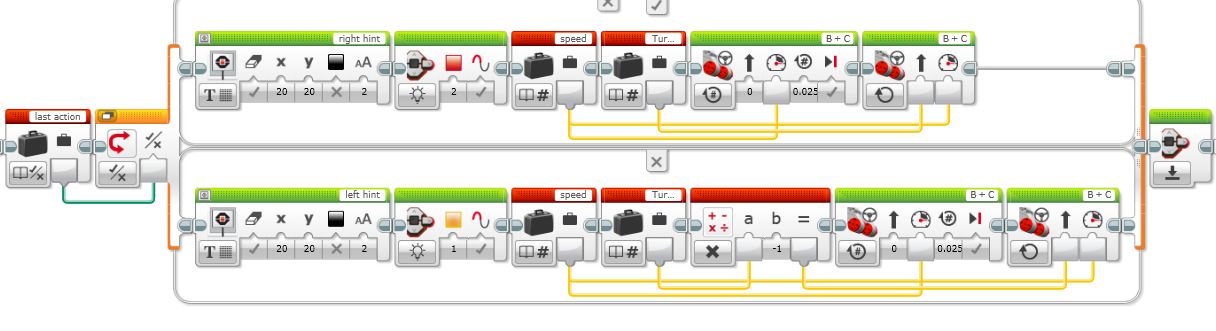
For the hints, the robot finds the last action using a variable we set at the start, last action.Last action finds the last turn the robot did, left or right. It then splits the code into 2 parts yet again: right hint and left hint. Basically, all either hint does is turn a minute amount (0.025 rotations) left or right. It then sets the motors to forward and runs through again.
At the beginning of the code the watertower found variable was set to true. The watertower found variable is a flag variable, which checks if that part of the code has been run through before. The variable checks for a grey dot, like the one at the chemical spill at the end, where the water tower is placed upon. If the competition managers decide not to include a water tower, they could include a grey dot in place of the watertower.
If both conditions are true and the top path is chosen, then the robot will stop for 2 seconds and start the can finding code.
Our can-finding code needs improvement, and that is what we will work on next week. For now, this is what we’ve got…
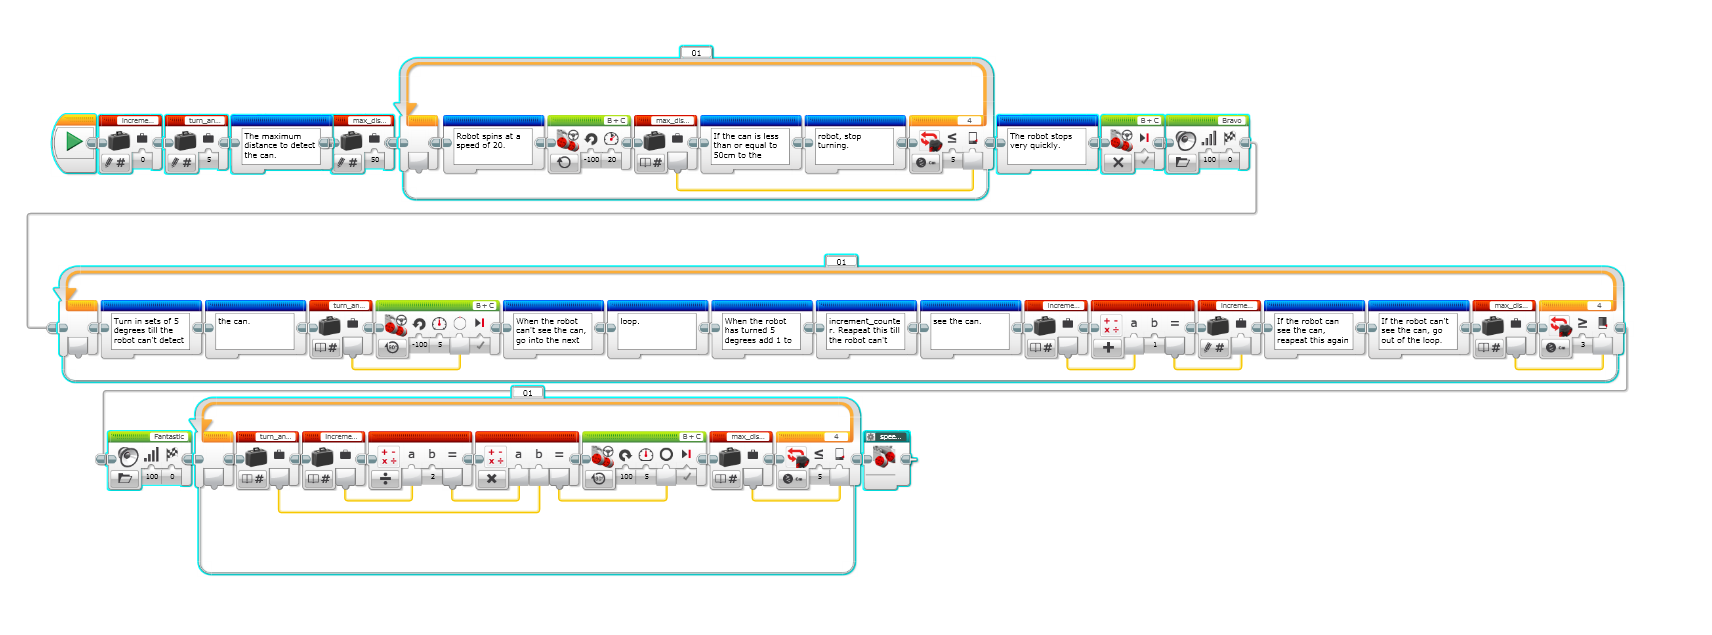
Can-finding code. The blue blocks are comments. Click to enlarge.
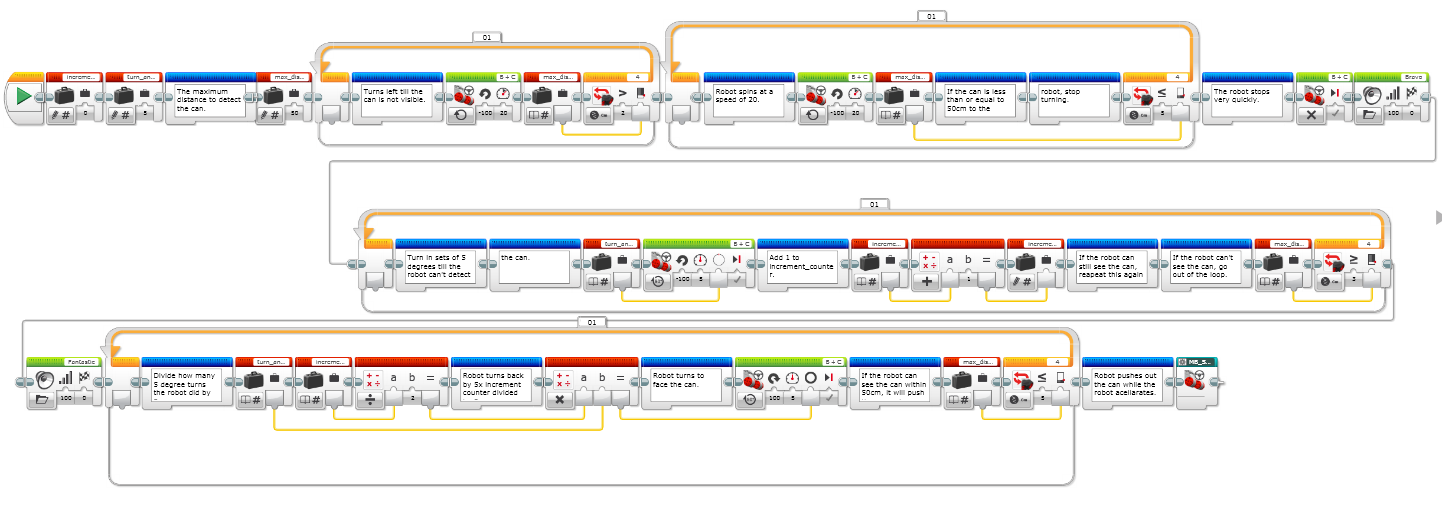
When the can-finding code is activated, the robot turns in place until it finds the can. If the robot can see the can already, it turns until it can’t see it and starts again. When the robot can see the can within 50cm from the ultrasonic sensor, it brakes. It then slowly turns 5 degrees at a time until it can’t see the can, while counting how many times the loop has gone around. When it cant see the can, it takes the number of times the loop has gone around, multiplies it by 5 then divides it by 2. It then takes that result and turns the opposite way that many times. This results in it finding the middle of the can. The robot then charges at the can using a move forward block for 75cm.
That was my explanation of how our code works. This is how it all came together in this video: try to see if you can see the different parts of the code in action!
Useless fact of the day: People say “bless you” when you sneeze because your heart stops for a millisecond. Achoo!!!
In this blog I’m just gonna be explaining how our competition code will work,and what we have to fix ( by we I mean me and Oliver).
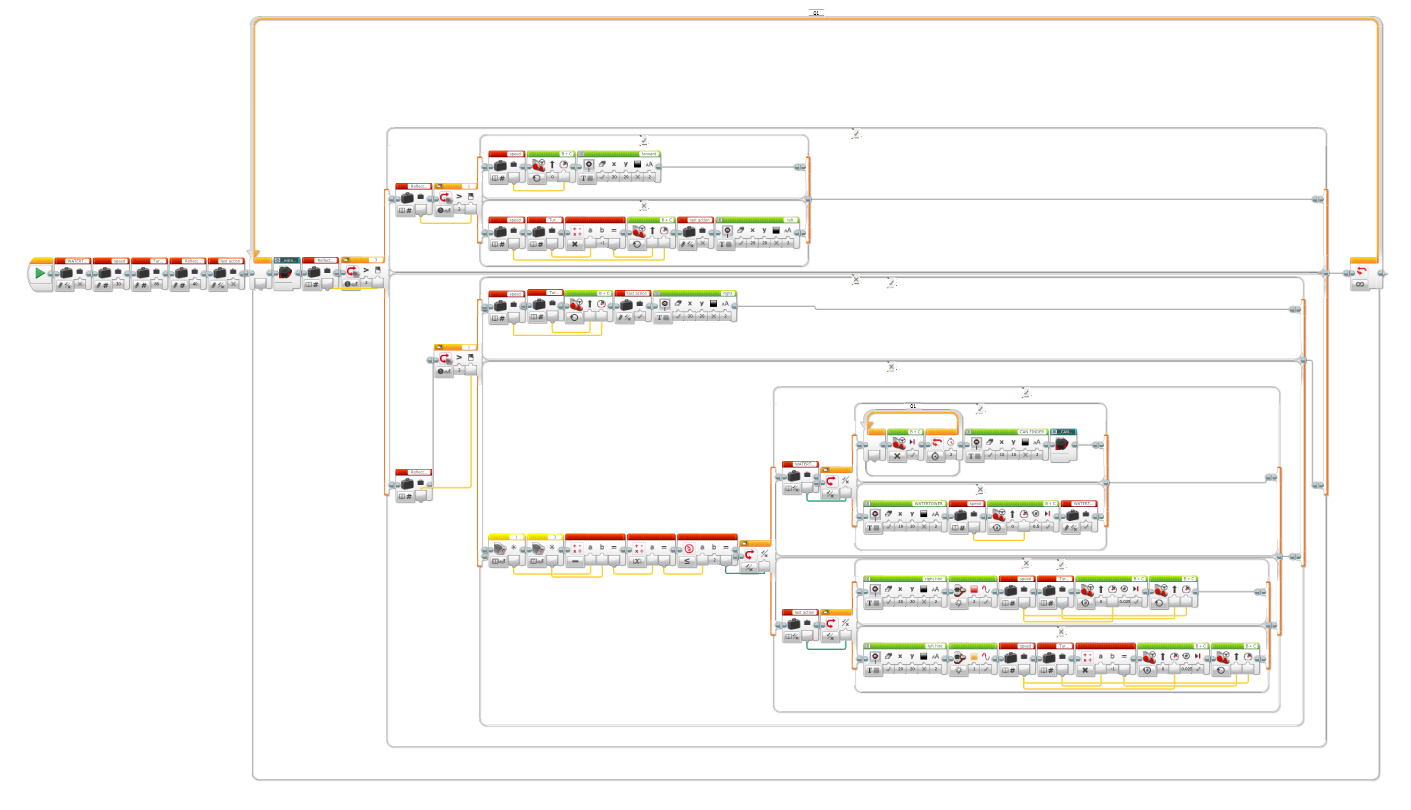
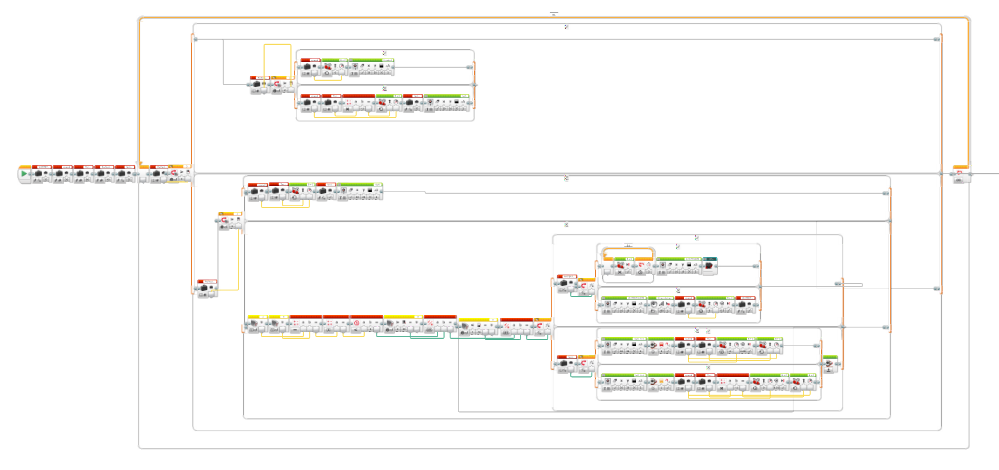
This is the complete code…
MangoBots Competion Code
You can click on it to make it bigger…
That’s the code we’ll be using, but to make it easier to explain I’ve broken it into parts…here’s the first part…
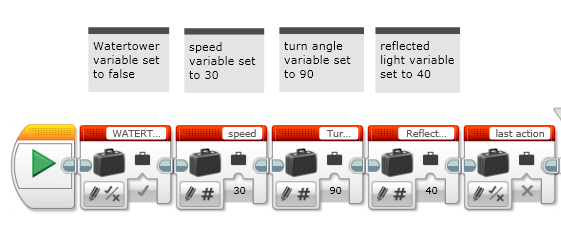
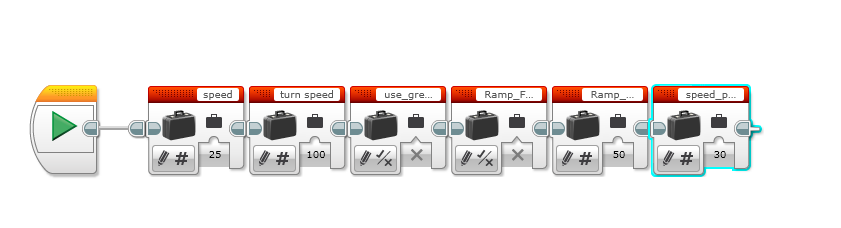
Variables
These are our current variables.
The first is the Watertower, it’s a flag variable and it’s set to true that means it thinks it has already found a silver bit meaning it doesn’t need to find another one, instead the next time it sees silver it should just stop. If it were set to false it would be looking for the silver watertower dot.
The second variable, Speed. its currently set to 30
The next variable, Turn Angle. That variable tells the robot how aggressive its turn should be when following the line. Its set to 90.
The Reflected Light variable is set to 40, why… because if its over 40 we know its white, if its under 40 then we know its a dark colour. And that makes it easier for the robot to know when to follow a line.
The final variable, Last Action. It detects what side the robot last turned, left or right. Then when it knows the last action it uses that as a guide when following hints.
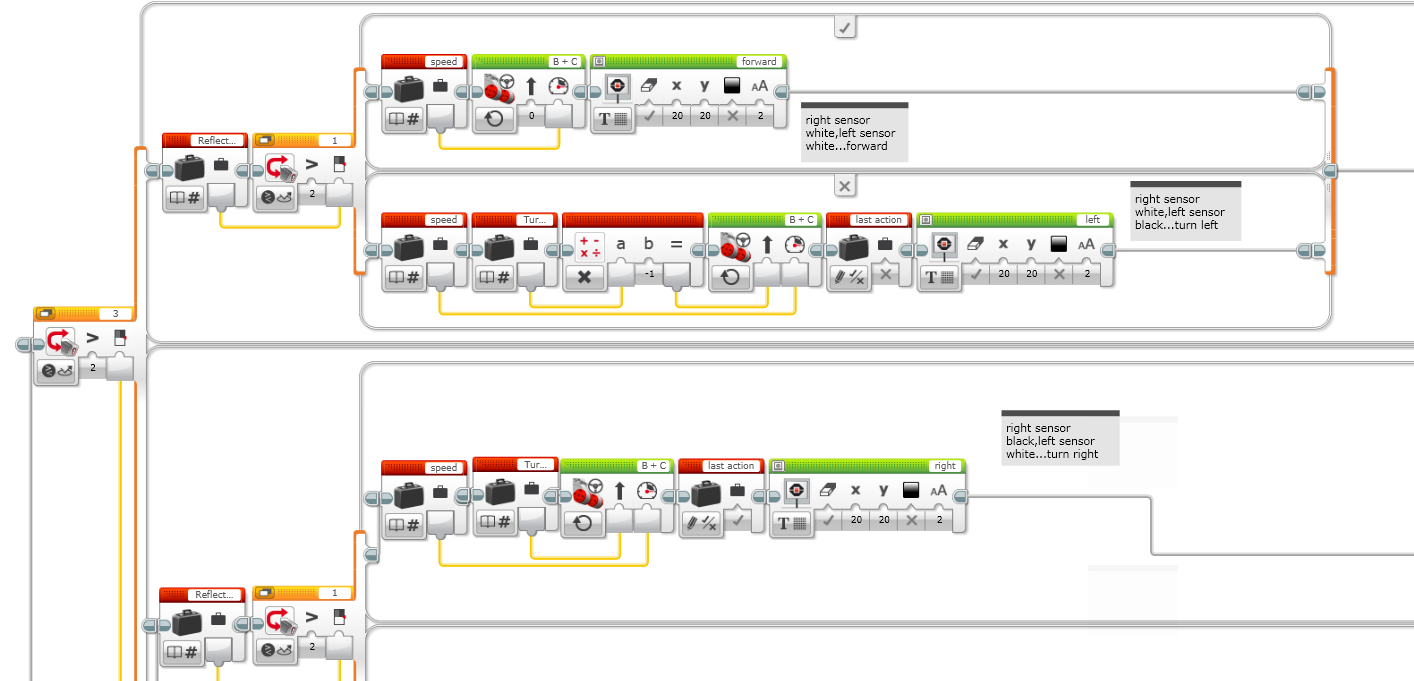
Left, Right and forward
That first orange block on the left side is detecting if the right sensor is greater than 40 then it should take the top path but if it isn’t then it should go down. If it goes up it gets asked another question, is the left sensor greater than 40? If yes then take the top path if no then go down. If for both those questions its a yes then it means the robots on white so it should go forward.
If the answers were yes for the first question and no for the second then that means the right sensor is white but the left sensor is on black. if thats the case then it should turn left to get back on track.
Now back to that first question… if the answer was no then it would go down, meaning the right sensor is black. Once again it gets asked a second question, is the left sensor greater than 40? If yes take the top path if no then go down. By taking that top path it means it needs to turn right to get back on track.
If to both those questions the answer was no then the robot will go down the 4th path…
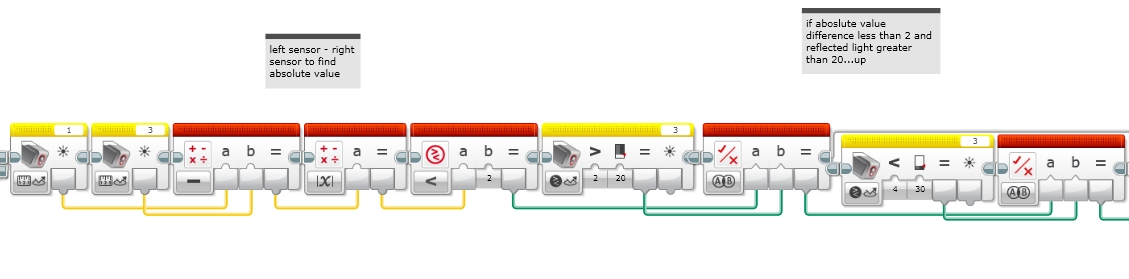
Silver Finder
This is where it gets complicated to explain. The first 2 yellow blocks are detecting the reflected light, then that result gets put into the red block that takes those two answers and subtracts them. The answer to that gets put into the next red block which finds the absolute value of the number. That answer gets put into the next block and it asks if that number is less than 2. Then the yellow block checks if the right sensor is less than 20, if it is and if the absolute value of the other equation is less than 2 it should take the top path because it has found silver.
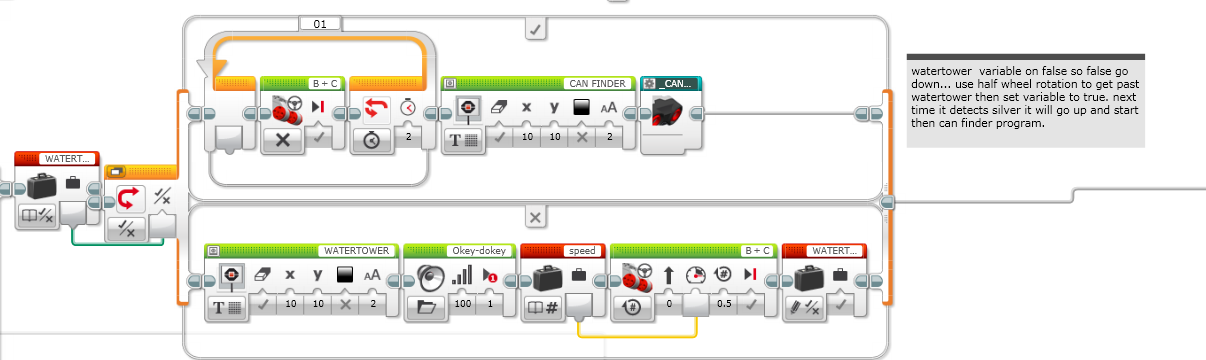
Silver
Since right in the beginning of the code the watertower variable was set to true then the robot will automatically take the top path. The top path makes the robot stop and stay still for a full 2 seconds, then after that it will start the can finding code.
Can Finder
Thats our Can finding code. What happens when this is activated is that the robot stays still and goes round a full 360 degrees until it detects a can, after its found it the first time it will keep moving to a point where it stops seeing it. Then it will stop and go to the middle of the two points (the point where it first saw it and the point where it last saw it). Then it advances forward and pushes the can out of the green zone.
The final part of the code…
Hints
For the hints it looks for green, when it finds it it will go forward for 0.025 of a wheel rotation before turning left or right.
That’s it the complete walkthrough of our working completion code…
Today I attempted to make my program work on the only bit it was failing on – getting over the ramp reliably. I had previously tried to get over the ramp with a flag variable called rampFound like in James’s code, but when I was looking in Port View I noticed that, although I had written my code to recognise a ramp when the values were within 5 of each other, when the robot approached the ramp they were, in fact, not. The reflected light values were actually the same as when the robot was following the black line, except reflected slightly less. This would explain why only when both sensors were on black, the ramp program worked.
I also realised that, instead of triggering the flag variable at the bottom of the ramp, it sometimes triggered at the top. I originally had the distance the robot went when it detected the ramp set to 2.3 full wheel rotations, but as the robot only had to come down from the top of the ramp I set it to 1.5. However, the robot recognised a hint at the top of the ramp and turned left before the robot realised it was on a ramp and fell off the edge.
My line follower so far, hopefully going to work for next year!
A possible solution to this problem could be to change my hints to only trigger after the program confirms that the ramp is not found, or to change my hint direction to straight, like Sara’s code. However, today was our last coding session and we were running out of time, so I decided to leave my code for the time being and help Sara get her code to stop on silver and run the can finder. As I had worked on stopping on silver and can finders before, I could work with Sara to make a flag variable and a can finder. I have explained my can finder in the blog last year.
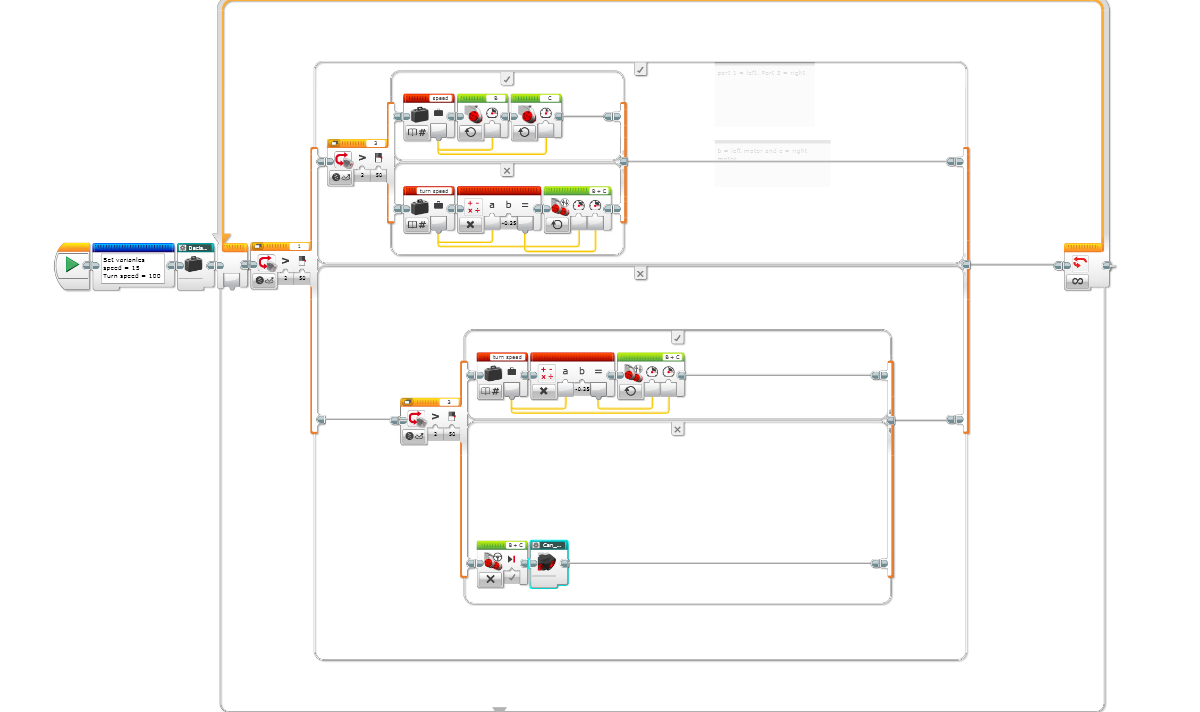
This is our final competition code after working with Sara and making a few changes:
The competition code.
I am looking forward to the tournament on Thursday and am excited to see what ideas the other teams do and learning from their code.
Fact of the Day: Owls are the only birds that can see the colour blue.
NEWS FLASH! The competition has been postponed till the 19th of September due to 2 of the 6 teams competing in the whole competition being sick!
We get extra time coding so I made my can finder and speed builder better. Here are the changes I made.
The change I made to my Speed Builder is that I added more speed every time and the robots doing it for 1500 times. The change I made to my Can Finder code is that I got rid of the loop and made the robot hit the can in the middle of the bar that pushes the can out.
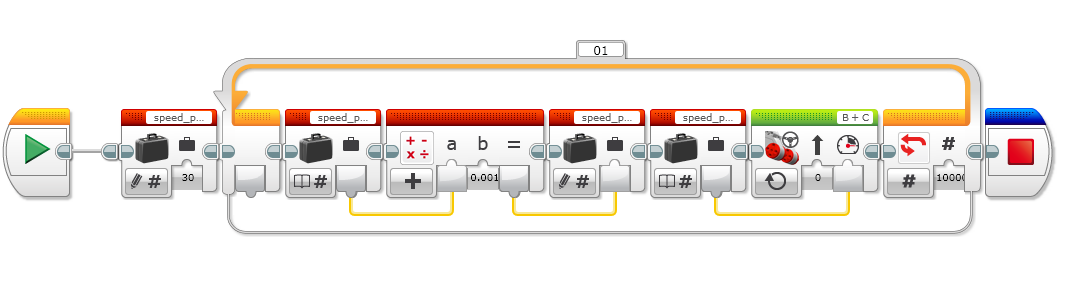
These are the changes I made to my speed builder.
Before: With my speed builder, I made the speed start from 30 and added 0.001 to the speed doing that for 10,000 times making the final speed 40.
After: I made the robot start at a speed of 30 but adds 0.01 to the speed and doing that for 1500 times and making the final speed 45. At the end I put a sound block that made a crowd cheer.
These are my changes to my can finder.
Before: I had a loop at the end of my can finder and my turn back code was affecting where the robot will hit the can.
After: I took out the loop and when I tested it the robot hit the can smack bang in the middle.
That’s all for today’s blog so I’ll leave you with the word and phrase of the day.
Machinery: The working parts of a machine
When you are not practicing, someone else is getting better – Allen Iverson
Hi guys. Today I added some more comments in all of my bits of code. Here is what they look like.
Can finder code.Speed builder code.Main code.
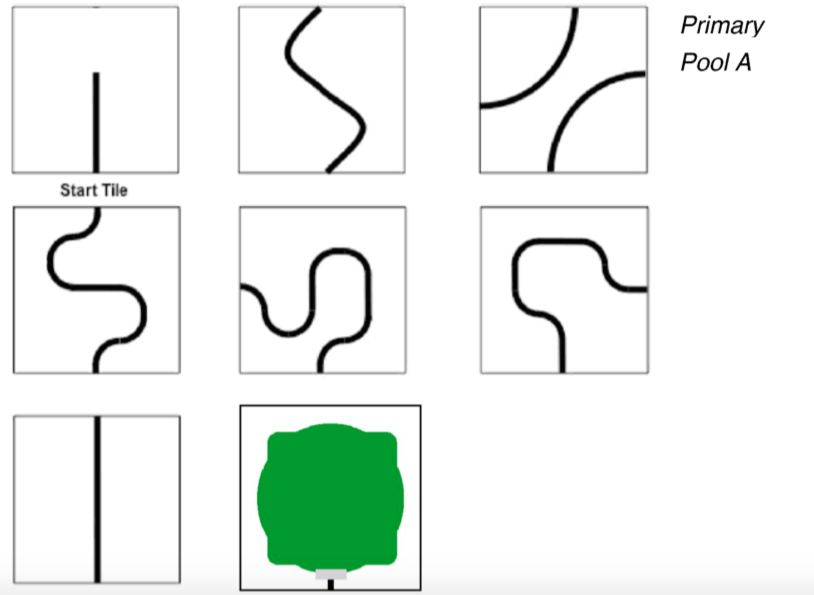
The Robocup JR competition is in a weeks time now so I tested the robot on all of the lines that could possibly be in my competition. Here are the tiles that I tested the robot on.
The tiles that I might need to complete in Robocup JR.
They all worked really well so I experimented with my turn speed.
I had my turn speed set at 75 but my dad suggested to change it down to 30 or 70 to see if it would still work.
It worked on 30 and 70 so I wrote down on a piece of paper.
This is the end of this weeks blog so I’ll leave you with the word and phrase of the day.
Algorithm: Rules for solving a problem in a finite number of steps
If you are afraid to fail, then your probably going to fail – Kobe Bryant
Hi guys. Today I did a lot of coding today. I finally worked out why the code was saying “Hello”. I was running the wrong project! I also forgot about the ramp and did some coding on the can finder and deleted all my code I don’t need for the competition. When I got back to the ramp, I managed to get it to work.
I’ve only kept four pieces of code for the competition. The picture of the code is below.
My main code.My variables. My can finder code.My speed builder code.
I tried the older code on the black line. But it did not work. Dad suggested I might be running the wrong code because I made a new project called 19/08/08 James.ev3 but I was running James.ev3, the project I made at the start of my journey!
With the can finder, I had to add a bit so it locks onto the can first and then locates it. It does not show you this in my code, above, because these photos where taken on Thursday but we had an extra lesson on Tuesday so we were prepared for the competition which is happening in 1 weeks time. The can finder works really well and gets the can out safely.
When we get up to the ramp, it runs my can finder code. So I added bits in before my can finder code to make the robot go over the ramp. I added a block to drive straight for 2.1 rotations of the wheel. It worked before saving the can and it also worked while the ramp was quite far off the liquid spillage area.
The line follower is still in good shape so I feel good about the competition.
My next step: To add comments in my code so I understand it.
This is the end of this weeks blog. Now here is the word and phrase of the day.
Perseverance: Not giving up despite the tasks difficulty.
I want to be remembered as a great competitor and a great teammate – Steve Nash