Week 3 – 2019 – Sara

Hello there!

This week in coding we did quite a lot. Here’s a few things we did…

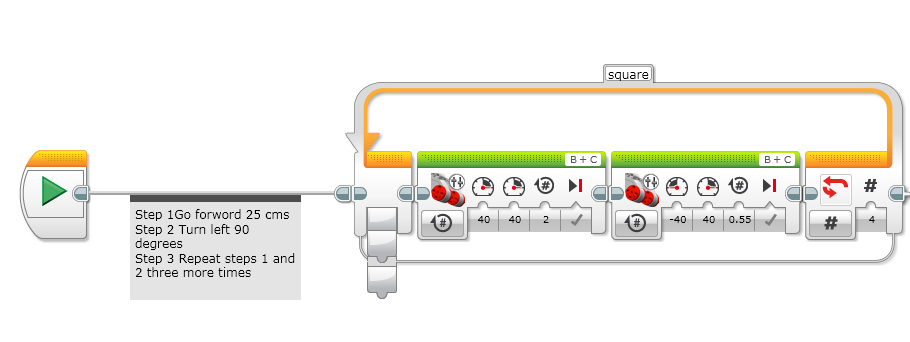
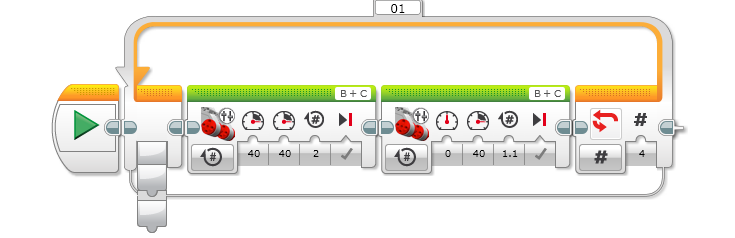
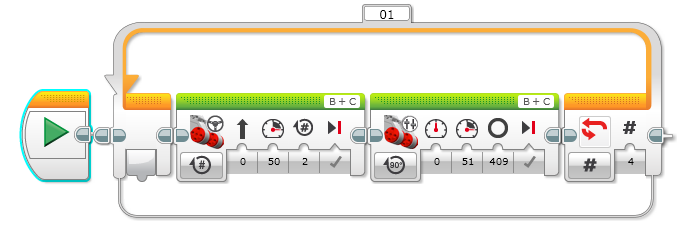
First we started off by changing our code from last week (the one that made the robot make a square). Instead of making one wheel stop and wait for the other to spin 409 degrees, we made both the wheels keep moving, each in a different direction, thus making the robot move back and turn 90 degrees at the same time.

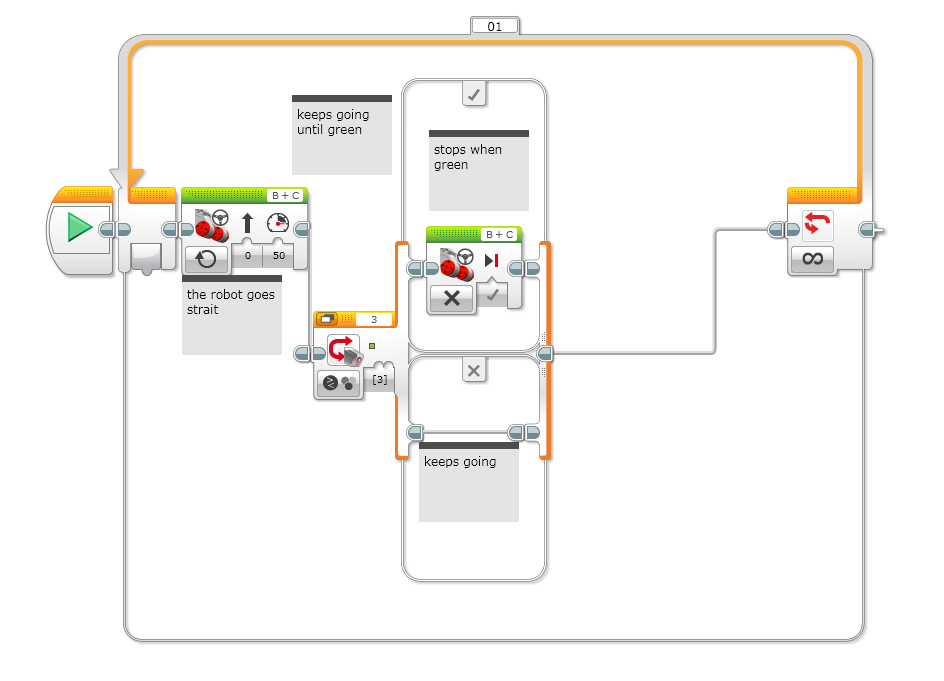
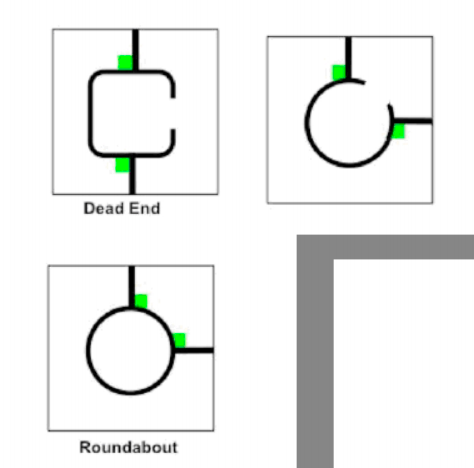
After this we started using the colour sensor. We had to use pseudocode once again to write our code later on, here was my pseudocode for the robot to detect the colour green…

Step 1: Move forward

Step 2: If green found completely stop

Step 3: If nothing found repeat until green is detected

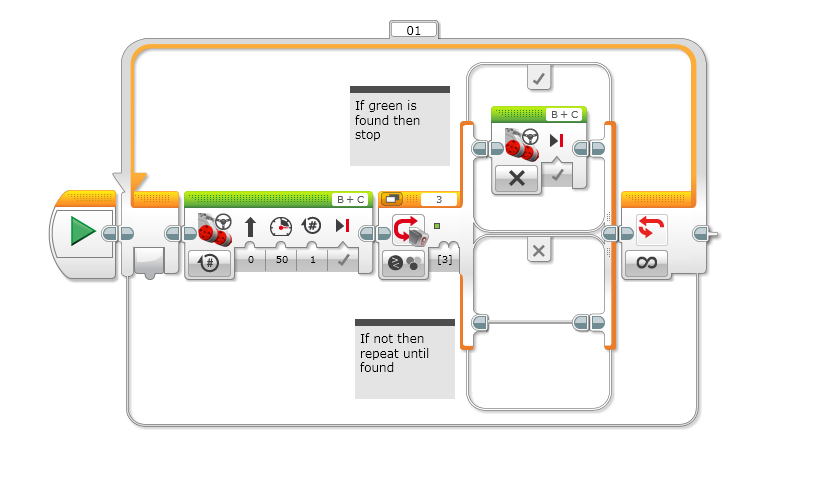
That was my code for the robot to detect the colour green. It worked quite well, when I put the green Lego piece in front of it, it detected it and stopped, it stayed there until I removed the Lego block then it moved forward again searching for some more green.

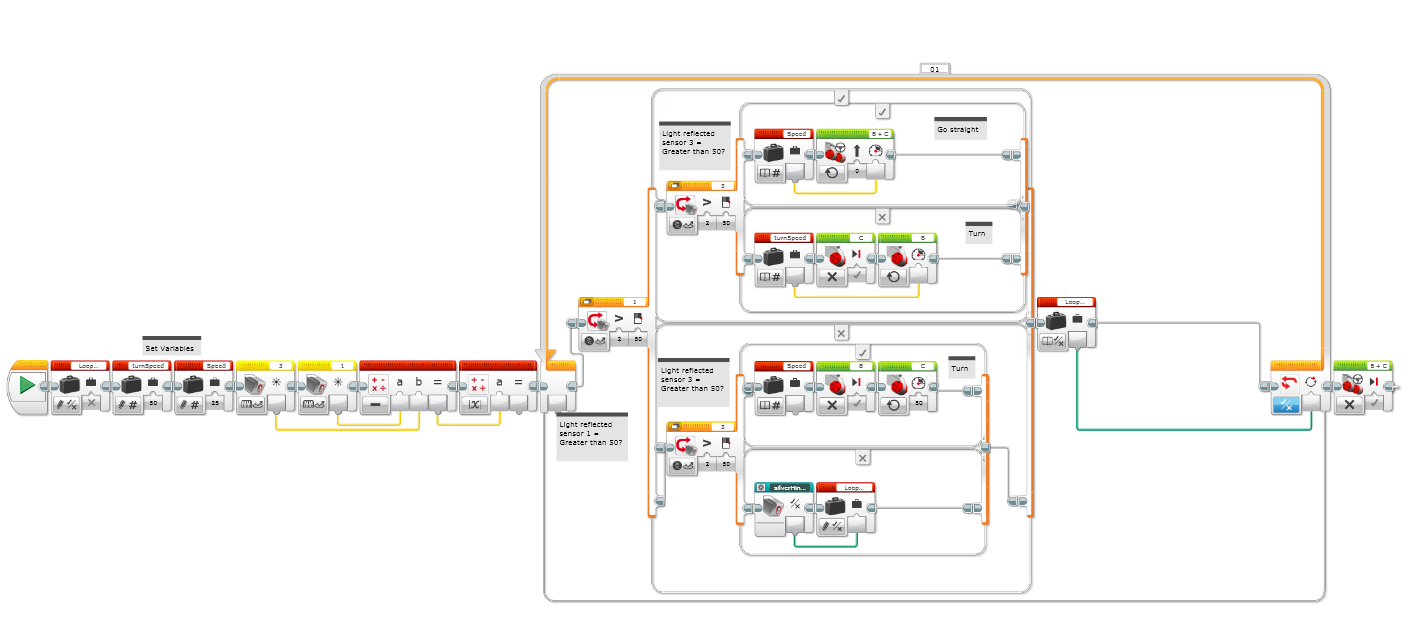
This was my next challenge…

Step 1: Move forward

Step 2: If green found completely stop, if not keep moving forward.

Step 3: If red found stop and wiggle 5 times, if not keep moving forward.

Step 4: If no colour is detected keep moving until something is found…

That was my finished code. The first block told the robot to move forward at a speed of 50, the second block told it to look for the colour green, then it had a switch block after that which meant that if green was found the robot should stop but if it wasn’t found then it should keep moving. After that it had another switch block, but this time it was looking for the colour red, if red was found then it should stop and wiggle on the spot 5 times, if not then it would keep moving until one of the 2 colours were found. All of this was put inside a loop block, which meant it was going to keep doing this until someone stopped the robot.

Ok I guess that’s it, I’ll write again soon with more to tell from our next time at robotics…

Week 3 – 2019 – Tamsin

Hello this week we made the robot stop on green and if it doesn’t find green it keeps going until something gets in its way or its battery runs out here are some pictures of my code.

We also changed last weeks code because it was so slow we wanted to speed it up a little so we did some work it was fun.

We figured out that if you half your wheel spins and that if you have one wheel at the speed of 40 and the other wheel going -40 instead of 0 it moves and turns faster

This week was so fun we did mostly our own code and hardly used Richs’ help. Can’t wait until next time because it was so fun this time and I hope it will be fun next time to.

Week 3 – 2019 – James

Hi guys. Today I finally figured out the hint bits in the senior Robocup Junior competition.

As I showed you last week, the hints looked like tiny green squares which were tucked in a certain corner. They are used for telling where the robot should go.

Sorry but my code was not uploaded but i’ll try to explain it as best as possible.

So my hint detector would run when either the left and right sensor was on the silver or when both sensors were on green or black.

If the left sensor was on green, the robot displayed on the screen “Found hint”. It would be the same if that happened to the right sensor. But if both were on silver, the robot would stop till the robot starts up his can finding algorithm.

Sometimes it incorrectly identified what it was on. To resolve that problem I made 1 as the B number in the math calculation. Next time it worked and was consistently working after that.

Next week, I’ll enhance the hint detector and finish the hint bit. (Well, maybe).

Before I go here’s the word of the day.

Mindset: The established set of attitudes held by someone.

And also, here’s the phrase of the day

You learn more in failure than you ever do in success – Jay – Z

Bye guys…

Week 3 – 2019 – Oliver

This week I made a new line-follower program with 2 sensors. This program doesn’t need to wiggle to stay on the black line. It uses the amount of reflected light to tell which direction to turn. The program is shown below:

My new line-following code (click on this image to make it bigger)

James and I started making the code for our hint-finder part of the line follower. If the sensors are on neither white nor black, they must be on green or silver. The robot automatically veers onto the hint, meaning one sensor is on green and the other on black. The difference between the right and left sensor is about 10, so we can use math blocks to work it out:

Sensor 1 (10) - Sensor 2 (20) = -10
The ABS of -10 is 10, so the output is 10.

ABS stands for ABSolute value, which removes the negative sign. The result is the difference between the two numbers. However, if the robot finds silver then both sensors will be on it. Therefore the sensors will receive about the same value, with an exception of 2 or 3. The absolute value of silver will then be lower than 3, which will trigger the can-finding program.

The table below explains the amount of light reflected from silver or green hints for each sensor:

    Reflected Light        |  
---------------------------|---------------------------- 
Left Sensor | Right Sensor | Difference (Absolute Value)
-------------------------------------------------------- 
80% (Silver)| 79% (Silver) | result = ABS (80 - 79) = 1  (Silver; Stop)
10% (Black) | 20% (Green)  | result = ABS(10 - 20) = 10  (Green;  Hint)

This screenshot is my hint-detector test code, which will show “GREEN” on the screen on a hint or “SILVER” if on silver.

This is my hint-detector test code. (click on this image to make it bigger)

But, of course, to incorporate this into my code would require a MyBlock. For the MyBlock to work effectively with the code, I needed to remove the loop and turn the if/or statement into a logic output statement, which you can make from the MyBlock menus like shown below:

This is how to set up a MyBlock for logic statements.

Finally, I placed the finished MyBlock in my line following code. When the colour sensors are both on silver, such as when it reaches the end of the line and the start of the can finder part, it cuts out of the loop and will lead to the can finding algorithm. I am yet to make a program to turn at the green hints, so I will come to that next week.

The semi-finished hint-finder MyBlock. I will add to this in future weeks.

Useless fact of the week: The closest fraction to pi is 22/7! Check on the calculator if you don’t believe me! (22 ÷ 7 = 3.14285714286 and π = 3.1415926535)

Week 2 – 2019 – Tamsin

This week Sara and I did a challenge to make the robot turn in a square.

This is the instructions we were given

Step 1 : Go Forward 25 cm

Step 2 : Turn left 90 degrees

Step 3 : Repeat steps 1 and 2 three more times

This is a sample of our code we used below.

We tried a few times but the robot failed to turn the correct angle so we adjusted the code a few more times.

We changed the angle by little bit more each time until we had the correct code to make it work.

It was really fun trying to make the robot turn in a square, I enjoyed it so much I can’t wait until the next coding lesson.

Week 2 – 2019 – James

Hi, James here again. Today I was working on the hints for the senior competition. Just saying I’m not in the senior competition but Dads asked me to have a go at it anyway. The hints look like this and they tell the robot which way to turn so they don’t turn somewhere where the line disappears.

The hints in Robocup Jr

Last year we had a table telling the robot what to when a certain event happens in our two sensor line follower. You can see this table below.

          Inputs           |         Outputs
---------------------------|--------------------------
Left Sensor | Right Sensor | Left Motor | Right Motor
------------------------------------------------------
White       | White        | Forwards   | Forwards
Black       | White        | Stop       | Forwards
White       | Black        | Forwards   | Stop
Silver      | Silver       | Stop       | Stop

Since we haven’t added green in the table, we’ll change it to see if we can try and detect a hint. The new table will look like this:

          Inputs           |         Outputs
---------------------------|--------------------------
Left Sensor | Right Sensor | Left Motor | Right Motor
------------------------------------------------------
White       | White        | Forwards   | Forwards
Black       | White        | Stop       | Forwards
White       | Black        | Forwards   | Stop
Not White   | Not White    | Stop       | Stop -> HintDetector MyBlock

If both are ‘Not White’ it is likely that the sensors are on either green and black or silver and silver.

If both sensors were on silver, they would both receive the same amount of reflected light. If one sensor was on green and the other sensor was on black, we think that green would reflect more light than black.

To compare the two sensors, we will use maths to work it out.

If we subtract the left sensor from the right sensor and take the absolute value we will get a result. If the result is close to zero, both sensors probably would be on silver. If the result is bigger than zero, the robot’s probably on a hint.

The absolute value is basically if a number is negative, just ignore the negative sign.

We can show this in a table to make things simpler.

      Reflected Light      | 
---------------------------|----------------------------
Left Sensor | Right Sensor | Difference (Absolute Value)
--------------------------------------------------------
80% (Silver)| 79% (Silver) | result = ABS (80 - 79) = 1
10% (Black) | 20% (Green)  | result = ABS(10 - 20) = 10

This approach may not work. If it doesn’t, we’ll have to think of something else. Here is my code so far. You can click on it to make it bigger.

My code for detecting the hints so far…

Next week I will keep working on it to see if the idea works.

Before I go here’s the word of the day…

Heuristic: A practical method for solving a problem that is not optimal or perfect but sufficient for the immediate goals.

Bye everyone…

Week 2 – 2019 – Sara

Hello there !

This week at robotics we finally started doing our own codes. It was really fun, it was kinda hard at the start but then I got the hang of it.

We started of by writing pseudocode for the robot to make a square. This was my pseudocode…

Step 1 : Go forward 10 inches ( around 25 cm) Step 2 : Turn left 90 degrees Step 3 : Repeat steps 1 and 2 three more times

This was my finished code…

The first green block was to tell the robot to move forward for two wheel rotations at a speed of 50, the second block was telling it turn off its left motor but the right motor should keep going and turn 409 degrees to the left. Then repeat this three more times.

The hardest part was finding the right number of degrees it should turn, I started of at 300 degrees and kept increasing until I found a degree that it had turned perfectly.

At first I thought that if I put 90 degrees it would make a perfect turn, but no, because I was coding for the right motor it meant it had a longer way to turn than the left motor. And if I put down that the left motor should turn 90 degrees I think it wouldn’t have worked because it would have needed the right motor to come along with it and that would mean I would have to wright two different degrees for each of the motors.

Ok , goodbye I’ll wright again next week.

Week 1 – 2019 – Tamsin

Today we learnt about variables and how they can be like collections and shopping lists how they store things. We also learnt that green spaces are clues or hints.

We learnt that the robot reads the instructions that we give it and that it follows the black line. To make it follow the black line it reflects the black and white and finds the middle of it. You have to use the variables to make it do so.

In the green square, which is a chemical spill, there is a person that needs to be saved but is too dangerous for a person to go in so we programmed the robot to save the person without the person falling over and get it back to safety.

To get to the person in the chemical spill it uses the ultrasonic sensor to locate the position of where it is, It knows the area of the spill due to the colour of the block detected by the colour sensors.

Week 1 – 2019 – Sara

Today was the first time we were at robotics class, by we I mean James, Tamsin, Oliver and Me. Tamsin and I are both new to it this years but the boys were there last year. We pretty much did the basics today, we checked out how the one sensor line follower is different to the two sensor (the two sensor makes it wiggle less)

We did some pseudocode on the robot following lines and using the sensors to find the can ( the person who needs to be rescued). We also learnt how to use the robot (turning it on, selecting the right code, ect.) We used some of Josh’s codes from last year just to see how it works and then next week I think will start doing our own codes.

By using light reflection it seems easy enough to tell the difference of when the robot is on a black surface or a white surface, on a white surface about 80% of light is reflected back, on a black surface its only about 10%, it can also tell the difference between green and silver. None of these colours reflect back the same amount of light that’s why its easy to tell the difference between one another.

We also looked at the Ultrasonic Sensor, its used to detect objects by using sound waves. It sends out a wave until it hits something and comes back to the sensor, therefor detecting how far away that object is. The speed of sound is 343 metres per second, so all this happens pretty fast.

Ok bye, I’ll write again next week…

Week 1 – 2019 – James

Hi, James here.

I’m back this year and with a new class! The people in this years Mindstorm class are Tamsin, Sara, Oliver and Me (Obviously). For this lesson, we just learnt stuff about the Ultrasonic Sensor and the Light Sensor to remember the important things. (Because there are two new coders). We also learnt a bit about pseudocode (Which I know about).

So we firstly looked at the line follower made by Josh last year. The line follower was really basic because the robot wiggled a lot. But when we used the 2 sensor line follower the robot didn’t wiggle as much as the basic line follower. I made a table to show the people reading how the 2 sensor line follower works.

You can look at the table here

When we were looking at the light sensor we also looked at how much light was reflecting from a certain colour. We tried it on green, black and white. White reflected about 80% of light, black reflected about 10% of light and green reflected about 20% of light. We found that out by using the Port View on the robot.

We also looked at the Ultrasonic Sensor. The Ultrasonic sensor is a sensor that sends sound waves till it hits an object and then it comes back to the sensor at a speed of 343 meters per second! We’ll use that sensor for locating the can (AKA the person who needs to be rescued). Last year Oliver, Josh, and Brayden used variables to find the can and push it out. By, locating the can, seeing how many degrees to spin till the sensor can’t detect the can then dividing that number of degrees by 2, the robot will turn back that many degrees to push the can out. I did the Can Finder challenge a different way. I used the turn motor block to spin the robot in only one direction then when it locates the can, the robot will push it out of the “Chemical Spill”.

For the new kids joining this year they had to do a challenge on Scratch. To do it you had to use variables. The meaning of a variable is:

A container with a name that stores important information. ( e.g The score in a game of Pac Man)

Sara said, “That there were different variable types”, “one is an ordinary variable (Like the one I gave the meaning on), another one could be a list, and another could be a collection”.

Before I go, I will always put a word of the day in. Today’s word of the day is…

Ascetic – Extreme self discipline and abstention from all forms of indulgence, typically for religious reasons.

Bye. See you next time I blog about my newest Mindstorm adventures…