Week 10 – Rich

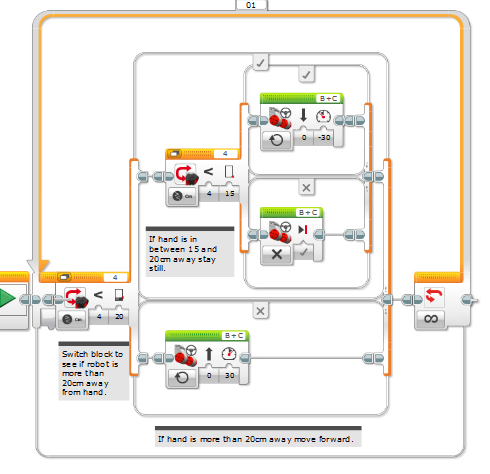
Our initial line follower algorithm was a simple one.  If the sensor sees white, the robot turns left.  If the sensor sees black, the robot turns right.  This works well, but the robot is very wiggly and a bit slow!

I was curious to see if I could implement a single sensor line follower that implemented Proportional, Integral, Derivative control or PID.  I’d briefly  studied this when I did my NZCE years ago (does that even exist any more!) and that was about the last time I looked at it.

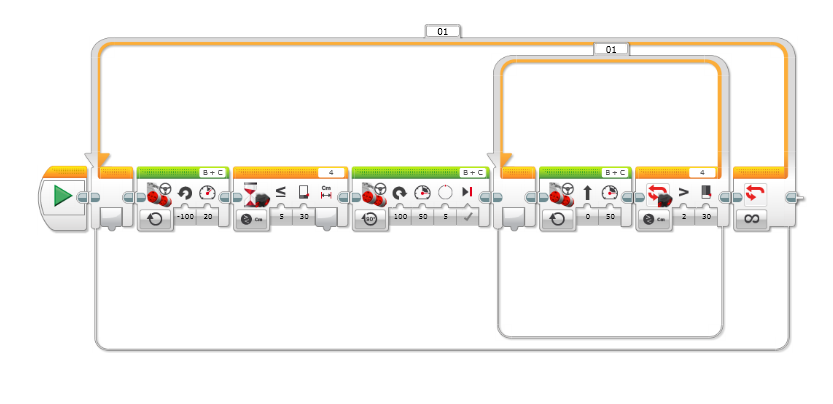
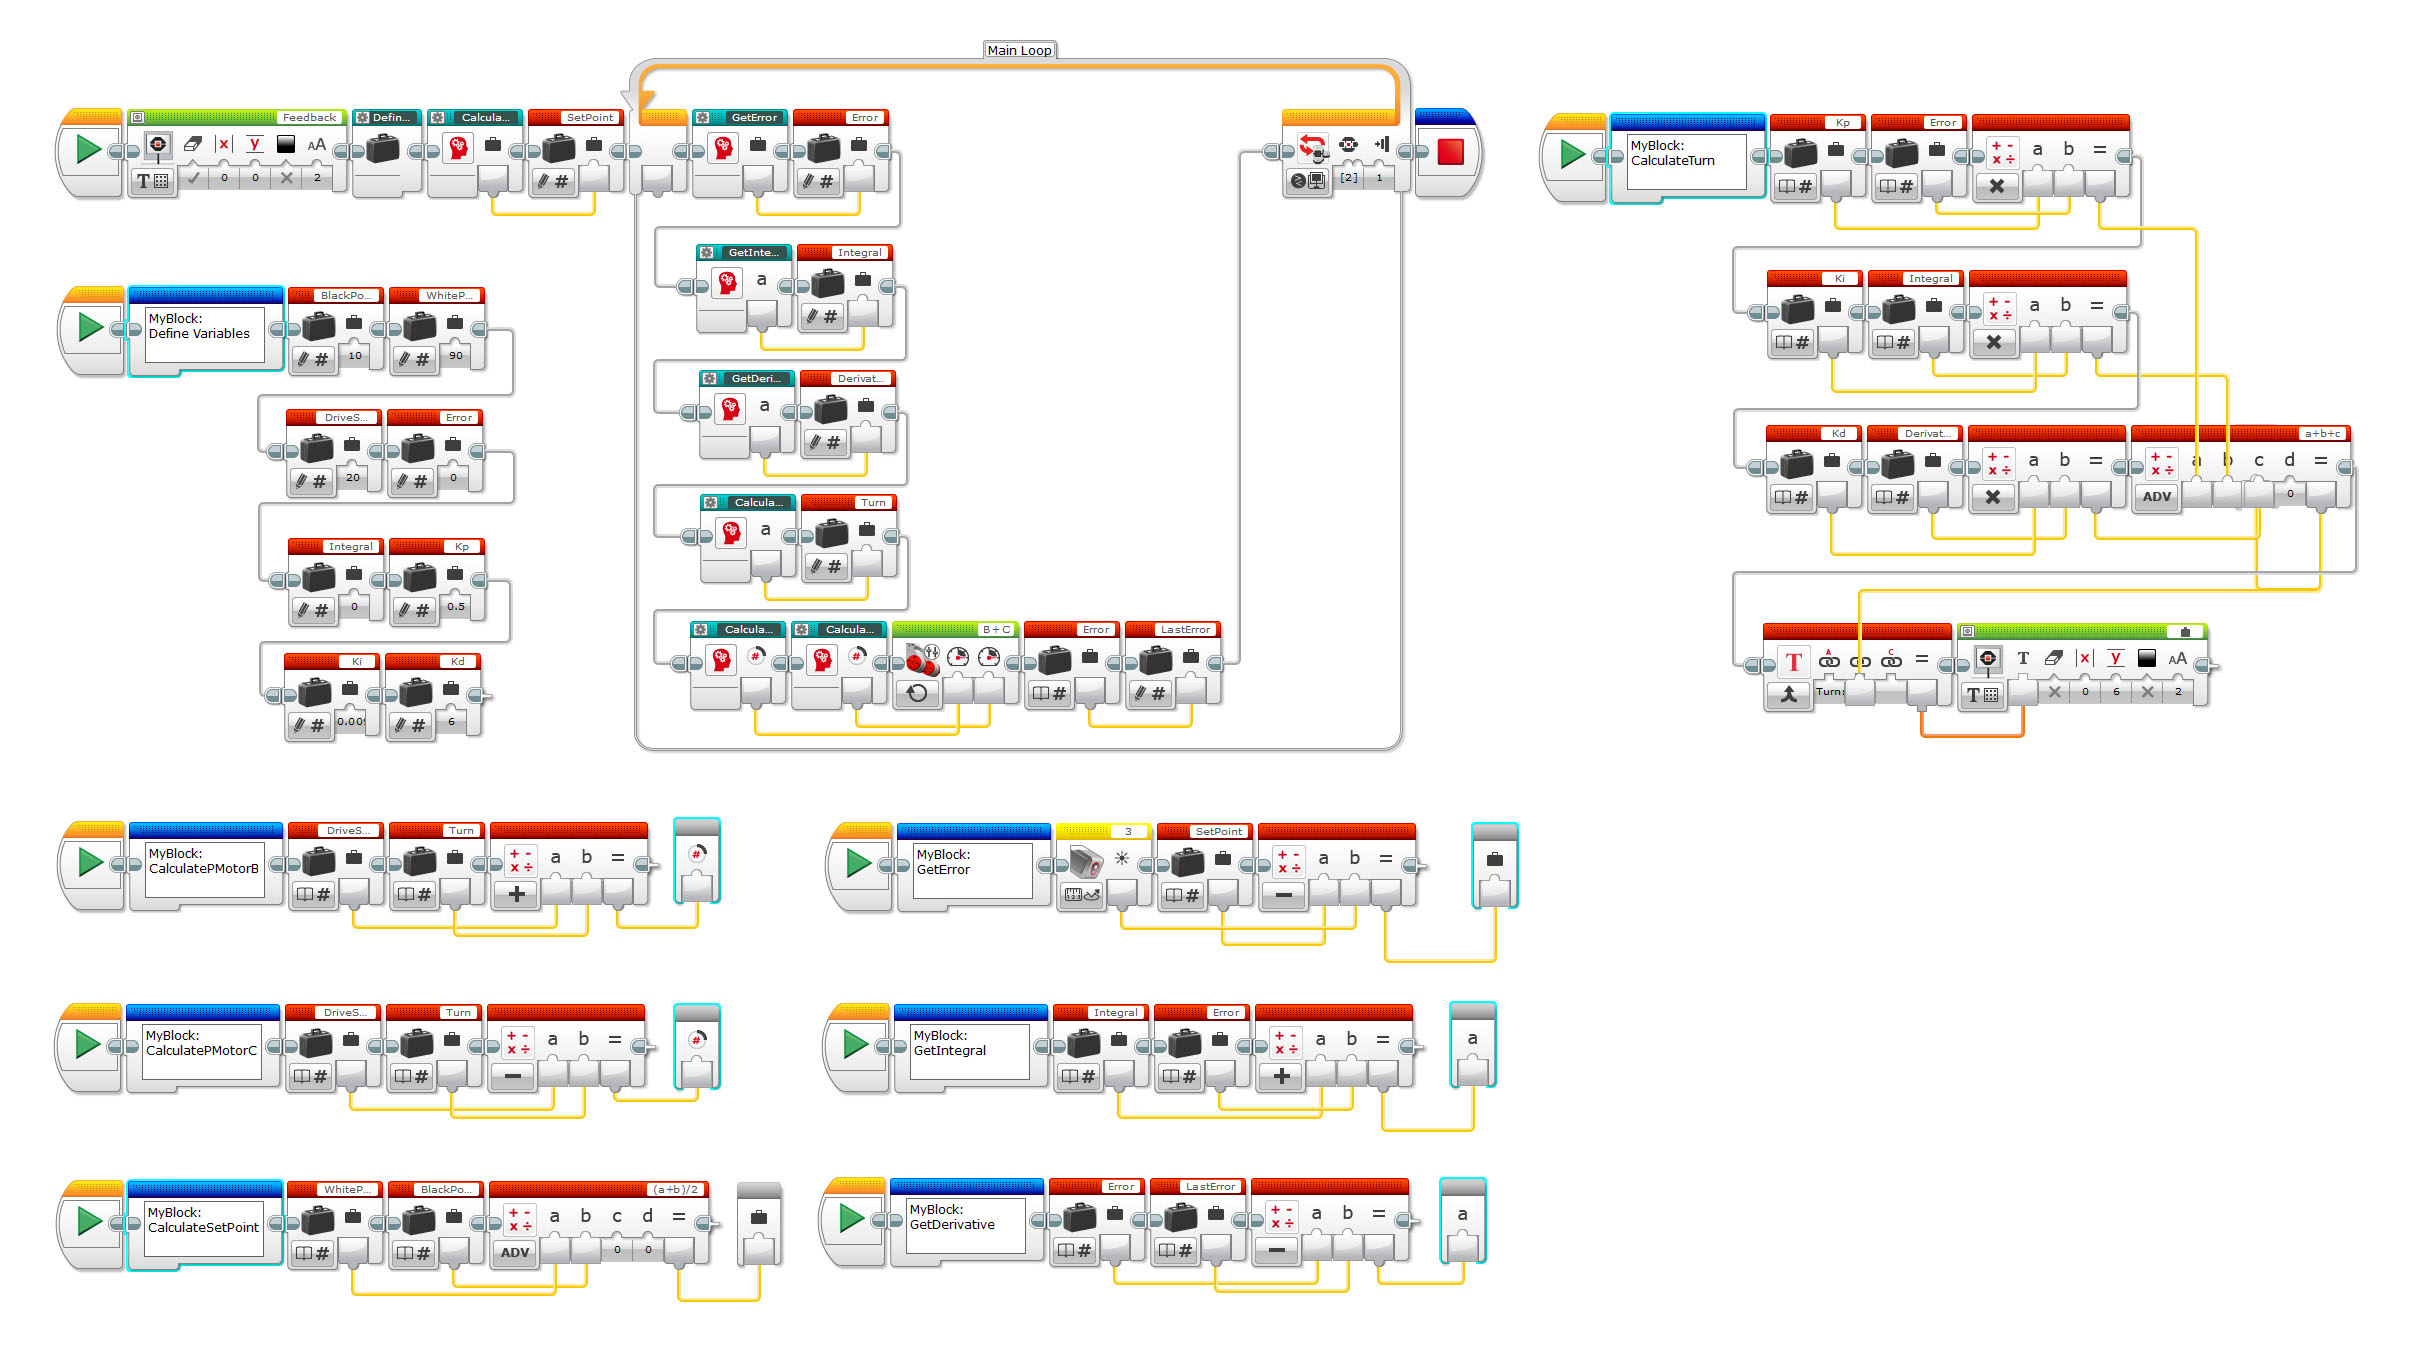
I did lots of reading, especially around EV3 implementations.  All of the EV3 implementations I looked at didn’t use functions and used loads of hard coded values which I wasn’t so keen on.  So I implemented a version breaking down individual parts into ‘My Blocks’, the EV3 equivalent of functions which, I felt, made the implementation easier to read while abstracting the details into smaller blocks which were easier to test in isolation.

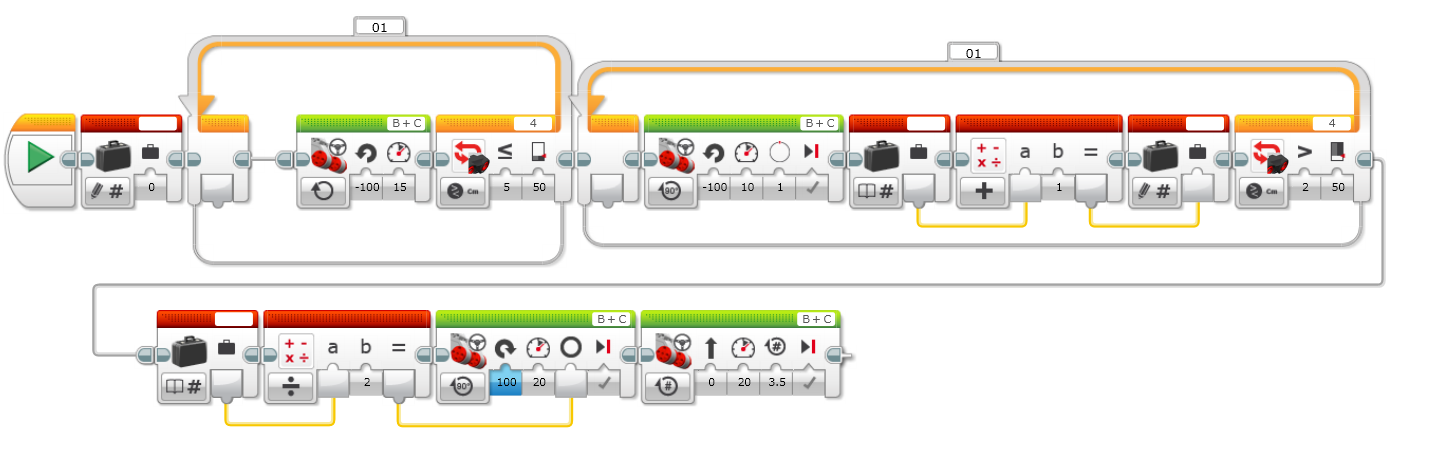
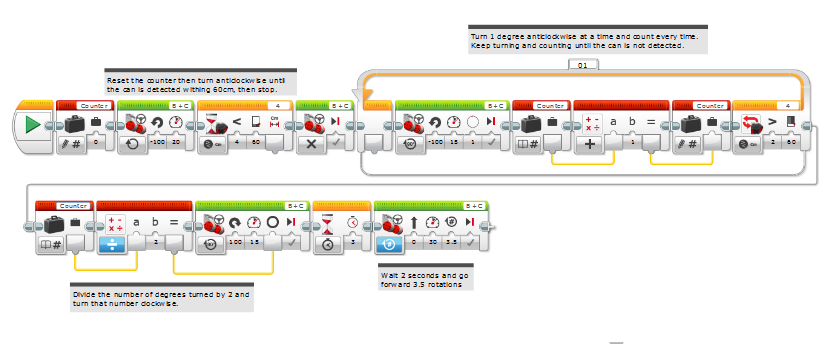
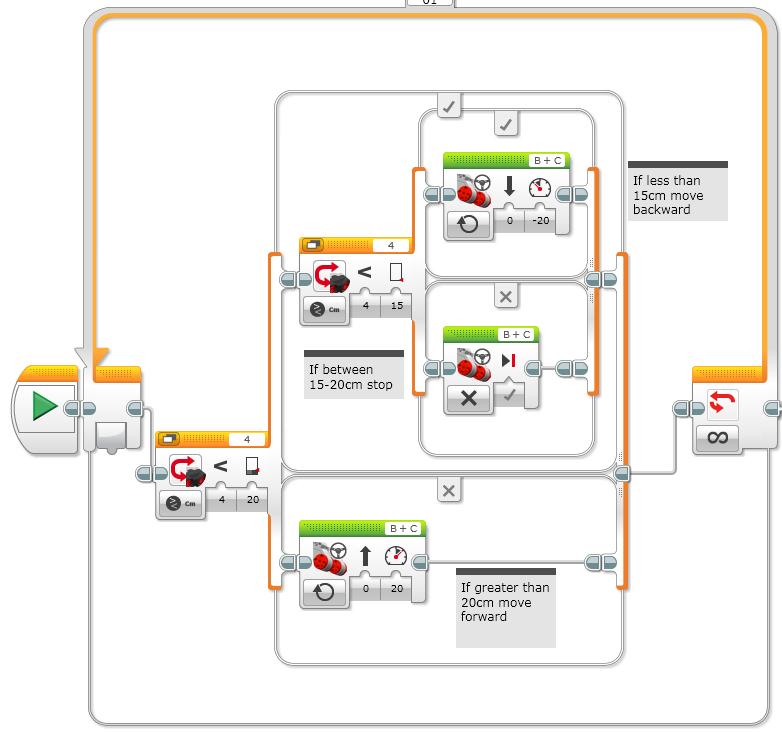
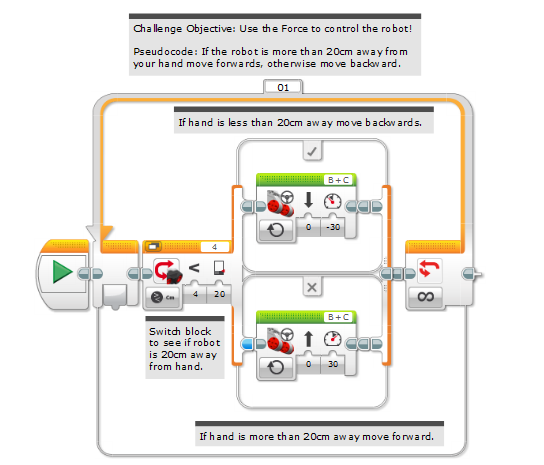
The code is below – It’s too small to see detail so click on it and it will open full size in a new tab 🙂

To compare the implementation of the simple algorithm to the PID algorithm, have a look at the two videos below.  We can see what a huge huge difference it makes.

This little project is beyond the children at this point in their education but it was a useful experiment to show them what can be achieved using maths and how important maths is if they would like to keep following robotics 🙂


Week 8 – Brayden

This week we were asked to write piece of code to detect the can in the green area and push it out of the ‘chemical spill’. The Mindstorm would then move towards the can and push it out of the green area. This is my pseudocode which is what I have used to design my code:

Pseudocode

  1. When the mindstorm reaches the green area it will stop
  2. Rotate left until can is detected
  3. Continue turning left until can is lost from sight
  4. The robot will be measuring the distance it turns to find the width of the can
  5. Halve the degrees measured and turn right that many degrees to find the centre of the can 
  6. Move forward

Trying to create the code to solve the challenge was extremely hard. It took us two weeks to completely write it and make sure there were no bugs in it. In my code I made many alterations as I had multiple bugs. These were things like rotating in the wrong direction and the speed of the Mindstorm. My most prominent problem was when I had wrongly coded my robot to measure the width of the can and then turn left half of that number of degrees where it should have been turning right. Here is my working piece of code:

My code to save the can in the rescue challenge

Here is a video of my code in action:

When creating this piece of code we had to use data operations blocks ( The blocks with red along the top) to measure the degrees from when the Mindstorm found the can to when the Mindstorm lost sight of the can and then divide that amount of degrees by two to find the exact centre of the can. The Mindstorm would then continuously move forward and push the can out of the green area. It was a relief after finding that my code had finally worked. One thing that I will find difficult is if the can is positioned directly in front of the Mindstorm when it reaches the green area.

Week 8 – Josh

Today we were given a challenge with the ultrasonic sensor that would prepare us for the rescue challenge.  The ultrasonic sensor would be used when we are attempting to push the can out of the zone.

Pseudocode written for challenge:

  1. The robot will stop on the aluminium foil.
  2. Turn ultrasonic sensor on and detect objects within 50cm
  3. Turn left for 360° continuously.
  4. If no object found move forward 5cm
  5. Repeat steps 3 and 4 until object found.
  6. If object is found stop.
  7. Continue moving left until sensor loses object then stop again.
  8. Determine the distance between the 2 stops then divide the rotations by 2.
  9. Turn right that amount of rotations.
  10. Move forward for 10 seconds.

This challenge was extremely difficult and challenging.  We had lots of hiccups and problems.

Fig 1. problem with the sensors massive FOV

The first and main problem that we had was the ultrasonic sensors FOV (Field Of View).  So that when the can was further away the sensor was picking it up a way before it was aligned straight with the robot.  So that that when the robot moved straight it missed the can.  This diagram shows what the problem would look like. Fig 1.

Fig 2. My end code is where it uses variables and maths to find the dead centre.

We eventually came up with the idea that if we used a variable we could calculate how far the distance is from when it picks it up (1) ,to when it loses it (2), then it goes back halfway (3).


Sometimes it doesn’t pick it up a circular object very well because the sound bounces off but more often than not it still works really well.

Other problems we encountered included the robot not going quite straight but if you started slower it didn’t jolt as much.  With other little fixes of bugs along the way I finally had a working product.  The code follows my pseudocode and after weeks of work it works like a charm.

Here is a video of my code detecting and pushing the can out.

Our Mindstorm adventures continue…


Week 9 – Rich

The children have been finding the actual rescue part of the challenge… pretty challenging!  They all have different ideas as to how to approach the task from simple (KISS) to more complex involving some maths and angles.  So far, none of them have got an entirely working solution 🙂

I was hoping to have a go at it myself, in parallel with the children, but their need for help during the class has overridden my desire to have a go too.  So, I’ve found a quiet slot in my week to sit quietly and at least write some pseudocode for how I might approach it.  I’ve written it in a way which should be fairly easily translated into the EV3 block language.

I’ve also been looking for a way to embed code into WordPress without using a plugin like Syntax Highlighter which hasn’t been updated in quite a long time.  After a bit of research, I settled on using Gists in my Github account and embedding that.  It seems to work quite nicely 🙂

Week 9 – Oliver

This week we used maths and logic blocks to make sure the robot hits the can perfectly and has no chance of missing it. I had to use a maths block, variable and loop to make a counter to get the can in the dead centre.

(New) Pseudocode:
1. When the robot reaches the green area, stop moving.
2. Turn on axis anticlockwise until an object is detected within a range of 60cm. (can)
3. Turn 1 degree at a time anticlockwise until the can is not detected while counting number of degrees.
4. Halve the number of degrees turned and turn clockwise that number.
5. Wait 2 seconds then move forward for 3.5 rotations.

We made this extra part because the robot frequently used to miss the can. The old program worked but Richard said that we can’t go up to the course like we did today and say “my robot can’t detect that” and move the can.

Some problems that I faced were connecting the variables to the math and movement blocks and getting the loop in the right place. I couldn’t copy the original code because the infinite loop would mess up the robot from getting the can.

We didn’t need to add the bumper attachment because the robot always hit the can straight on with our new algorithm. We measured how far it was to the farthest point of the green circle from where the line following course finished and made the robot only go slightly more than that.

This is my final code:

WORD OF THE DAY: Sesquipedalianism. The tendency to use long words.

Week 8 – Oliver

This week we were asked to write some pseudocode and then a program to find the can in our line-following mission that we are going to do in the Robocup Junior next year. Here is my pseudocode:

Pseudocode:
1. When the robot reaches the green area, stop moving.
2. Turn on axis anticlockwise until an object is detected within a range of 30cm. (can)
3. If the can is not detected move forward 2 wheel rotations and go back to 2.
4. When can is detected move forward while the can is being detected.
5. If the can is not detected stop and go back to 2.

At first, I thought it would be not too hard. The pseudocode seemed simple enough, although there was a few “return to” parts that are hard to execute in Mindstorms. My original code could detect the can by spinning around anticlockwise until it found the can but would not move forward until the can was moved out of the way. The reason it did this was that I had mixed up the larger than and less than symbols in a loop.

I then realised that when the robot moved forward and crashed into the can, the ultrasonic sensor banged into the can. This must have messed up the sound waves, because the robot started turning again. Because the sensor couldn’t detect the can if it was straight up against it, I decided to make a bar to keep the can away from the sensor so it could still be detected. I had finished making it but unfortunately we ran out of time so I couldn’t attach it onto the robot.

My finished code is below:

And now for (drum roll please…) The Word of the Day: Batrachomyomachy – A pointless argument.

Week 7 – James


Hi its James here.  This week we started looking at the ultrasonic sensor and what it does. This is what an ultrasonic sensor looks like:

An ultrasonic sensor is an instrument that measures the distance to an object using ultrasonic sound waves.

An ultrasonic sensor uses a transducer to send and receive ultrasonic pulses that relay back information about an object’s proximity.

High-frequency sound waves reflect from boundaries to produce distinct echo patterns.

Our first challenge was to stop at a wall with the ultrasonic sensor. All of us (excluding Josh because wasn’t here) had troubles at the start like how we had to change the code for the port for the ultrasonic sensor from port 4 to port 1 because that is where we had plugged the sensor into but we agreed to change the plug the sensor was plugged into port from port 1 to port 4. This is my solution.

Our second challenge was to control the robot with The Force! (that’s in Star Wars). I would have thought that if you didn’t know about Star Wars I would think I’m magic. But this is the code I wrote to do it.

But if you truly want to master the force, this is my code.
As you can see I have used comments to tell you what the block does. For example you can see that in every coding bit (except for the first one) that I have used comments to tell you what one or many blocks do.

We found discrepancies in the teaching booklet because the code to Truly Master the Force had the wrong comment in 2 places. (They where in <15 cm move backward and >20cm move forward).  It should have been the other way around like you can see in my code.

When we learned about the mini sounds that the ultrasonic sensor can hear we looked up how well can a human can hear. This is the information on it.

While 20 to 20,000 Hz forms the absolute borders of the human hearing range, our hearing is most sensitive in the 2000 to 5000 Hz frequency range. As far as loudness is concerned, humans can typically hear starting at 0 dB.

Before I go the word of the day is

Eschew Deliberately avoid using

This is the end of my post so I’m over and out. Goodbye!

Week 7 – Brayden

This week in robotics class we began to use the ultrasonic sensor. The ultrasonic sensor uses sound waves that are at a higher frequency than human beings can hear to detect and measure the distance to an object. We began the session by taking on a challenge in which we had to use the ultrasonic sensor. For this challenge we had to programme the mindstorm to move until it was 20cm away from a wall. We achieved this task fairly quickly.

My code for the first ultrasonic challenge.

After completing this challenge we moved on to a second challenge in which we had to programme the mindstorm so if it was closer than 20cm to an object it would move backwards and otherwise move forwards. This was called ‘Using the Force’.

My code for the second challenge

We then attempted one final challenge for which we used the same code as challenge 2 but if the Mindstorm was between 15-20cm it would ‘rest’ and stop. In this challenge we were ‘Mastering the Force’.

My code for ‘Mastering the Force’

While completing the challenges this week we noticed some discrepancies in the comment blocks of the challenge solutions.

Week 7 – Oliver

This week at coding we used the ultrasonic sensor. The ultrasonic sensor sends out high-pitched sound waves that we can’t hear to detect where a wall is. This will be used when we have to detect the tin can and push it out of the green circle. First we made a simple program to go towards the wall until it was 20cm away, then stop. Unfortunately, I had downloaded the Home Edition onto my laptop so I had to download the Student Edition, taking out a bit of coding time.

The “20cm away from wall” code.

The next challenge was to use “The Force” to control the robot. The pseudocode was: If the robot is more than 20cm away from the hand move forward, otherwise move backwards. We wondered why the code was not working, but we worked out that our sensor had to be plugged into port 4 to work because that was the default of the ultrasonic block.

Our next challenge was to use the exact same code from the previous challenge, except making the robot stop and stay still if it was between 15 and 20 centimetres away from our hand. For this we needed to use nested switch blocks, which is one switch block inside another.

An interesting thing that we found with the EV3 lessons site was that there was a discrepancy between their comments and the solution for the code. They had got the greater than and less than signs mixed up, making the comments not make sense.

This is last weeks result with our line follower. It is following the course that we will be doing for the Robocup Junior.

WORD OF THE DAY – Discrepancy – an instance of inconsistency or difference.