Week 7 – 2019 – James

Hi guys, if you’re wondering why we haven’t written for a week, it’s because of Dad looking after me. (I was sick last week). Anyway, I worked on my can finder (again).

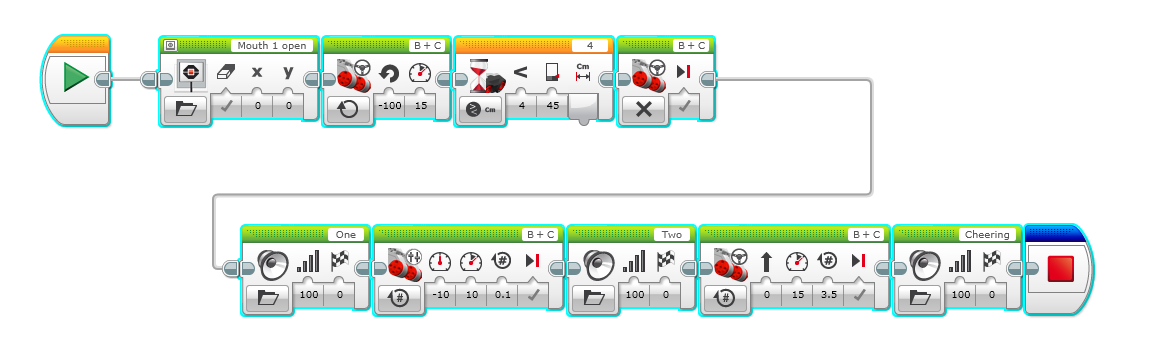
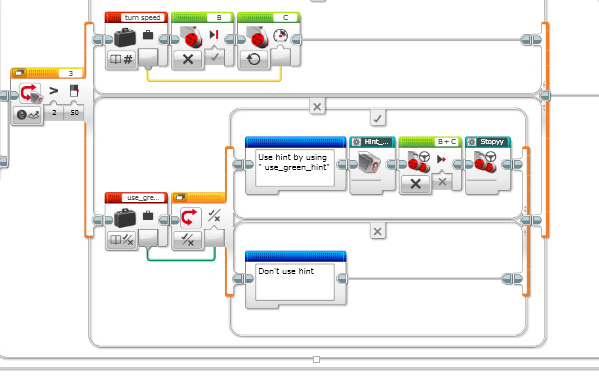
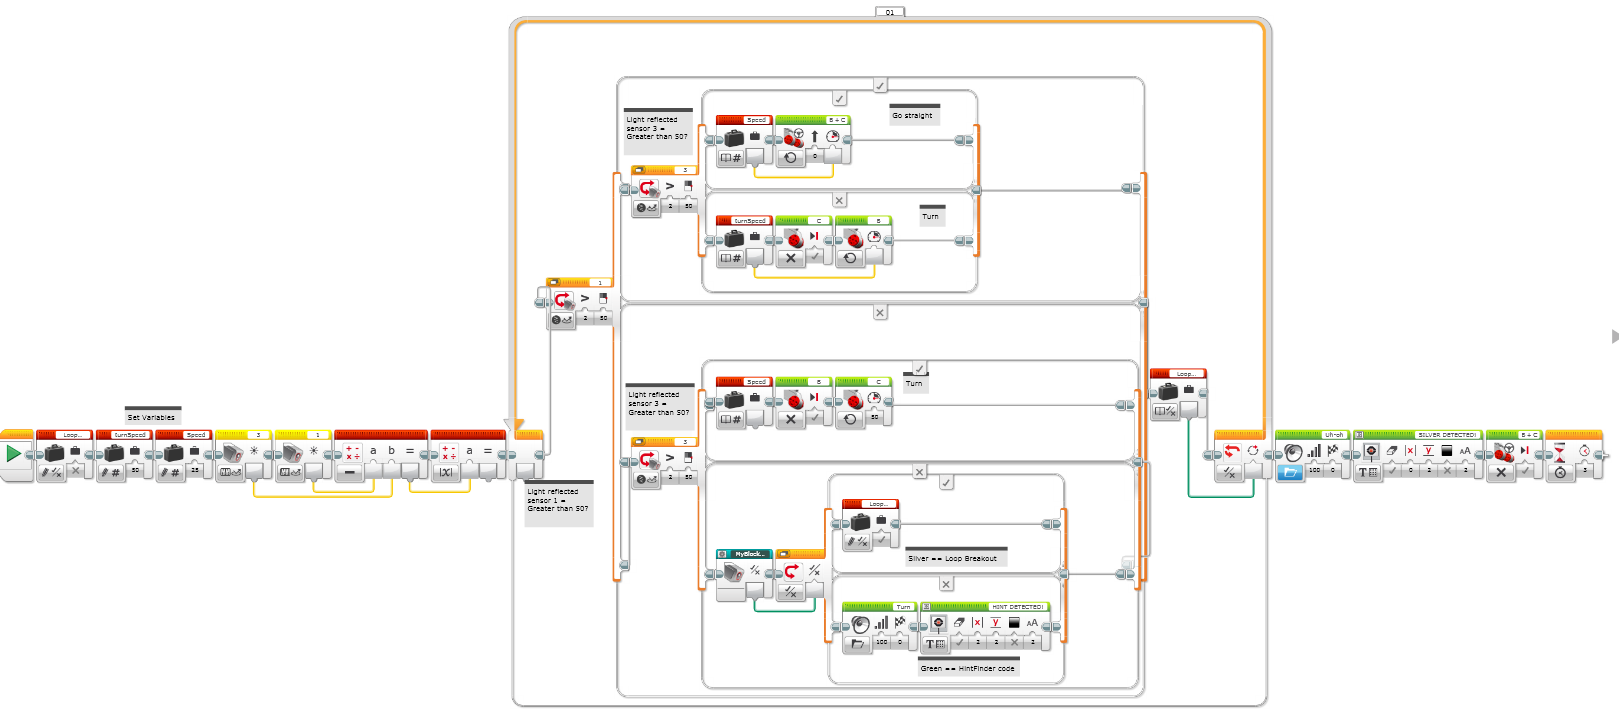
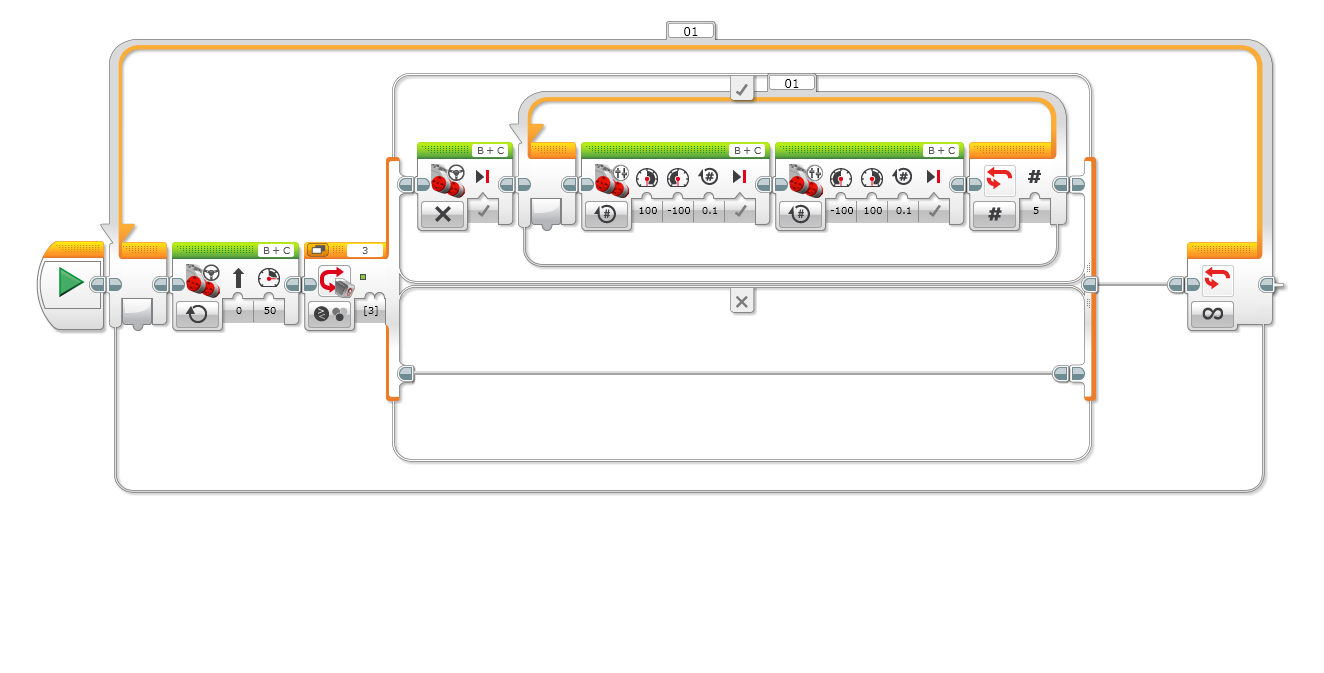
The last one I showed you (Back in week 6) was partly done. But now, I’ve done more on it and put more comments in. Here is a reminder of what my last weeks one was compared to this weeks.

My last weeks can finder code. Note: the last loop hasn’t been tested or uploaded yet.
This weeks can finder code. Note: The “My Block” at the end just slowly ramps the speed up when pushing the can out by adding 0.01 to the speed every time the code goes around the loop.

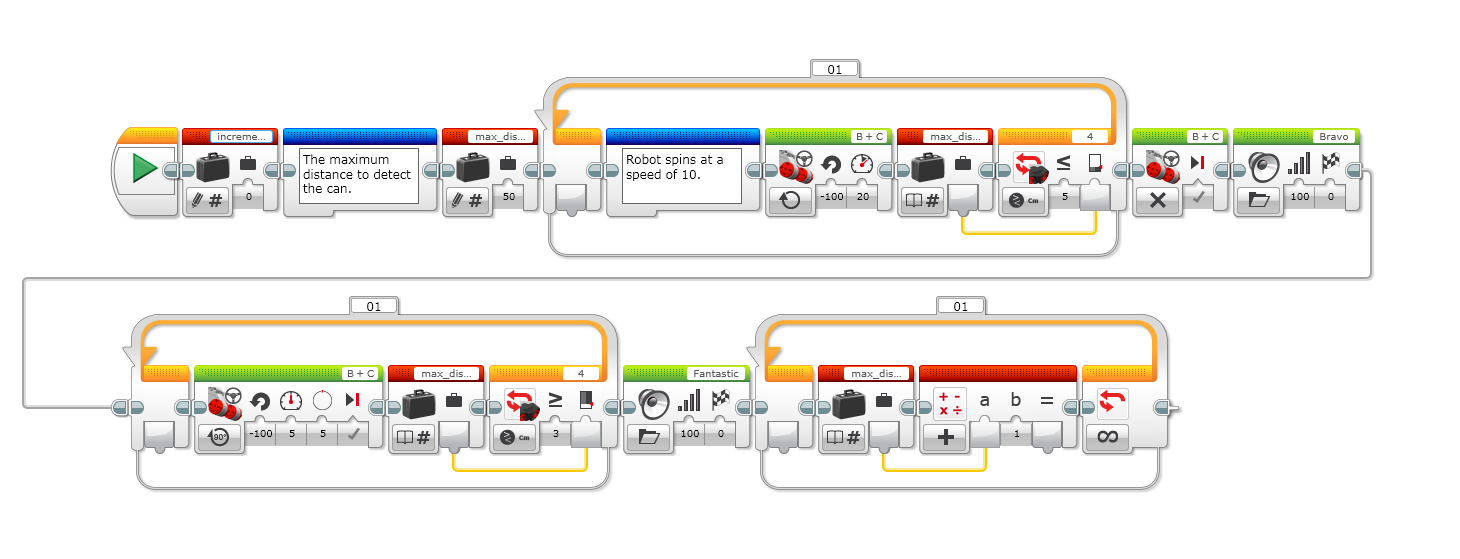
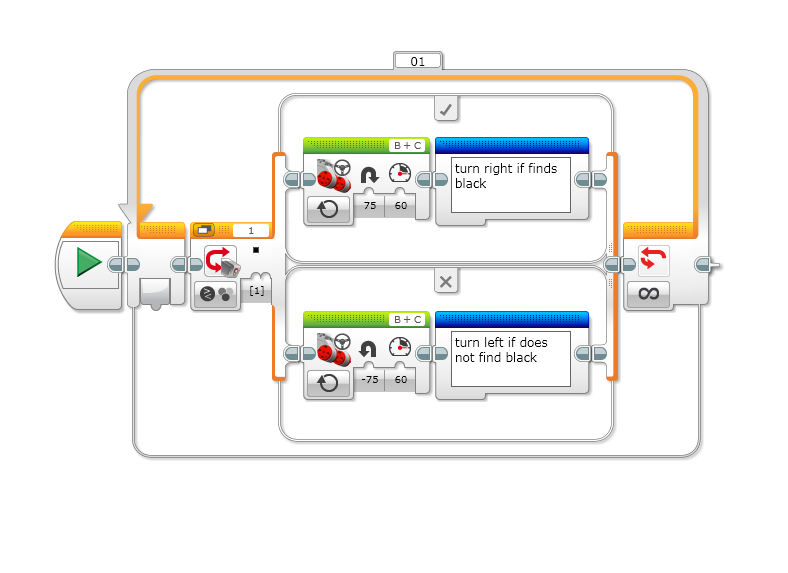
As you can see, I’ve made a new variable and a new “My Block” which i’ll explain about now.

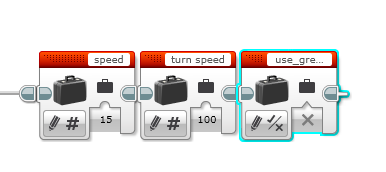
The new variable is called “turn_angle”. It stores the number of degrees to turn for every increment. The new “My Block” is called “speed_adder”. It increases the speed by 0.01 every time the is repeated in the loop. Inside the “My Block” uses an addition block which puts the speed up by 0.01.

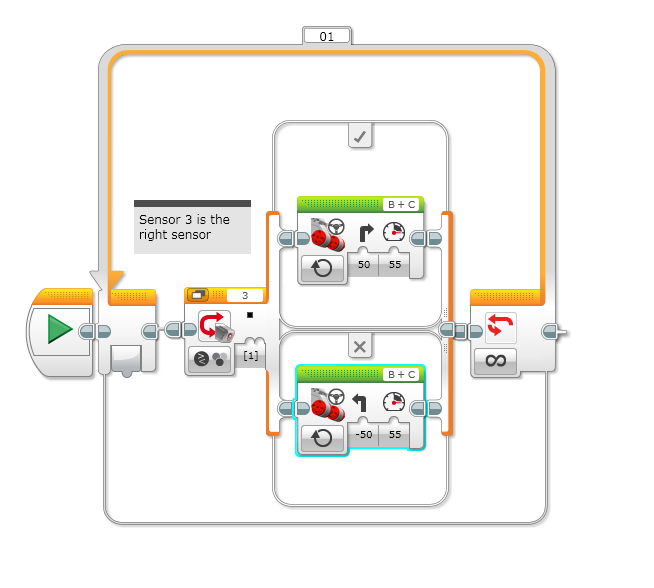
I can’t show you the code inside it since I haven’t got a screenshot of it.

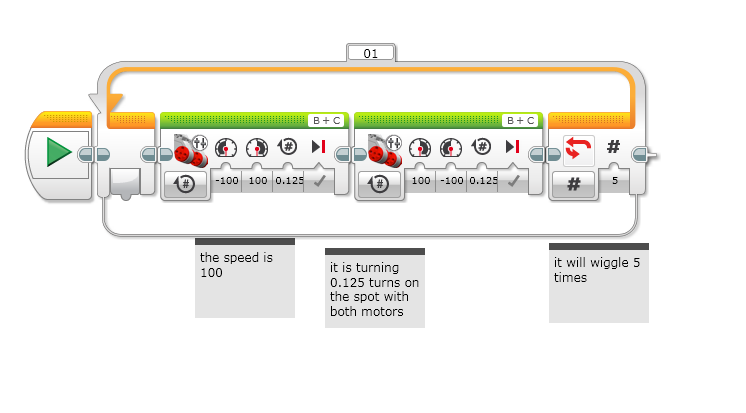
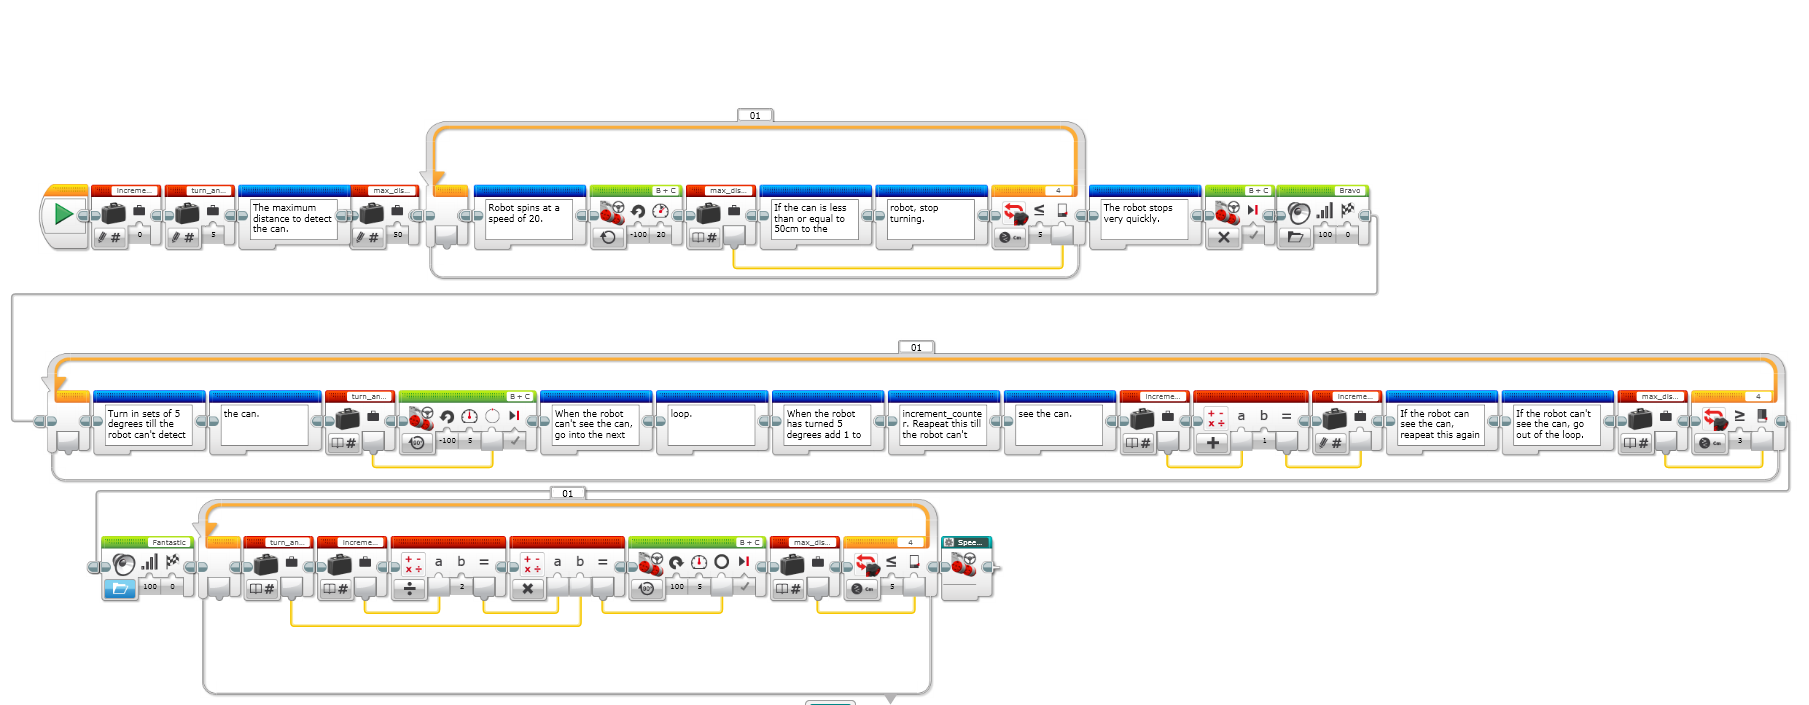
This is what happens when I run my new code. When the robot gets up to the silver strip, the robot finds the can. Next it turns in five degree increments till the robot cannot see the can. Next you have to do some maths. The maths is how many increments were turned till the robot didn’t see the can. Divide this number by 2. Multiply this number by how many degrees in an increment. In my code an increment was five degrees.

I left it at five degrees because it worked quite nicely. However, the robot appeared not to turn the opposite direction as much as expected. I’m going to look at it next week to find a way to make sure the robot lines as straight up as possible with the can.

That’s it for today’s post. But for now here is the word and phrase of the day.

Abet: To help, encourage, or support someone in a criminal act.

The true competitors are the ones who always play to win – Tom Brady

Week 6 – 2019 – James

Hi guys, today I revisited my can finder code for the Robocup Jr compition. I did this because my line follower definitely works but my can finder is pretty basic compared to the other team members code from last year.

Here is my code from before:

My Can Finder code from last year. Pretty basic really.

My new one is going to include a variable in it. The others from last year all used variables in their can finder. They did not add one thing though, comments. So I’m going to make the can finder better and adding comments along the way as well as rewriting my line following code with comments and adding the new ‘My Block’ with my new can finder code inside it.

To start things off, I looked at some examples from last year. I made 2 new variables called ‘increment_counter’ to know how many degrees the robot has turned and ‘max_distance_to_can’ to locate the can within the variables value. (Note: ‘max_distance_to_can’ may be changed. I’ve set it to 50 at the moment). When the can is located, the robot will stop and then turn 5 degrees till the robot cannot see the can. When it can’t see the can it will count how many 5 degree turns it has done and divide that number by two. When you get the answer the robot will turn that amount of degrees in the reverse direction and stop. At this point, the robot should be pointing at the can. Last, and finally, the robot will move forwards and push the can out of the green chemical spill.

I’ve only done a bit so here is the code for my improved can finder, so far. I really need to write some pseudocode so I will do that next week!

My new can finder code. Note: the last loop hasn’t been tested or uploaded yet.

That’s it for this weeks blog. I hope you’ve enjoyed learning stuff so far. Here is the word and phrase of the day.

Charlatan: A person falsely claiming to have a special knowledge or skill; a fraud

Be proud of who you are – Eminem

Bye…

Week 6 – 2019 – Sara

Hello…

This time at robotics me and Tamsin got challenged to make a 2 Sensor Line Follower. First we watched a YouTube video, which took quite awhile to find, but when we finally did find it we watched it. It explained a lot about 2 Sensor Line-Followers and truth tables. A truth table is basically writing that tells you what will happen when the robot does or detects something.

Here’s an example…

If right sensor and left sensor are on white then move forward. If right sensor is on black then turn right,if left sensor is on black then turn left. When both sensors are on white again move forward.

Tamsin and I wrote different codes but with the same goal (to make a 2 Sensor Line-Follower). On my first try the code actually worked, it followed straight lines the curves and the sharp curves. The only problem was that it was wiggling a lot. When I tried to fix that problem I just made it worse, after that the robot wouldn’t even follow straight lines (there were times when it would just go round round in circles). Near the end of the session I finally got the robot to follow straight lines again (the main problem was that I was only using the right sensor and I completely forgot to use the left one). The robot actually worked pretty well after that, it followed straight lines and even some curves not the sharp ones though.

This was the code I ended with…

Two sensor line follower

Here’s some explanation for the code. Using the right sensor the robot will look for reflected light (that is how much light reflects back, self explanatory right.) If the amount is greater than fifty, suggesting it’s white, it will move forward with a speed of 45. The next block tells the robot that is it’s less than 40, suggesting its black (but it could be any dark colour really), then it should turn right 75 degrees. Then the next to blocks are pretty much the same thing but for the left sensor, the only thing that changes is than if the left sensor sees black then it should turn left not right.

Usually a 2 Sensor Line-Following code works better and smother than 1 Sensor, but last week Rich showed us a 1 Sensor code that worked well and smoothly. We even thought it was using 2 Sensors.

Here’s my one Sensor code compared to my 2sensor unfinished code which is up there… ( just a few scrolls up actually)

1 Sensor Line-Follower

I think next time I will have to change the aggressiveness of the turn to make the other code work. But for now this is ok.

Bye…

Week 6 – 2019 – Tamsin

This week at coding first of all Sara and I had to watch a really long video as well as reading all of last years coders blogs about what we did this week.

So this week we tried to make the robot go in a straight line using both motors. To follow the black line around a corner you have to use a lot of blocks to do so. It is very hard.

At first I thought it was going to be easy but after I finished what looked like my code, when I tried to turn it on it just went round and round and round in circles .

In the end we did not get the robot to go in a straight. Line this week we had a lot of fun at robotics

Week 5 – 2019 – Tamsin

This week at coding we coded a line follower that wiggled when it moved to do this you have to get a loop block and inside the loop you put a true or false block in the true you put turn right if finds black ,in the false you put turn left if does not find black.

To do this it takes a bit of time. It took me and Sara a million times to get it right mostly we just changed the speed and the angle of turn

This week I was really busy, I wrote my blog and then it got deleted, I tried to redo it but I ran out of time.

Week 5 – 2019 – Sara

Hi…

This week we finally got the l sensor line follower to work. After getting used to how it was supposed to work it actually seemed quite easy.

This was the code I used last week…

1 sensor line follower

In my last blog I explained how my code worked,but if you haven’t seen it yet here’s a quick explanation. Using the right sensor the robot was supposed to find the right side of the black line,when that was found it was supposed to turn right, then when it detected white it would turn left,making the robot wiggle but follow the line at the same time. The main problem with this code was that the robot was using the right sensor and also trying to follow the right side of the line, and that made it really hard for the robot .

This was how I fixed the code to make it work…

1 sensor line follower
week 4

This is how this code works. The robot still looks for black, but with a difference this time it uses the left sensor. If it does find black then it should turn right 75 degrees with a speed of 75. When it finds white then it should turn left -75 degrees with a speed of 75. The reason I changed it from 50 to 75 was because last time it wasn’t doing any sharp curves, but by changing the angle to 75 it makes the robot do more aggressive turns. The change of speed from 55 to 75 is really only to speed up the process.

I think that the thing that made the biggest change to the two codes is the change from the left sensor to the right sensor.When it was using the right sensor the robot would keep going off the line and onto the white, that’s when it would get lost and go round and round in circles. But when it uses the left sensor the robot doesn’t go past half of the black line and that’s what keeps it going straight.

So, I guess that’s about it.

Bye…

Week 5 – 2019 – James

Hi guys, today I worked on the junior competition requirements for the Robocup Jr junior competition.

Here are the tiles you’ll have to complete in the junior competition.

The tiles in the robocup Jr primary competition.

Some time ago I think I had a photo of my 2 sensor line follower. But this time I’ve made the line follower even better. Here’s what I did…

Firstly, in the senior competition there are those green hints. I added a variable called “use_green_hints”. I used that to look for the hints if I turned the variable setting to true. If I put it to false, the robot would not be looking for hints. This would be useful because in the junior competition, there are no hints. But if you compare that to the senior competition, there are hints.

With that true or false variable, I put it in to my ‘Declare Variables’ ‘My Block’ along with the speed and turn speed variables, as you can see below on the far right.

The new variable is a true or false block so you can turn things on and off like this case for instance.

You can see the code below for using the true or false block where that green line is leading to.

The code for turning the hint finder on or off. (The blocks after the “use hint” comment are not necessary but the code still works.

There will be a ramp included in the competition but we don’t have one yet. It should be made sometime soon though.

That’s it for today’s post, so now i’ll give you the word and phrase of the day.

Lionize: To treat someone as a celebrity; pursue celebrities

It’s better to offer no excuse than a bad one – George Washington

Bye…

Week 5 – 2019 – Oliver

This week I updated my line-following code to include the hint-finding MyBlock. I had to connect the logic output to a logic variable, which cut the program out of the infinite loop.

My updated line following code

To incorporate the hint-finding code into my program, first I had to make a MyBlock of what the robot should do when it comes across a hint. The program finds the direction the hint is facing based on which sensor is receiving more light. If the left sensor is receiving more light than the right sensor, the robot turns left and vice versa. I put a Display block to show whether the robot was meant to be turning right or left. The wait block is at the end so you can read the display.

The testing code for the MyBlock

The robot turned on the hints the right way when it found them, but it had a problem when it came to the silver. The program found a hint before the silver, meaning the program must have detected a light difference higher than 1.

When I looked in port view, the difference between the two sensors when the robot was on silver was 3. I changed my code to accommodate for this by making the difference 5, but the robot still detected a hint before it came to a stop. This is a mystery that remains unsolved and will do until next term.

Useless Fact of the Day: 99% of all the mass of the solar system is concentrated in the sun.

Week 4 – 2019 – Tamsin

This week at coding I learnt alot about code and how to do it so let’s get into what I now know and what I learnt.

So, this week I learnt how to make the robot wiggle 5 times. To make the robot do so you have to read the instructions below.

1st you put the speed to as high as you like. 2nd on the next speed block put minus the same speed. 3rd you put how many turns. I put 0.125. 4th repeat steps 1-4. 5th get a loop and put everything inside it

For the next code I made the robot wiggle on green. For this I used my wiggle code put it in the true for the switch block and added a steering block but only used it for going straight until it finds green.

This week coding was fun. We learnt a lot of stuff this week. I did my work a lot faster so i could get more stuff done and it worked so I will do that next week too.

Week 4 – 2019 – Sara

Hi again…

This time at robotics I made a simple 1 sensor line follower. I found it pretty complicated to get the robot to follow a straight line, that was partly because it wouldn’t start exactly on the black line sometimes it would start on white and thats when it wouldn’t work at all.

The code worked better when the robot was making turns but not so much for when it was going straight.

This was the code I finished, even though it didn’t completely work…

Pretty much all the code tells the robot is, if you see black turn right if you see white turn left. This makes the robot wiggle and follow the line at the same time. The reason why it wiggles is because I only used one sensor, if I had used 2 then it would have wiggled way less.

Well good bye, I’ll write again next week…