The files consisted of a .ev3b file, a .ev3 file, a .rtf file and a .rbf file. The .ev3b file includes the My Blocks necessary for the project (there are lots of them). Without the ev3b file, we would have to copy and paste the data from the My Blocks into new ones of the same name or re-open them. The .ev3 file is simply the program, like every other program in the editor. The .rtf file is a Rich Text File. EV3 Firmware Release v1p1 uses the .rtf extension to enable the files to be downloaded using the standard LEGO MINDSTORMS EV3 software. The .rtf extension is intended to be used for files containing text so using if for the executable program is a work-around. It is an executable program, compiled from C++ that implements an efficient solving algorithm that can find much shorter solutions than the older NXT MindCuber variants. The .rbf file is a script file that installs a program on the EV3 to run the code from the programs menu.
And the robot was built. The cube-turning arm was complete, the spinning base was constructed, and the robot’s brain attached with all it’s 32 million bits of memory filled with cube-solving patterns. It was perfect and good to go… or was it?
We placed the cube in the base and pressed the robot’s button The colour sensor went to work, scanning the faces of the cube. But when the arm went to flip it, it couldn’t get a grip on the cube and the colour sensor ended up scanning the same face again and getting confused. However the robot tried to twist and turn, the cube was never solved.
We got to work. We would change the arm so it was lower and got more of a grip on the cube. But, just as the plan was laid out so carefully in our head, the bell rang outside and our plans were postponed until next week.
Wait and see…
Fact of the Day: Earth is the only planet not named after a god. Does that mean the planet called GJ 581g is also a god..?
This week was our last week before the Robocup Junior competition. Our code can navigate around the entire course, as you saw in the video last week, quite reliably. This week we adjusted the can-finder to have the counter code in front of the motor code, so it had to run through that before turning.
This week, we were asked to research and write a blog post about what we were going to do after our line-following work was finished. We decided that we could make a Rubik’s Cube solver (MindCub3r). I have found the following tutorials for how to make them:
These would be a good guide to follow and then convert them into our own ideas. We could also make a program to scramble a Rubik’s cube by trying to make a pseudorandom number generator, or make a program to turn the cube into a specific pattern, like the video below:
This Rubik’s cube solver not only solves the cube but makes cool patterns too!
Making a Rubik’s cube solver would be challenging, because of the 3-dimensional virtual map created by the colour sensor. We would then have to write an algorithm to solve it using the twists and turns of the cube, in the EV3 block code. This an explanation of the algorithm online Rubik’s cube solvers use to solve cubes: Ruwix – The Rubik’s Cube Algorithm
We also could learn how to make a PID (Proportional Integral Derivative) line follower for next years competition with 1, or even 2, sensors (See: 2-Sensor EV3 PID Line Follower,) make a Lego brick sorter that sorted the bricks into colours and shapes (see: EV3 Brick Sort3r), and even possibly expand on this into weights.
Finally, I would like to say a big thank you to Richard for helping us with our coding for the past 2 terms and last year, for giving us suggestions and challenges that improved our programming knowledge and giving up his time to come in to teach us. It’s been a long line for us to follow, but you programmed us well and we managed to get to the end!
Fact of the Day: 👾 The sound of E.T. walking in the film was made by someone squishing their hands in jelly. 👾
Today our task was to navigate around the watertower. We had to find our way without touching the watertower, and efficiently and reliably. We had to write pseudocode for the task, turn it into code and comment it.
This was my first pseudocode attempt:
Original pseudocode:

if watertower within 15cm:
    turn right
    go forward 1 wheel rotation
    turn left
    go forward 1 wheel rotation
    turn left
    go forward 1 wheel rotation
    turn right
else:
    keep following line
When converted to code, however, the problem was that the robot never turns exactly 90° when it turns left or right. This meant that when the robot turned right at the end and rejoined the line, it rarely lined itself up right and ended up continuing through the white.
The other problem with this code was that the robot tried to detect the watertower too soon. This meant that it found it too far back, and crashed into it when it tried to rejoin the line. I changed this to 7cm instead of 15, which let the robot get close but not close enough to knock it. I also tweaked the amount the robot moved forward to go around the can, from 1 full wheel rotation (360°) to 420° and 710°.
The biggest change I made was adding the last line: go forward until right sensor is on black, then turn right. This fixed the first problem of the robot not lining up with the line correctly when it finished, by only turning when the right sensor was on black.
I wrote this pseudocode, then converted it into code again:
Revised pseudocode:

if watertower within 7cm:
    turn right
    go forward 420
    turn left
    go forward 710 wheel degrees
    turn left
    go forward right sensor is on black
    turn right
else:
    keep following line
There was one problem with this new code, as Richard noticed: the robot did a little wiggle as it found the line again. When I looked closer, I noticed that while the robot stopped when the right colour sensor was on black, when it turned back onto the line, the left sensor was on black. This caused it to turn left again. To fix this, I replaced the last line, turn right, with the following lines
turn right until left sensor is on black
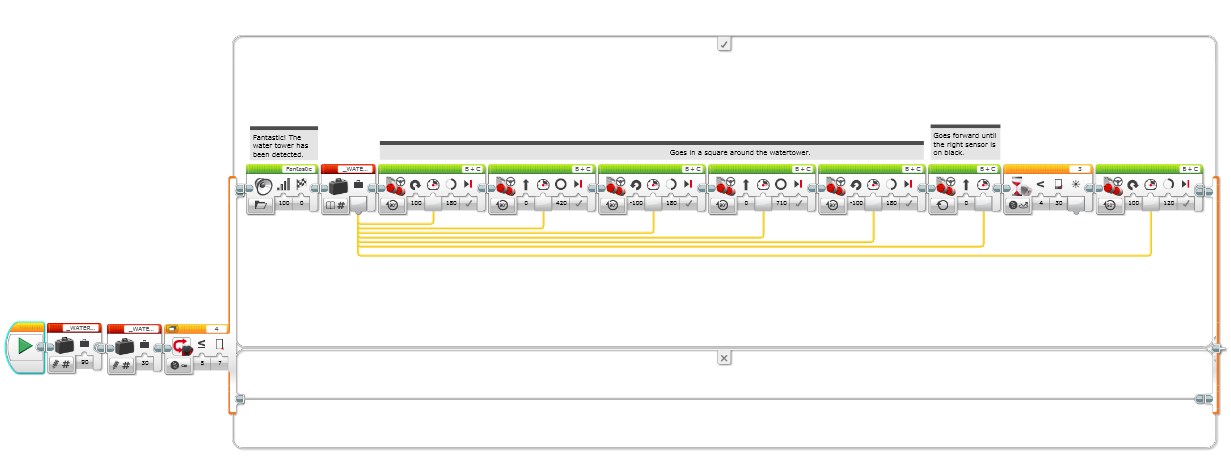
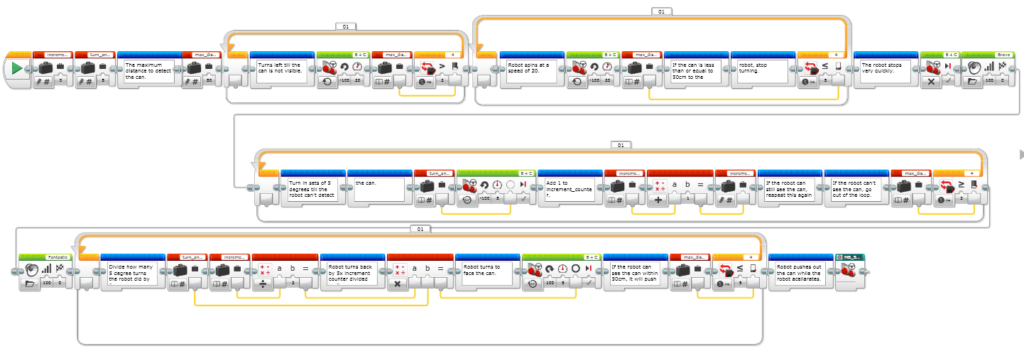
This meant that the robot did not have to do a wiggle to orient itself on the line. This is what the pseudocode looked like converted into code:
1. The first part of the code sets the variables:
WATERTOWER_TURNSPEED, which controls how fast the turns are made
WATERTOWER_SPEED, which controls how fast the robot moves.
I decided to only make use of 1 variable, because I used the same turnspeed as in my main line-follower program.
2. The switch block determines if the watertower is within 7 cm of the Ultrasonic sensor. If it is, then it replies true and goes through the watertower code, otherwise it repeats back to the main line-follower.
3. If the switch block replies true, then a sound is played. I used ‘Fantastic.’ The program then fetches the WATERTOWER_SPEED variable and feeds it into all of the move blocks to set their speed. Then the robot goes in a square around the watertower using move blocks.
4. The robot sets both motors to move forward at the speed determined by the variable. The wait block prevents the robot from stopping until it finds the right sensor on black.
5. The robot then uses another wait block to turn until it finds the left sensor on black, then returns to the normal loop.
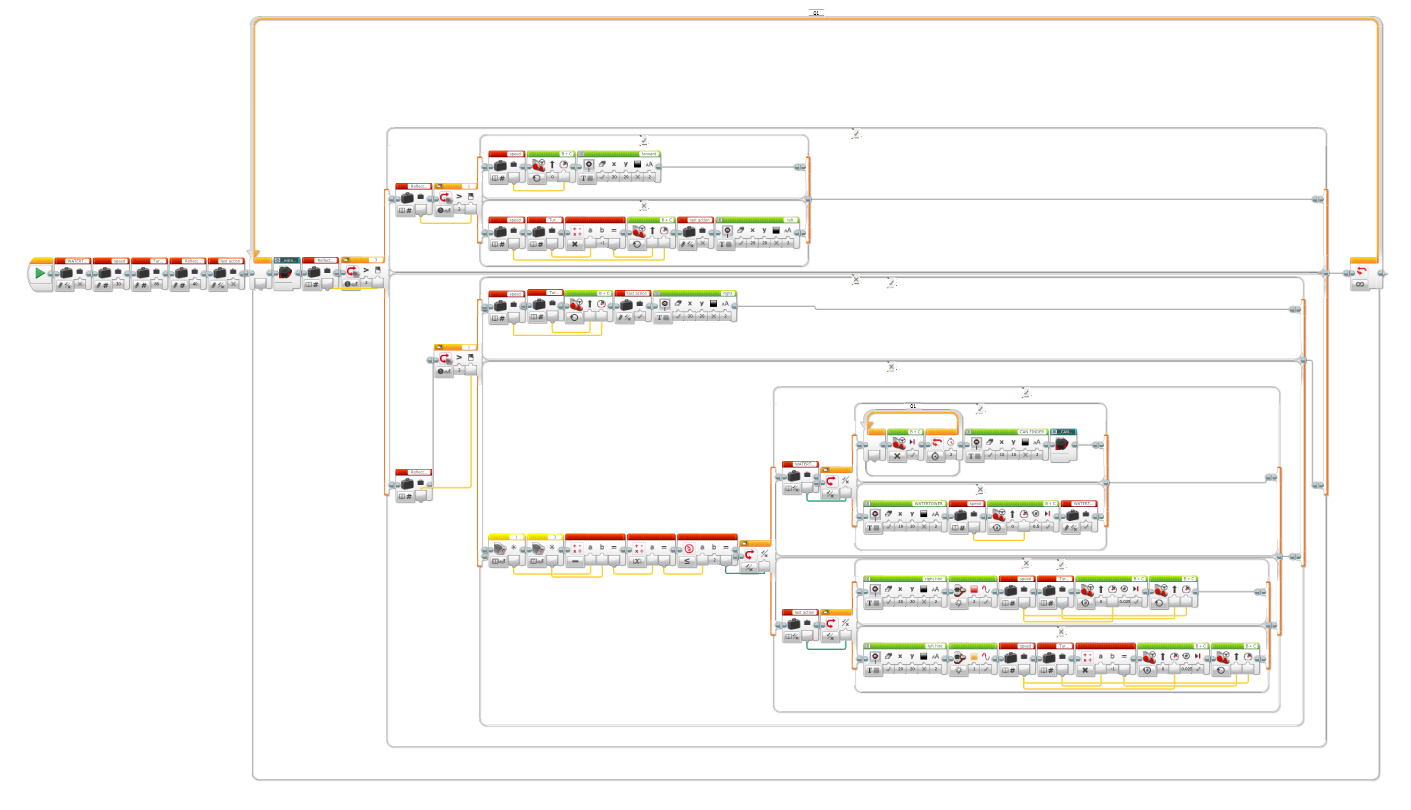
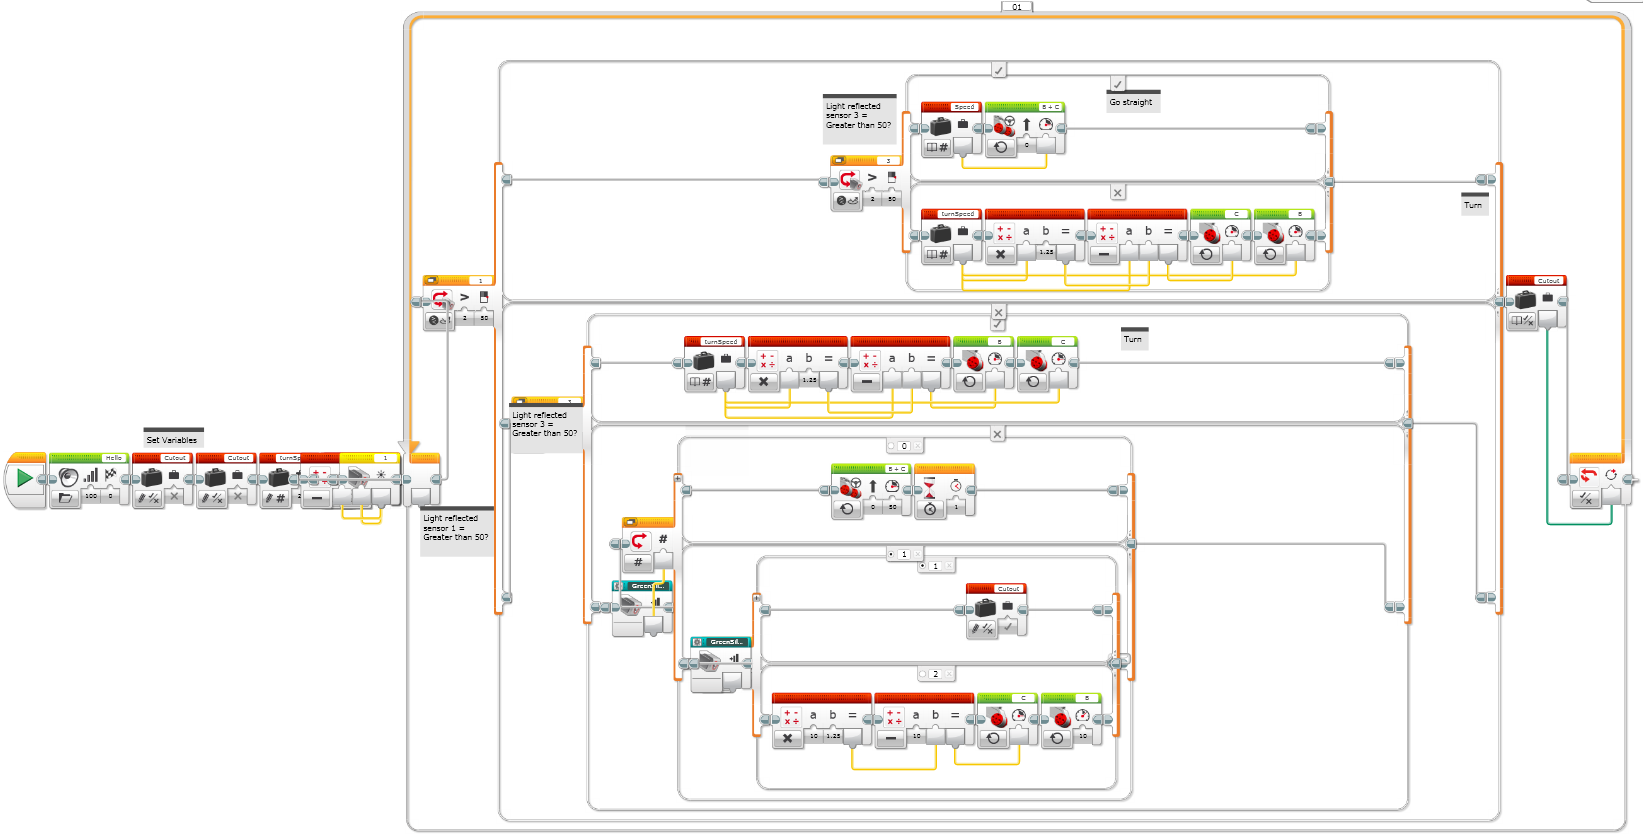
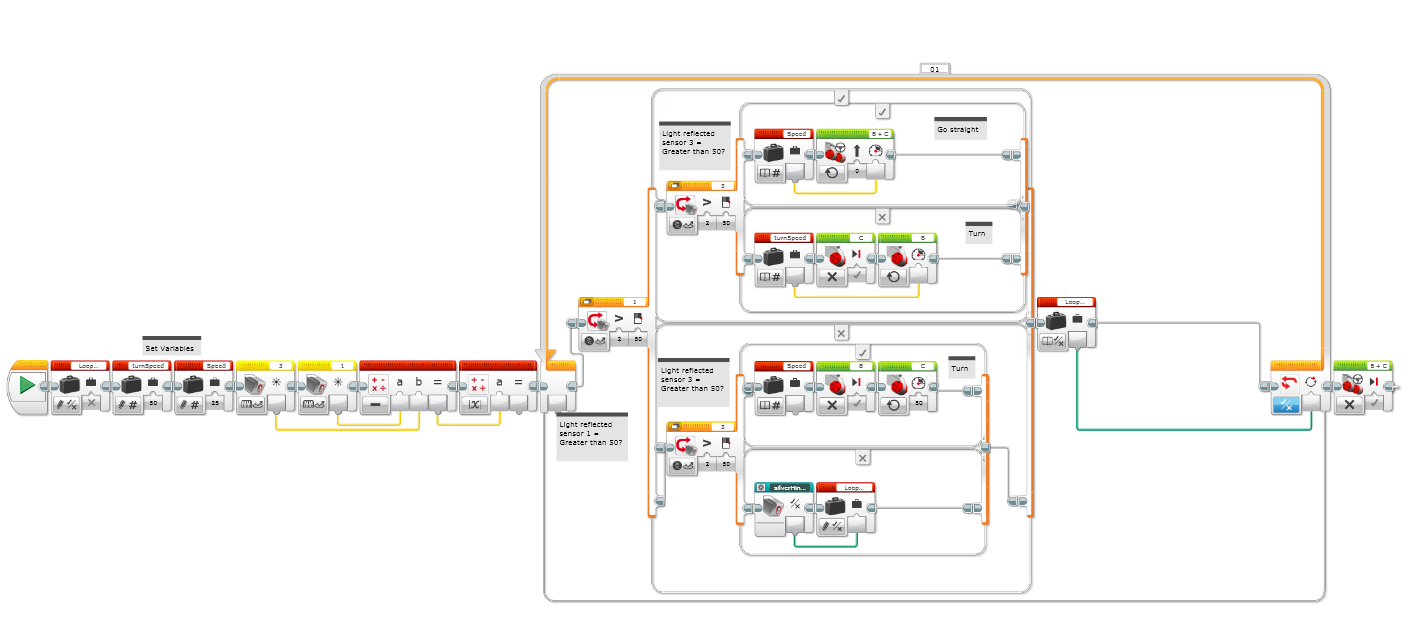
This is the code we have made so far for the Robocup:
I am now using the same code as Sara, if it looks familiar.
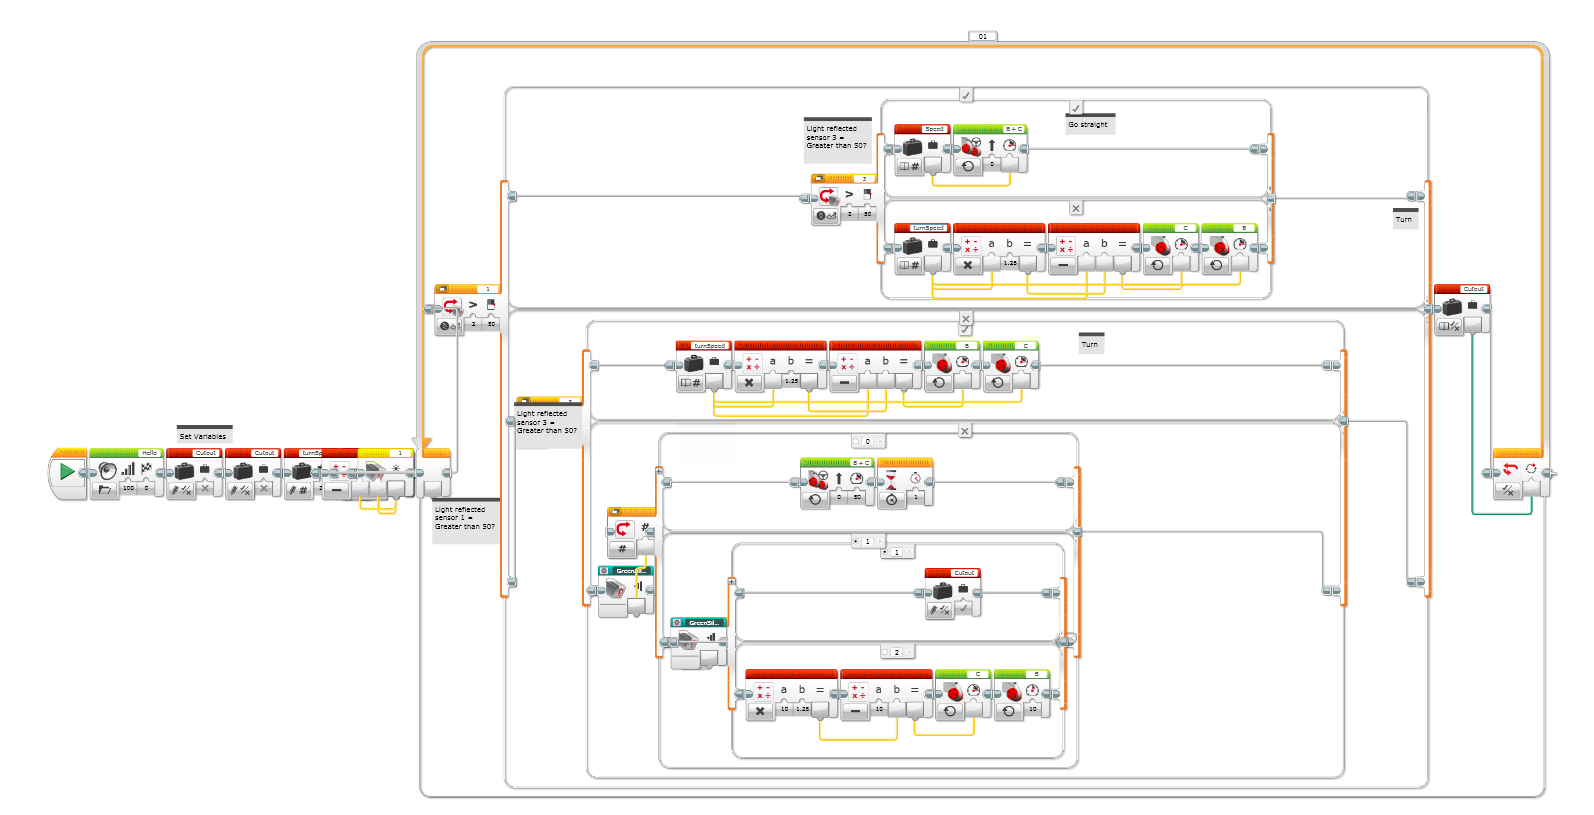
As in the watertower code, I am setting the vairables at the start. One of the variables, watertower found, is set to true. I will explain this later. The code then enters an infinite loop, than checks through the watertower code. If no watertower is detected, then the robot checks the reflected light intensity of sensor 3 (the right sensor), if it is higher than 40, the robot assumes that sensor is on white and takes the top path, otherwise it takes the bottom.
If the robot takes the top path then the same question is asked again, but this time for the sensor 1 (the left sensor). If the answer is yes again, both sensors are on white and that means that the robot doesn’t need to turn and can go forward.
If the answer for the second question is no, then the right sensor is on white and the left sensor is on black. This means the robot must turn left to get both sensors on white and the robot on the line.
However, if the answer to the first question is no, then the second question is asked again. If the answer to the second question is yes, then the right sensor must be on a colour that reflects less than 40% of the light shone at it, and the other sensor is on a colour that reflects more. This means that the right sensor is on black and the left sensor is on white, which means that the robot has to turn right to get back on track.
But what if the answer to both questions is ‘no?’ This means that both sensors are on a surface that reflects less that 40% of the light shone at it. This is where the fourth branch of code comes in. There are 2 reasons why less than 40% of the light shone is received – a hint, or silver.
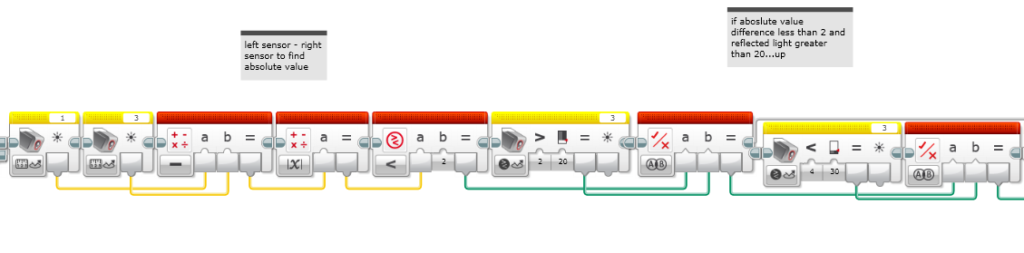
By using an algorithm that subtracts the sensor values from each other then uses the absolute value (removes the negative sign if there is one and turns a negative number into a positive number), the robot is able to decide whether it is on a hint or on silver.
Silver/hint detector
Imagine the left sensor has a reflected light value of 56 and the right sensor’s value is 70. The program would find the answer by finding the reflected light from the sensors, in our case 56 and 70, and puts their results into the red block (a math block). The math block then subtracts the first sensor from the second (56-70) and finds the answer (-14). That answer is then put into the next red block, which finds the absolute value. (absolute value ignores the – sign. So negative numbers become positive numbers and positive numbers stay positive numbers.) In our case the absolute value would be 14. The next math block checks whether the absolute value is less than or equal to 2. Then, the yellow blocks check whether the sensors values are less than 20.
If both answers are yes, and the numbers are within 2 of each other and less than 20, than the robot has found silver and goes onto the can finder. Otherwise, it has found a hint. In our case, with the ABS at 14, the robot has found a hint.
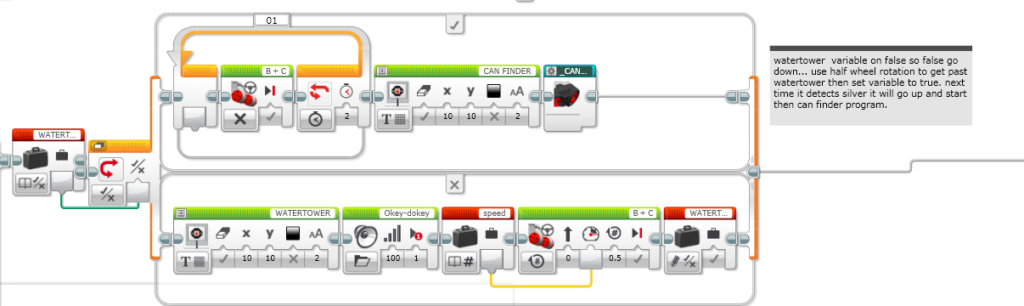
For the hints, the robot finds the last action using a variable we set at the start, last action.Last action finds the last turn the robot did, left or right. It then splits the code into 2 parts yet again: right hint and left hint. Basically, all either hint does is turn a minute amount (0.025 rotations) left or right. It then sets the motors to forward and runs through again.
At the beginning of the code the watertower found variable was set to true. The watertower found variable is a flag variable, which checks if that part of the code has been run through before. The variable checks for a grey dot, like the one at the chemical spill at the end, where the water tower is placed upon. If the competition managers decide not to include a water tower, they could include a grey dot in place of the watertower.
If both conditions are true and the top path is chosen, then the robot will stop for 2 seconds and start the can finding code.
Our can-finding code needs improvement, and that is what we will work on next week. For now, this is what we’ve got…
Can-finding code. The blue blocks are comments. Click to enlarge.
When the can-finding code is activated, the robot turns in place until it finds the can. If the robot can see the can already, it turns until it can’t see it and starts again. When the robot can see the can within 50cm from the ultrasonic sensor, it brakes. It then slowly turns 5 degrees at a time until it can’t see the can, while counting how many times the loop has gone around. When it cant see the can, it takes the number of times the loop has gone around, multiplies it by 5 then divides it by 2. It then takes that result and turns the opposite way that many times. This results in it finding the middle of the can. The robot then charges at the can using a move forward block for 75cm.
That was my explanation of how our code works. This is how it all came together in this video: try to see if you can see the different parts of the code in action!
Useless fact of the day: People say “bless you” when you sneeze because your heart stops for a millisecond. Achoo!!!
Today I attempted to make my program work on the only bit it was failing on – getting over the ramp reliably. I had previously tried to get over the ramp with a flag variable called rampFound like in James’s code, but when I was looking in Port View I noticed that, although I had written my code to recognise a ramp when the values were within 5 of each other, when the robot approached the ramp they were, in fact, not. The reflected light values were actually the same as when the robot was following the black line, except reflected slightly less. This would explain why only when both sensors were on black, the ramp program worked.
I also realised that, instead of triggering the flag variable at the bottom of the ramp, it sometimes triggered at the top. I originally had the distance the robot went when it detected the ramp set to 2.3 full wheel rotations, but as the robot only had to come down from the top of the ramp I set it to 1.5. However, the robot recognised a hint at the top of the ramp and turned left before the robot realised it was on a ramp and fell off the edge.
My line follower so far, hopefully going to work for next year!
A possible solution to this problem could be to change my hints to only trigger after the program confirms that the ramp is not found, or to change my hint direction to straight, like Sara’s code. However, today was our last coding session and we were running out of time, so I decided to leave my code for the time being and help Sara get her code to stop on silver and run the can finder. As I had worked on stopping on silver and can finders before, I could work with Sara to make a flag variable and a can finder. I have explained my can finder in the blog last year.
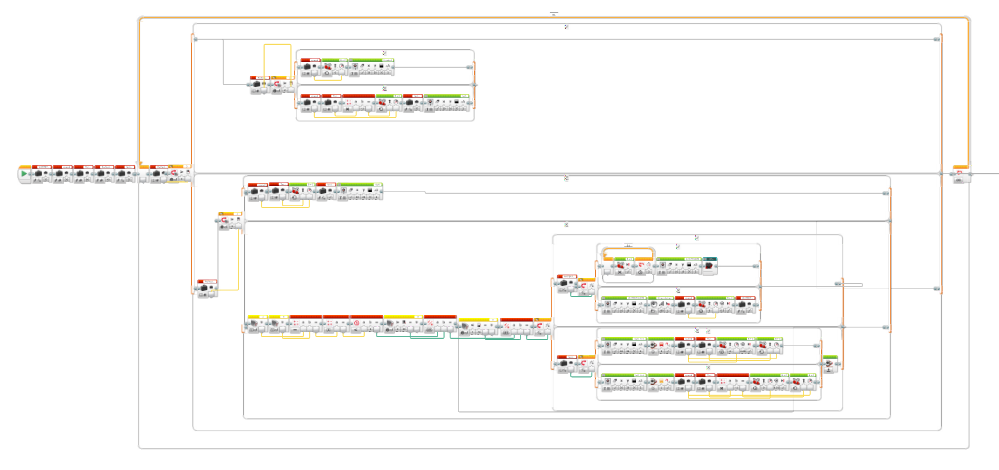
This is our final competition code after working with Sara and making a few changes:
The competition code.
I am looking forward to the tournament on Thursday and am excited to see what ideas the other teams do and learning from their code.
Fact of the Day: Owls are the only birds that can see the colour blue.
Today I only had to make one last change to my line-following code to get it working. The code could run the robot around hints, through the sharp turns and over the ramp.
But there was only one challenge that had not been tackled – stopping at the silver indicating the start of the chemical spill and finding the can. I achieved one of those problems today in the code below:
This slightly blurry program is what I have been working on for the last year.
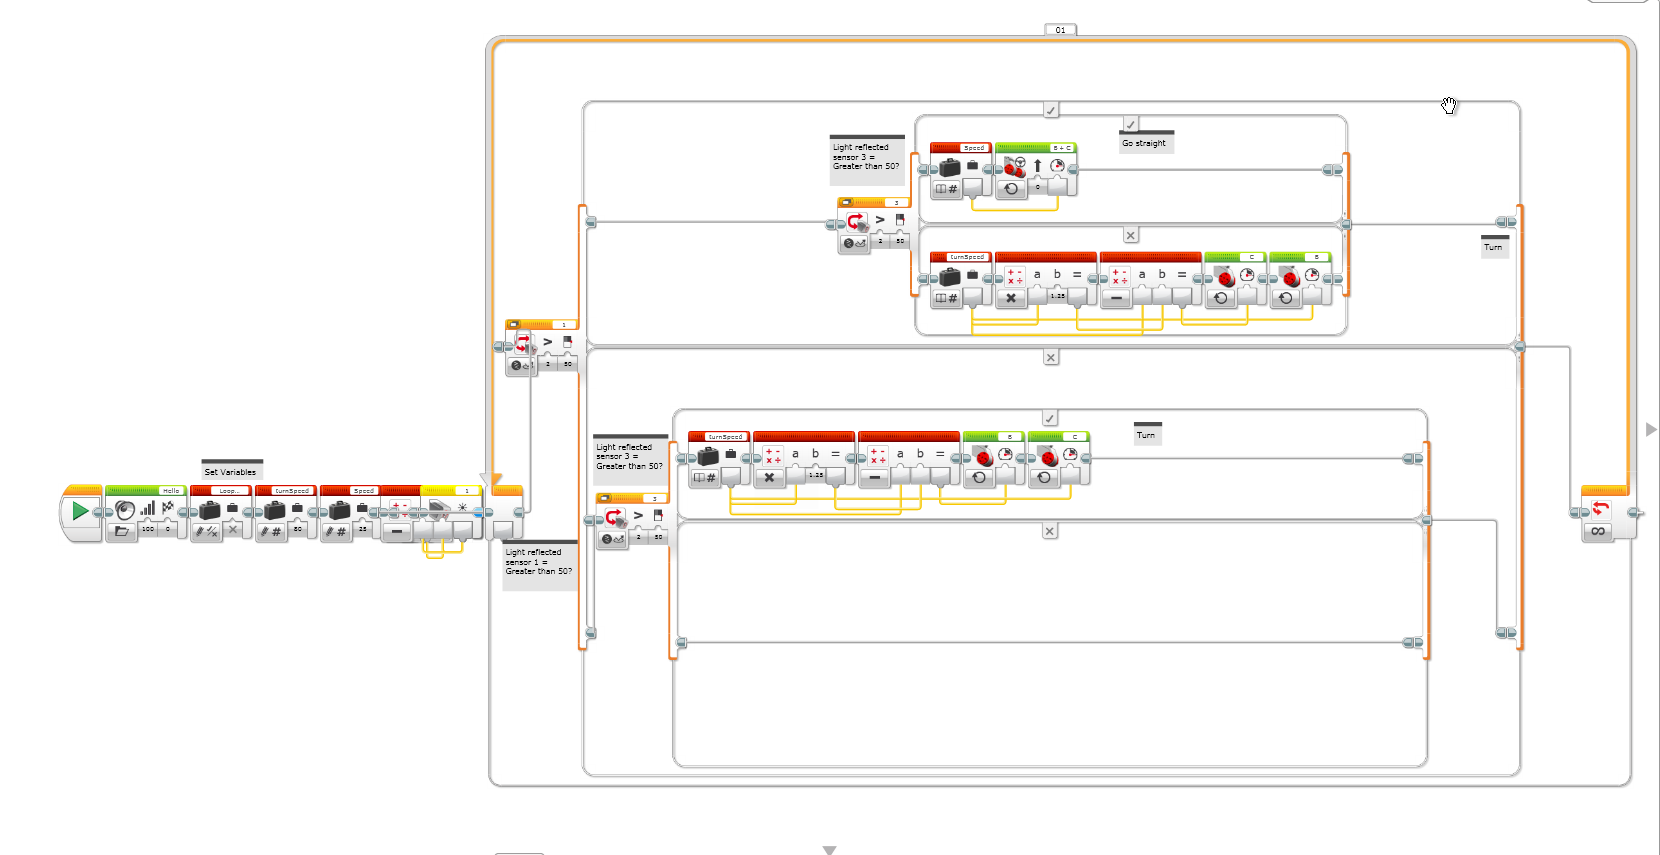
Today I added the major switch block in the fourth instance. I found out how to make a triple switch block to split the code into 3 parts. The part of the project I was working on was hints, the ramp and stopping on silver. To achieve this, I inserted a text variable called TurnDirection with 3 possible outcomes: F, L and R. The variable is changed every time the program runs through any of the top parts of the program: Left, Right and Forward turns. All I did was insert a variable write block to set the variables.
When the robot drops down into the fourth part of the code, it turns on a red status light indicating that the code is currently running in the hint part. It then reads the variable and directs the program into one of the three branches. Each branch then contains another switch block that deduces if the difference between the colour sensor outputs is equal to or less than 5. If so, then the robot assumes it is on grey. However, I noticed the robot also stopped at the beginning of the ramp.
To fix this issue, I made a variable to track whether the robot has gone over the ramp or not. The first time the code runs through the less than or equal to 5 part, it assumes it is on the ramp and goes forwards at a speed of 50 for 2.3 full wheel rotations. It then switches the ramp found variable to true, so the next time it finds the sensors having a difference of less than or equal to 5 it would cut out of the main loop and start searching for the can.
On Thursday this week, I have to bring in my can finder program on a USB stick from my laptop at home and improve on the old files. I also have to run a few tests to make sure the code runs consistently.
Useless fact of the Day: 14% of all facts and statistics are made up and 27% of people know that fact. Okayyyy..?
This week one of our main focuses was to add the Ultrasonic sensor to the robot. In case you don’t remember what the Ultrasonic sensor does, it can measure the distance from the robot to an object. It does that by firing high-frequency sound waves (hence the name ultrasonic) out of a T (transmitter) module that bounce off solid objects such as walls, or in our case, the can. The sound waves emitted from the T module then bounce back to the R (receiver) module. The time delay between firing and receiving is then calculated by the computer by an algorithm that converts the time delay into the distance. We use the Ultrasonic sensor for rescuing the can at the end of the line following course in the RoboCup Junior.
*picture of updated robot with ultrasonic sensor plz, Richard?*
Next week I am going to copy my old Can-finder program off this blog and put it back into my file.
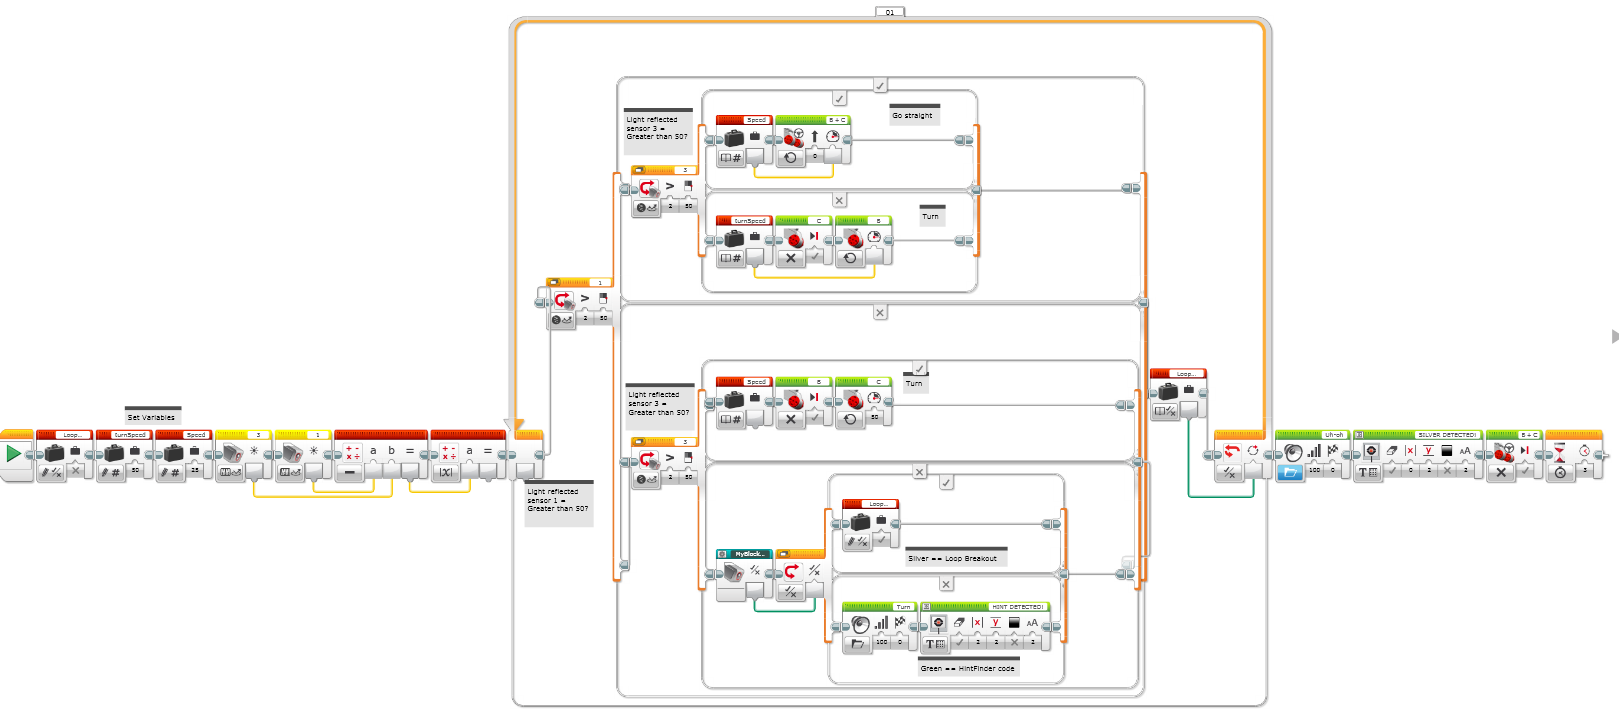
The updated line follower with a loop cutout and a partially-working hint finder.
This week I managed to make a loop cutout for when the robot finds silver. This is mainly successful, but on one of the tries the robot found both sensors with equal values when it came across a hint instead of on silver. This would result in the loop cutting out early and causing an embarrassment in the competition. To stop this happening, I could insert a [wait] block into the hintFinder myBlock and make sure the robot actually is on silver before the loop cuts out.
I could insert the breakout checker in the [silver] section of the nested if/else split block.
Next week Richard plans to have a full-day session so we can make a program out of our best codes and try to fix the existing errors and any new bugs that pop up.
Useless fact of the day: “Stewardesses” is the longest word typed with only the left hand on a conventional QWERTY keyboard.
This week our task was to make the robot achieve the whole course up to the can-finder. We aimed to complete the hints, the ramp and the silver – with the line follower still functioning perfectly.
My updated code…
Last week, I made a part of code that made one wheel turn backwards for every forwards turn of the other wheel. I discovered that by adding this code, I affected the turning speed of the robot. My turnSpeed variable was set to 50, which I chose because it was not too aggressive but could cope with the sharp corners of the line. However, with the sensors moved closer to the chassis of the robot, the robot made too aggressive turns to move over the hints, and the wheel turning backwards at 0.5x the speed of the other wheel didn’t help. With no hint detector in my code, the robot did 3 turns over the hint and ended up turning the wrong way.
To fix that error, I adjusted turnSpeed to 25, and decreased the back wheel turning ratio to 0.25. With this change, the robot could follow the hints.
To go over the ramp, I made a piece of code to detect when the sensors were off the mat and therefore receiving very little reflected light. I explained in my last post, as the robot goes up the ramp, the amount of reflected light drops as the sensors above the ground.
My solution to the problem was to add the reflected light values together, and deduce from that whether the robot was on a ramp, on a hint, on silver or on the line. I altered my old hint-finder in a completely new project to add the ramp.
My test code for the ramp-finder.
This is my ramp-finder test code. It found reflected light values and added them together to find the total. If the total was greater than 80, the robot outputted ‘RAMP’ and set the output variable to 0. If the value was less than 80, it would cut into my old silver/green hint-finder code, which used the Absolute Value to find the difference between numbers and deduce what colour the sensors were on and which way to turn. When I tested the program on the robot, it worked most of the time, but when I tried to incorporate it into my main line-follower, it stopped on silver and green and worked on the ramp only once out of 5 times.
Next week I need to add another part of my program to detect the difference between white and a ramp. The problem is that the code only has four switch block possibilities, as explained on this table below:
Sensor 1
Sensor 2
<50
<50
<50
>50
>50
<50
>50
>50
To add in my ramp-finder code, I need to add a fifth instance to distinguish the parts of the RoboCup Jr. map that are not possible with the regular line following code. I may have to achieve this by even adding a sixth instance for hints instead of the ramp.
Useless Fact of the Day: No piece of square dry paper can be folded in half more than 7 times. If you folded a piece of paper 103 times, it would be thicker than the Universe!
Our task this week was to make a program that could overcome the ramp (thanks Mrs. Bennet) obstacle while still completing the rest of the course. The robot’s sensors were too far away from the wheel chassis originally, so as the robot’s wheels moved up the ramp, the sensors got farther and farther off of the ramp. The light emitted by the sensors was at too much of a distance to be reflected back effectively. This caused the robot to think both sensors were on black because the amount of reflected light was low and in turn, the robot turned in a circle and ran off the ramp.
The code above was able to go over the ramp, but to make the robot able to achieve this I needed to remove the hint section of the code. The hint-detection part of the code activated when the light changed on the ramp, so next week I aim to try and reincorporate it into the program.
When the sensors were moved closer to the wheels, the original program stopped working. This is because changes to the physical robot also make errors in the code. To counteract this, I edited my line follower so the wheel not turning turned backwards instead of staying in place. For example, if the robot turned right then the left wheel would move forward and the right wheel would move back. I experimented with multiple measures but found that the best was the wheel turning 1/4 of the way backwards for every 1 turn of the forwards-turning wheel.
I also started making a program to detect hints without getting fooled by the ramp. My logic was that if the amount of reflected light drops below a certain threshold, the robot would assume it was on the ramp and continue until the lone was found again. The problem with this code is that the amount of reflected light on the ramp changes gradually, while the amount of light on a green or silver hint changes suddenly. Next week I will seek to find a solution to this problem. This is my code so far:
Richard explained to us a concept of making a new program. He told us that instead of altering the old code and risking making errors, to make a whole new program and copy and paste our old code in to change. That way, if an error appears, the old code is always there to revert back to if needed.
Useless Fact of the Day: Intelligent people have more zinc and copper in their hair.
This week I updated my line-following code to include the hint-finding MyBlock. I had to connect the logic output to a logic variable, which cut the program out of the infinite loop.
My updated line following code
To incorporate the hint-finding code into my program, first I had to make a MyBlock of what the robot should do when it comes across a hint. The program finds the direction the hint is facing based on which sensor is receiving more light. If the left sensor is receiving more light than the right sensor, the robot turns left and vice versa. I put a Display block to show whether the robot was meant to be turning right or left. The wait block is at the end so you can read the display.
The testing code for the MyBlock
The robot turned on the hints the right way when it found them, but it had a problem when it came to the silver. The program found a hint before the silver, meaning the program must have detected a light difference higher than 1.
When I looked in port view, the difference between the two sensors when the robot was on silver was 3. I changed my code to accommodate for this by making the difference 5, but the robot still detected a hint before it came to a stop. This is a mystery that remains unsolved and will do until next term.
Useless Fact of the Day: 99% of all the mass of the solar system is concentrated in the sun.
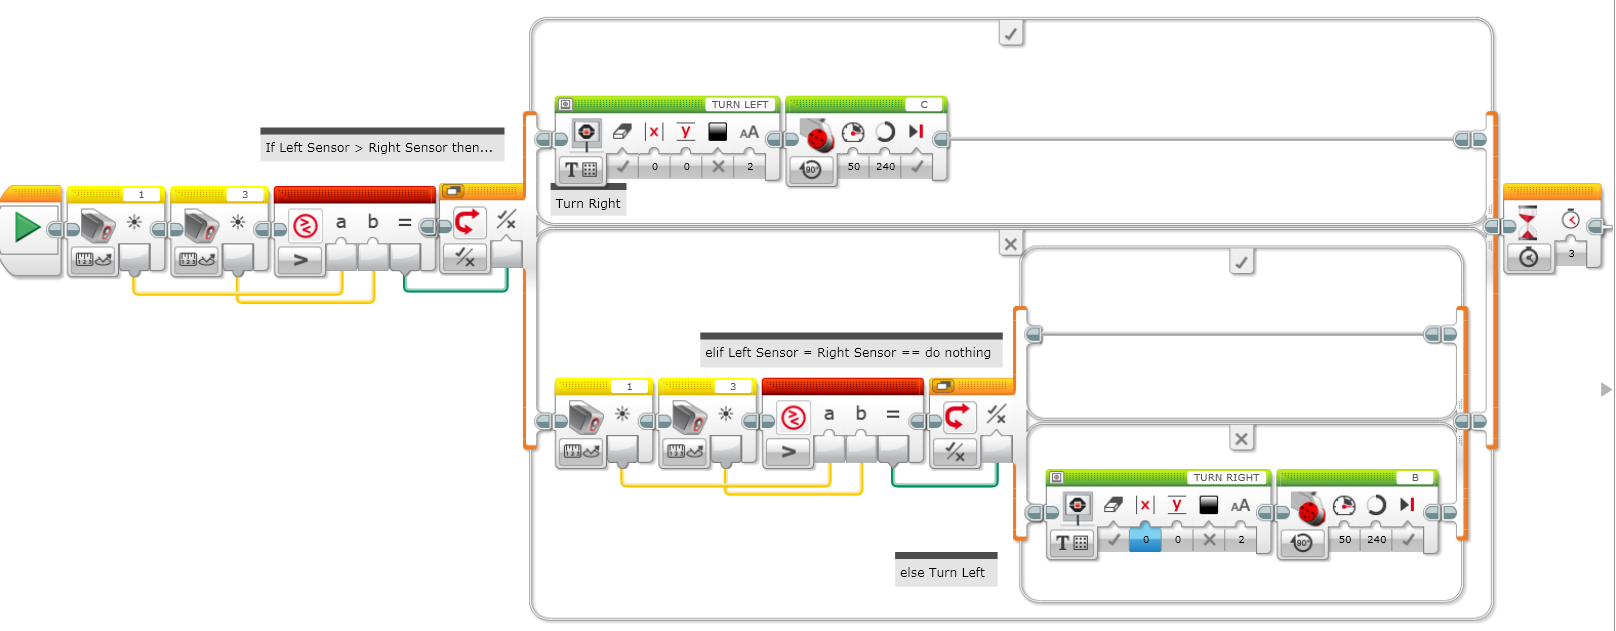
This week I made a new line-follower program with 2 sensors. This program doesn’t need to wiggle to stay on the black line. It uses the amount of reflected light to tell which direction to turn. The program is shown below:
My new line-following code (click on this image to make it bigger)
James and I started making the code for our hint-finder part of the line follower. If the sensors are on neither white nor black, they must be on green or silver. The robot automatically veers onto the hint, meaning one sensor is on green and the other on black. The difference between the right and left sensor is about 10, so we can use math blocks to work it out:
Sensor 1 (10) - Sensor 2 (20) = -10
The ABS of -10 is 10, so the output is 10.
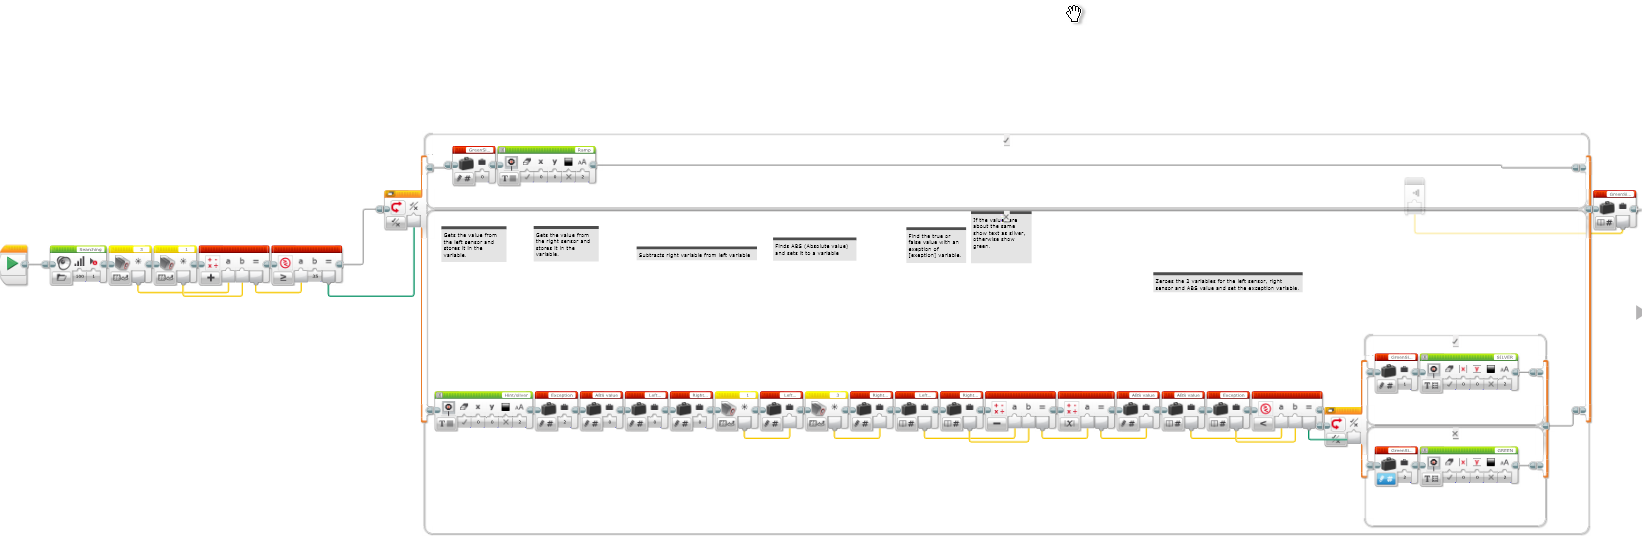
ABS stands for ABSolute value, which removes the negative sign. The result is the difference between the two numbers. However, if the robot finds silver then both sensors will be on it. Therefore the sensors will receive about the same value, with an exception of 2 or 3. The absolute value of silver will then be lower than 3, which will trigger the can-finding program.
The table below explains the amount of light reflected from silver or green hints for each sensor:
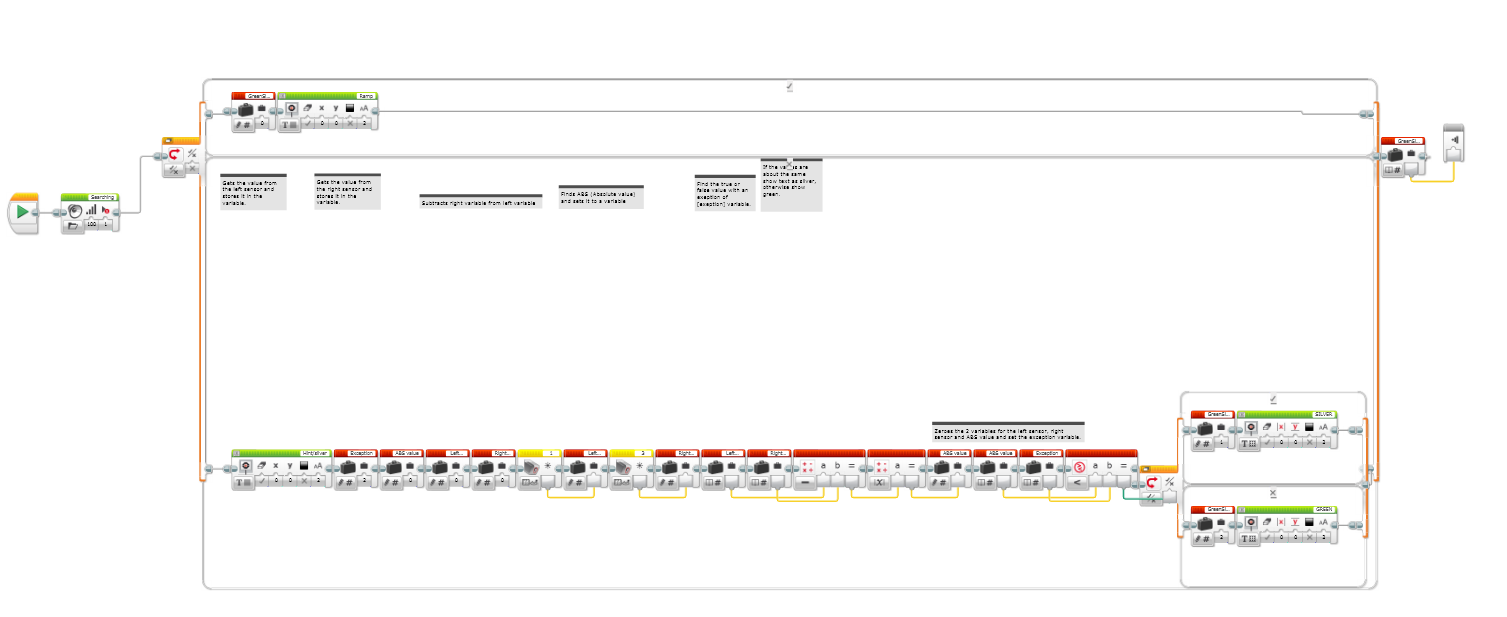
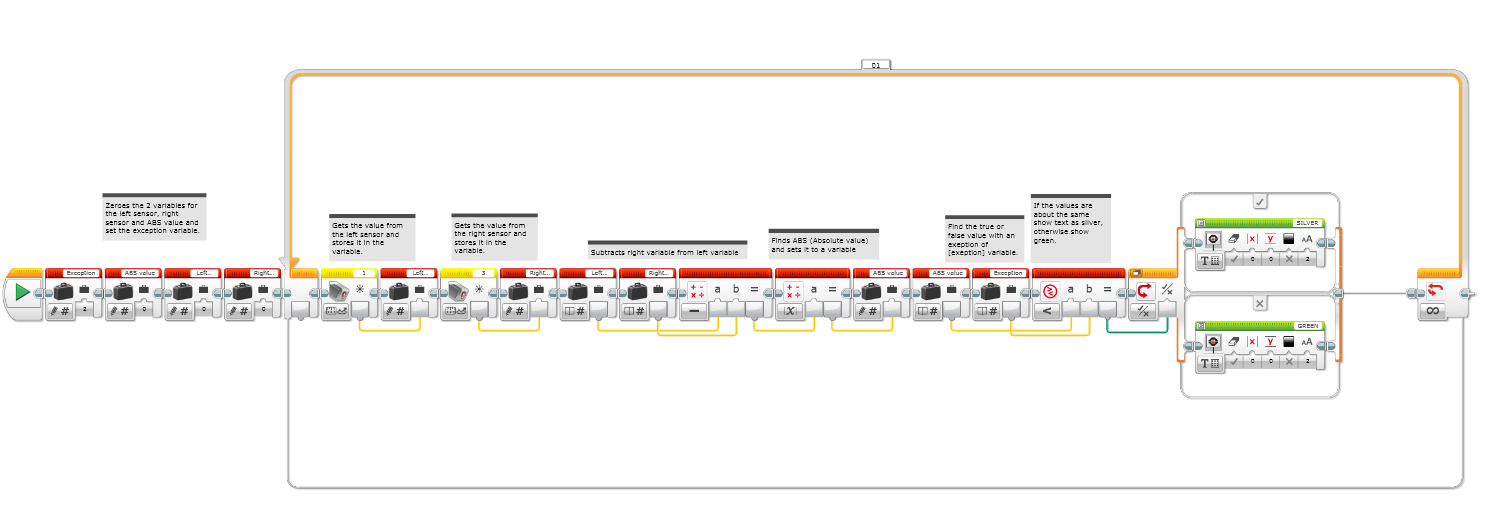
This screenshot is my hint-detector test code, which will show “GREEN” on the screen on a hint or “SILVER” if on silver.
This is my hint-detector test code. (click on this image to make it bigger)
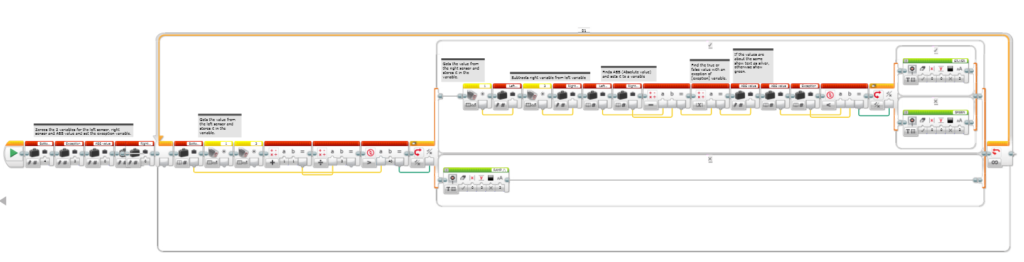
But, of course, to incorporate this into my code would require a MyBlock. For the MyBlock to work effectively with the code, I needed to remove the loop and turn the if/or statement into a logic output statement, which you can make from the MyBlock menus like shown below:
This is how to set up a MyBlock for logic statements.
Finally, I placed the finished MyBlock in my line following code. When the colour sensors are both on silver, such as when it reaches the end of the line and the start of the can finder part, it cuts out of the loop and will lead to the can finding algorithm. I am yet to make a program to turn at the green hints, so I will come to that next week.
The semi-finished hint-finder MyBlock. I will add to this in future weeks.
Useless fact of the week: The closest fraction to pi is 22/7! Check on the calculator if you don’t believe me! (22 ÷ 7 = 3.14285714286 and π = 3.1415926535)