Week 6 – Josh

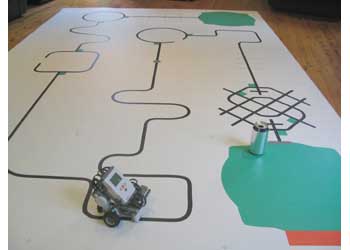
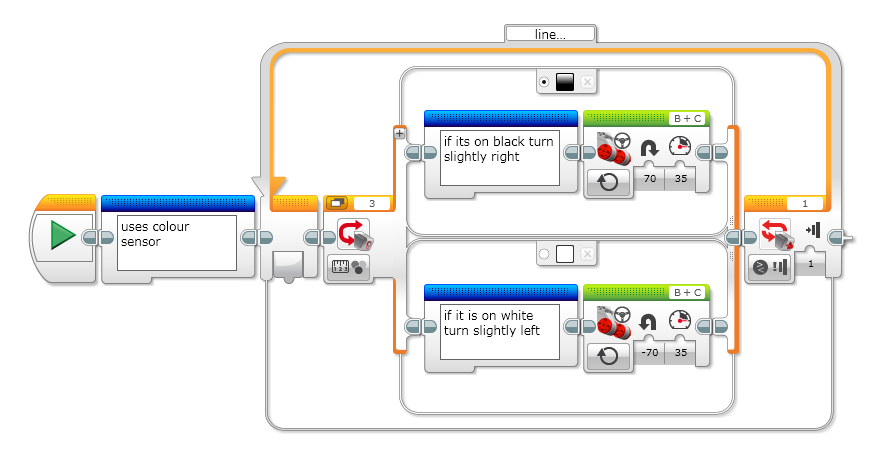
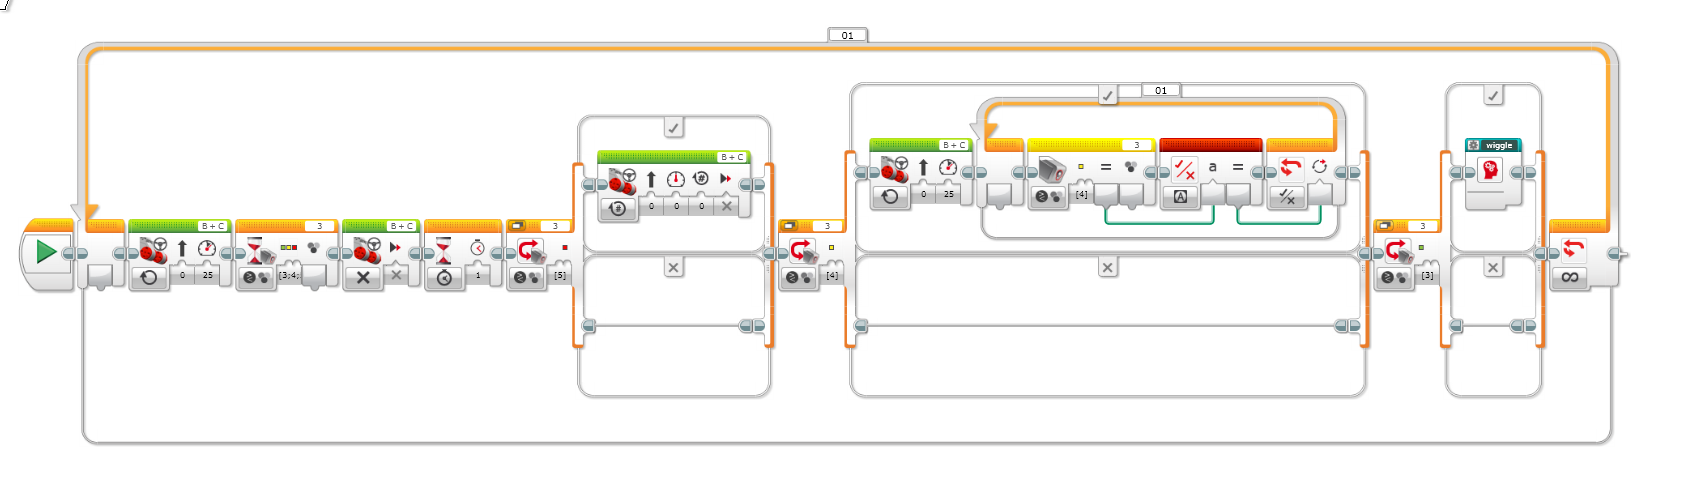
Today at coding class we cracked into our overall goal, making a line follower.  First we had to learn about switch blocks which is really the program asking the robot a question about its surroundings and answering yes or no.  E.g is the colour sensor on a black line; yes turn right, no turn left.

We then got stuck into our first challenge.  The pseudocode challenge guidelines are as follows.

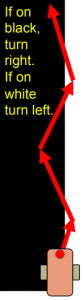
Step 1: Write a program that follows the RIGHT edge of a line.
Hints: If your sensor sees black, turn right.  If your sensor sees white, turn left.  Use loops and switches!
Step 2: Try it out on different lines.  Did your line follower work the same on straight and curved lines?
Step 3: If not, instead of turn Steering = 50, try smaller values.
Is it better on the curved lines now?
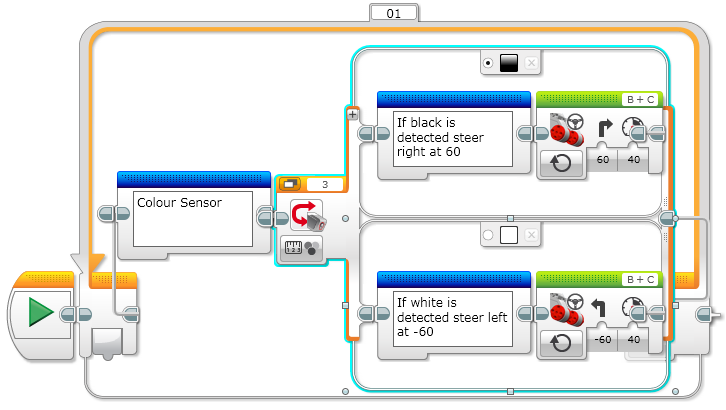
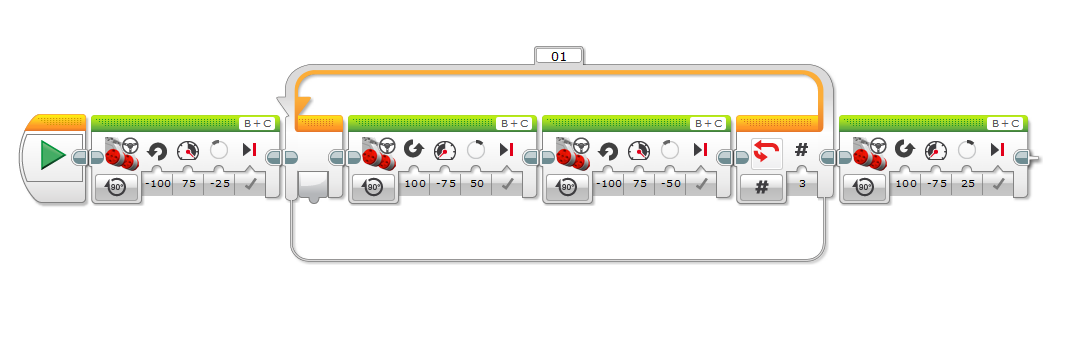
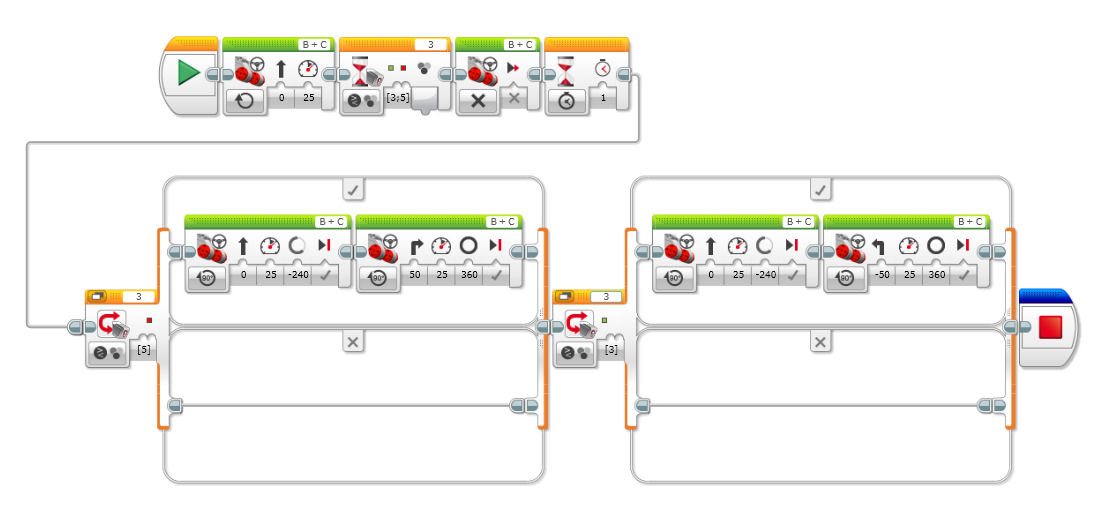
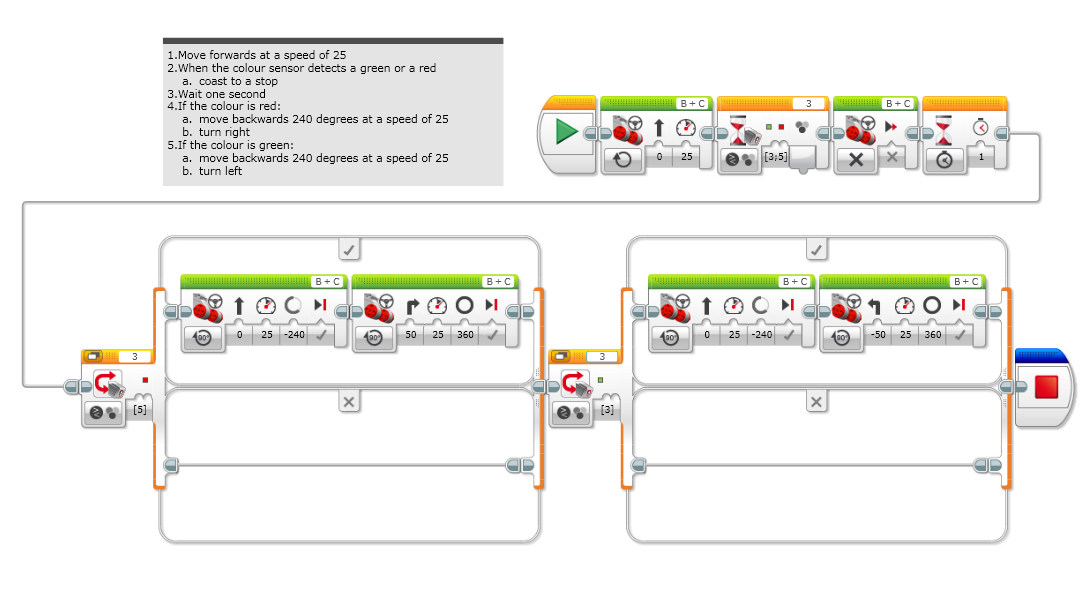
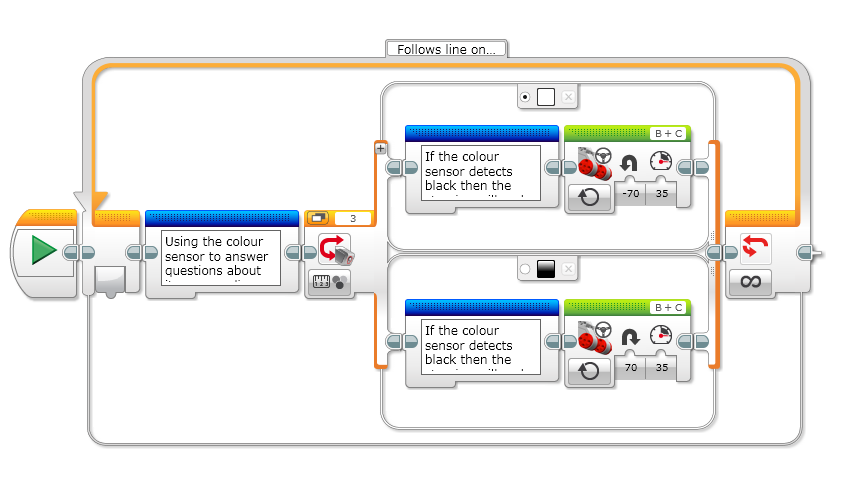
After some trial and error I got the robot to follow the line but when it got to a sharp turn it lost the line.  After adjusting the speed and steering I got it to work.  (I slowed down the speed and increased the steering).  This was a very interesting task as everyone used something different to steer to start with.  I used ‘On’, but the others used rotations, time and degrees.  We ended up all finishing on ‘On’.  The picture of the code is to the left .  We then checked the solution and it was very similar, the only real difference was the speed and steering.
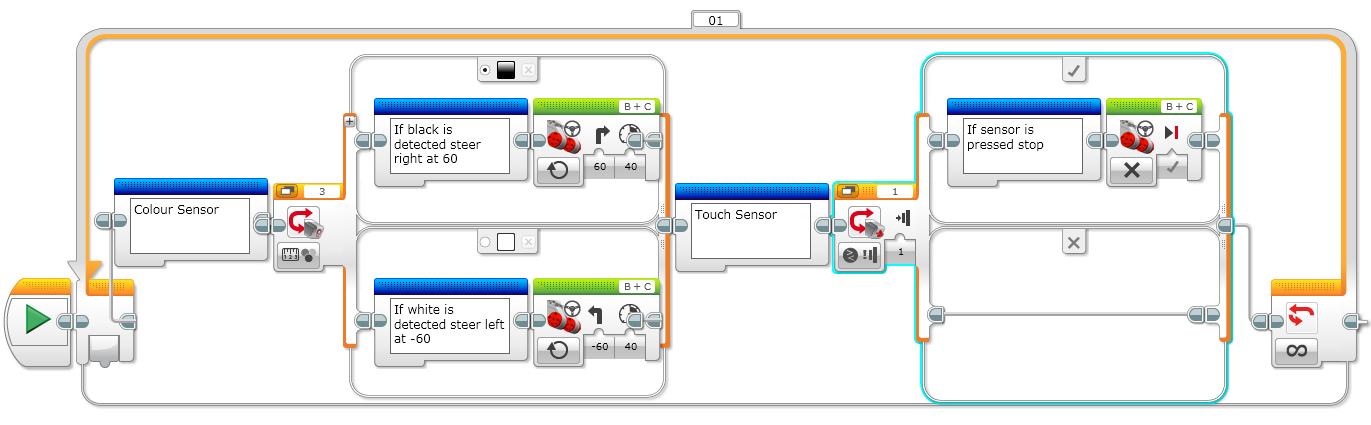
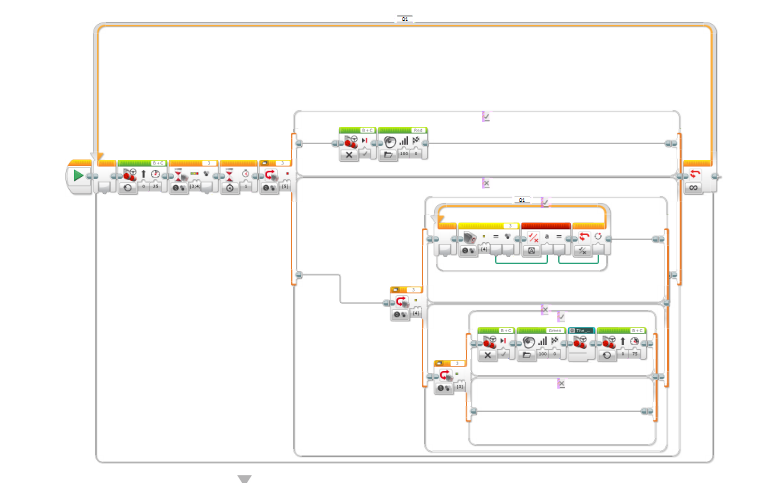
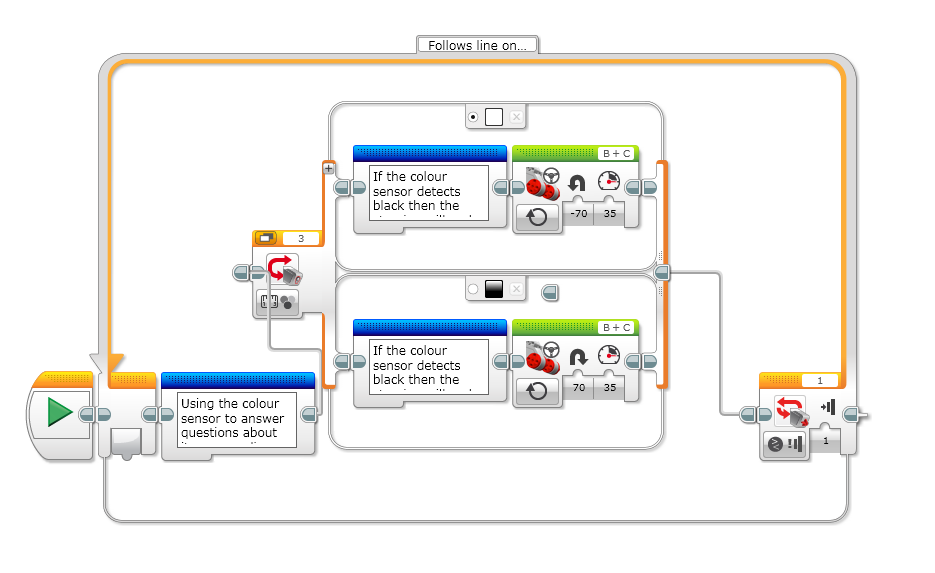
The second challenge was pretty much an add on to the last task as we just had to make it stop when the touch sensor is pressed while the same line following code applies.  As you can see we changed the repeat forever to until touch sensor is pressed.  This was a very good lesson and is setting us up for our final goal.
Our Mindstorm Adventures Continue.

Week 6 – Brayden

This week we completed two line following challenges using the colour and touch sensors. At the start of the lesson we were given a challenge where we had to programme the Mindstorm to follow the right side of a line.

This had to be completed by programming the mindstorm to ‘zigzag’ across the edge of the line by using a switch in the code.

We used the switch to determine whether the Mindstorm was on the black line or on the white of the track. If it was on the black it would turn slightly to the right and move in that direction. If it was on the white it would turn slightly to the left and move in that direction. This would cause the Mindstorm to cross back and forth over the edge of the line. At first there were a few bugs in the code but after some alterations to the code we all achieved this.

My Line Follower Challenge 1 Code (Explanation in the blue comment blocks)

We then attempted another challenge. In this challenge we had to use the code we had just created and alter it so if the touch sensor was pressed the Mindstorm would stop moving. We achieved this challenge fairly quickly.

My Code for the Line Follower Challenge 2

I am looking forward to testing my coding knowledge in future weeks.

Week 6 – Oliver

🙂 This week at coding we made a simple line follower that (surprise, surprise) followed a line. It wasn’t at all simple to make it though.

We had two challenges. Our first was to make a line follower that successfully followed lines using white and black. Our second was to make our robot stop running the program if the touch sensor was pressed.

At first, I tried to use the Reflected Light Intensity block to see if the light that was on the line was more or less than 50. This did not work because of the ambient light making the numbers mixed up. My idea was to make the robot follow the edge of the line, but it was too complicated for me and I didn’t understand it. We will do that sort of code in future weeks.

I then decided to use the Compare Colour mode. This detects what colour the colour sensor is seeing, then reports it to the code. If the sensor detects black then the robot turns right 35 degrees, and on white it turns left 35 degrees.

This session took a lot of trial and error and a lot of mistakes. In the end I learned a lot about the language and how it works. My final result is down below. 😉

WORD OF THE DAY: Hunt-and-peck. Using only one or two fingers to type on a computer keyboard.

Week 6 – James

Hi it’s James here. This week we started our goal which is doing a line – following challenge like the one in Robocup Junior ( Our course looks like this).

This is basically what the course looks like at Robocup Junior. ( It’s only missing a ramp)

We looked an algorithm on how to make the robot follow a line. We followed a section of the course going the opposite direction of where the robot is facing in the picture, above.  The robot can’t follow the middle of the line because it can’t see the black line ahead of itself like a human can.  If you look at the code below it is coded to follow one side of the line. (mine was the right side).

If the robot is placed on the left side of the line it turns around and goes the wrong way. When it follows the right side, it jiggles side to side like this.

The algorithm is repeating forever moving away from the black line and when the color sensor is on the color white, it moves back towards the black line.

To make the code work I adjusted the speed to 35 and then I made several adjustments to the turning starting from 45 and -45 and going to 70 and -70.

I had several problems like with the switch block and other things in the code  but here are the main problems I had…

  • My speed was too fast to get around some corners.
  • I turned too much when doing the jiggle.

I could make my code better by adding some more comments.


Week 5 – Oliver

This week Richard had a challenge week with me and James only. We had a list of pseudocode instructions to make the robot follow, shown below:

1. Move forwards in a straight line
2. If a red, green or a yellow tile is detected stop and wait for one second
3. If the tile is red, stay stopped
4. If the tile is yellow, move forwards until it is not yellow and go back to 1
5. If the tile is green, wiggle side to side 3 times and go back to 1

This is a lot harder than it may seem. We had to use many different block types to make the program work, and I feel like I have learned something new to try on my robot at home.

My code is still not perfected, but this is my unfinished result. I have written step by step of how my program works:

  1. Move forward until one of the three colours is found.
  2.  Wait 1 second.
  3. If the colour is red then stop motors, say “RED” and then go back to the beginning.
  4. If the colour is not red then if the colour is yellow then;
  5. Until the colour is not yellow move forward then go back to 1.
  6. If the colour is not red nor yellow and it is green then stop motors, run the My Block called “The_Wiggles” and then go back to 1.

I have used Nested Loops (loops inside each other) in my program. Right now, it does not work, so I wonder if I choose a different format of laying out my code it would work better? I am going to try that next week.

My Wiggle Block

This My Block starts by turning the robot 25 wheel degrees left by moving the wheels. It then repeats turning 50 wheel degrees left and right 3 more times. Then it finally finished by turning 25 wheel degrees right.

WORD OF THE DAY: Petrichor The smell when rain and soil combine.

Week 5 – James

Hi, its James here. We didn’t write last week because we only had 2 people here last week ): . (Oliver and Josh were away). Anyway, this week we finished a challenge that I did last week. Dad helped me because you can see that there is a yellow and red block is in the code. (We haven’t used those blocks yet). It took us 2 weeks to get it to work properly. If you’re wondering what the yellow and red blocks do it does this…


Week 4 – Rich

There are some students away this week so rather than progress with teaching I’ve set a challenge to try and put together all of the pieces we’ve looked at so far.

The challenge is:

There are four flat Lego tiles placed in a straight line 50cm apart.  One tile is red, one tile is green, one tile is yellow and one tile is blue.  The tiles can be placed in any order.

Write EV3 code from the pseudocode, below:

1. Move forwards in a straight line
2. If a red, green or a yellow tile is detected stop and wait for one second
3. If the tile is red, stay stopped
4. If the tile is yellow, move forwards until it is not yellow and go back to 1
5. If the tile is green, wiggle side to side 3 times and go back to 1

In your own blog posts for week 4, describe what you did today.  Show your EV3 code and discuss any problems you had.

Week 3 – Rich

Today, amongst other things, we discussed what pseudocode was and how important it was to use as a means to accurately describe what we want the robot to do before we write EV3 code.  The children discuss pseudocode, in a bit more detail, in their own posts.

The children looked at my EV3 code below, but it was not immediately obvious what the code did at all!  It would take a little time to follow it through and, if there was a block that was unfamiliar to them, they would need to research what it did before progressing to find the full intent of the code.However, by looking at the pseudocode I wrote before writing the EV3 code, the children quickly worked out exactly what the robot was meant to do and could relate it to the EV3 code.

1. Move forwards at a speed of 25
2. When the colour sensor detects a green or a red
     a. coast to a stop
3. Wait one second
4. If the colour is red:
     a. move backwards 240 degrees at a speed of 25
     b. turn right
5. If the colour is green:
     a. move backwards 240 degrees at a speed of 25
     b. turn left

Sometimes it’s useful to put the pseudocode in as a comment in your EV3 program, as below.

Use of pseudocode is something we will continue to develop as the childrens challenges become more complex 🙂

Week 3 – James


Hi – it’s James again. This is what happend in robotics class this week.

We discussed what pseudocode means and it means detailed steps that can be used to write actual code.  It could be written in a different language like French or Spanish or any other language in the world and is a helpful guide to not forget steps. Click here to see the others

After that, we looked at a PB+J sample of what to do to make a PB+J sandwich. ( PB+J means Peanut butter and Jelly incase you were wondering). There were 3 students and they wrote some pseudocode of how to make a PB+J sandwich. All there students were wrong but this is a solution below.

  1. Take exactly two pieces of bread.
  2. Take one piece of bread that is not covered with peanut butter on any side and use a knife to spread peanut butter on one side
  3. Take a second piece of bread that is not covered with jelly on any side and use a knife to spread jelly on one side
  4. Place the jelly side of the second piece of bread against the peanut butter side of the first piece of bread
  5. Place the combined pieces of bread on plate

Next, we had a challenge using pseudocode to get around a square going left around the square. Richard said that I had the best code. I also was the first one to do it. The code I wrote is down below.


The pseudocode challenge was very hard because it took like 15 times to make it work. Thats how hard it was. So now, our adventure continues.

Week 3 – Josh

This week we discussed what pseudocode is and what it can do for us as programmers.  Pseudocode is what coders use to plan or explain an idea without actually coding it.  An example is if I wanted to make my robot go forward and then flash its lights blue and red.  This could help a fellow coder understand what I am trying to achieve while I have a clear plan in front of me.  We then look at the Peanut Butter and Jelly example and discussed what we could do to refine it and make it better.

Goal: Robot needs to go once around a square box. It starts at the line and faces north.  It will end on the line facing north.
Step 1: Go forward 10 inches
Step 2: Turn left 90 degrees
Step 3: Repeat steps 1 and 2 three more time.
We then attempted to code the EV3 to do this task.  It was actually an extremely difficult task.  As we had to figure out through guess and check how many rotations the wheel had to do, to do 90 degrees.  But now we have this information we can keep reusing it.  This will be very important information.
Our Mindstorm Adventures continue.