Week 4 – 2019 – James

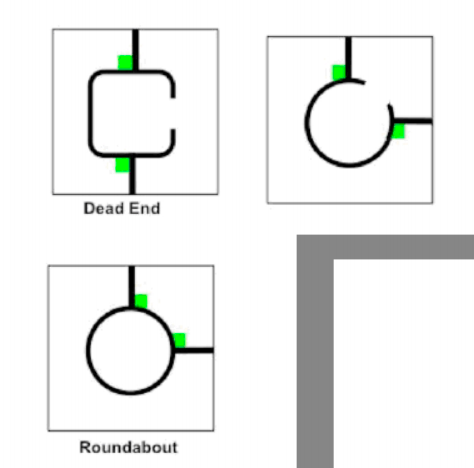
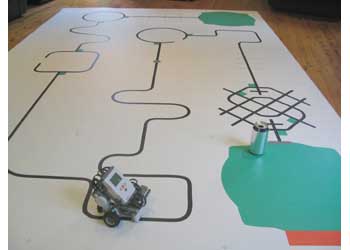
Hi guys, today I worked on my hint finder (again). This time I got around some tight corners which looks like very sharp corners.

The code for the sharp turns and hints.

The turns were in the junior and also maybe the senior compition. The problem we had is we had to get around the hints and the tight corners together.

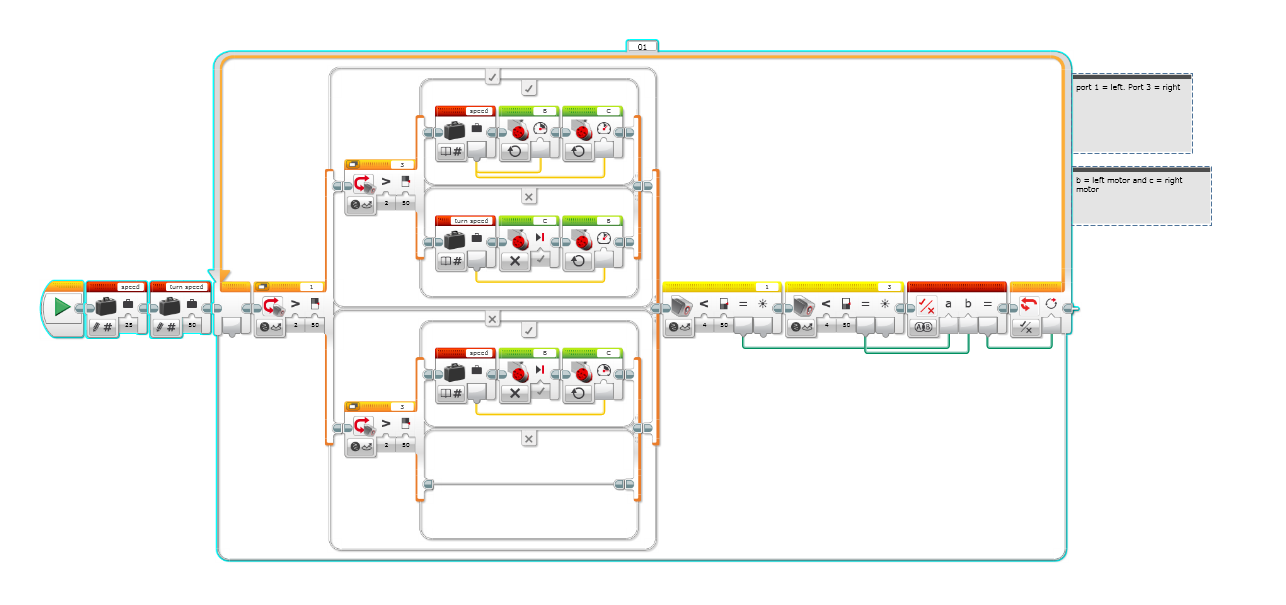
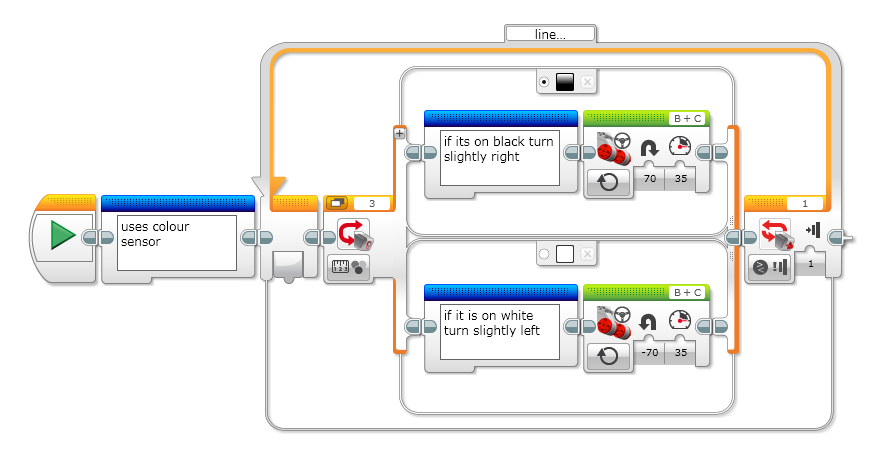
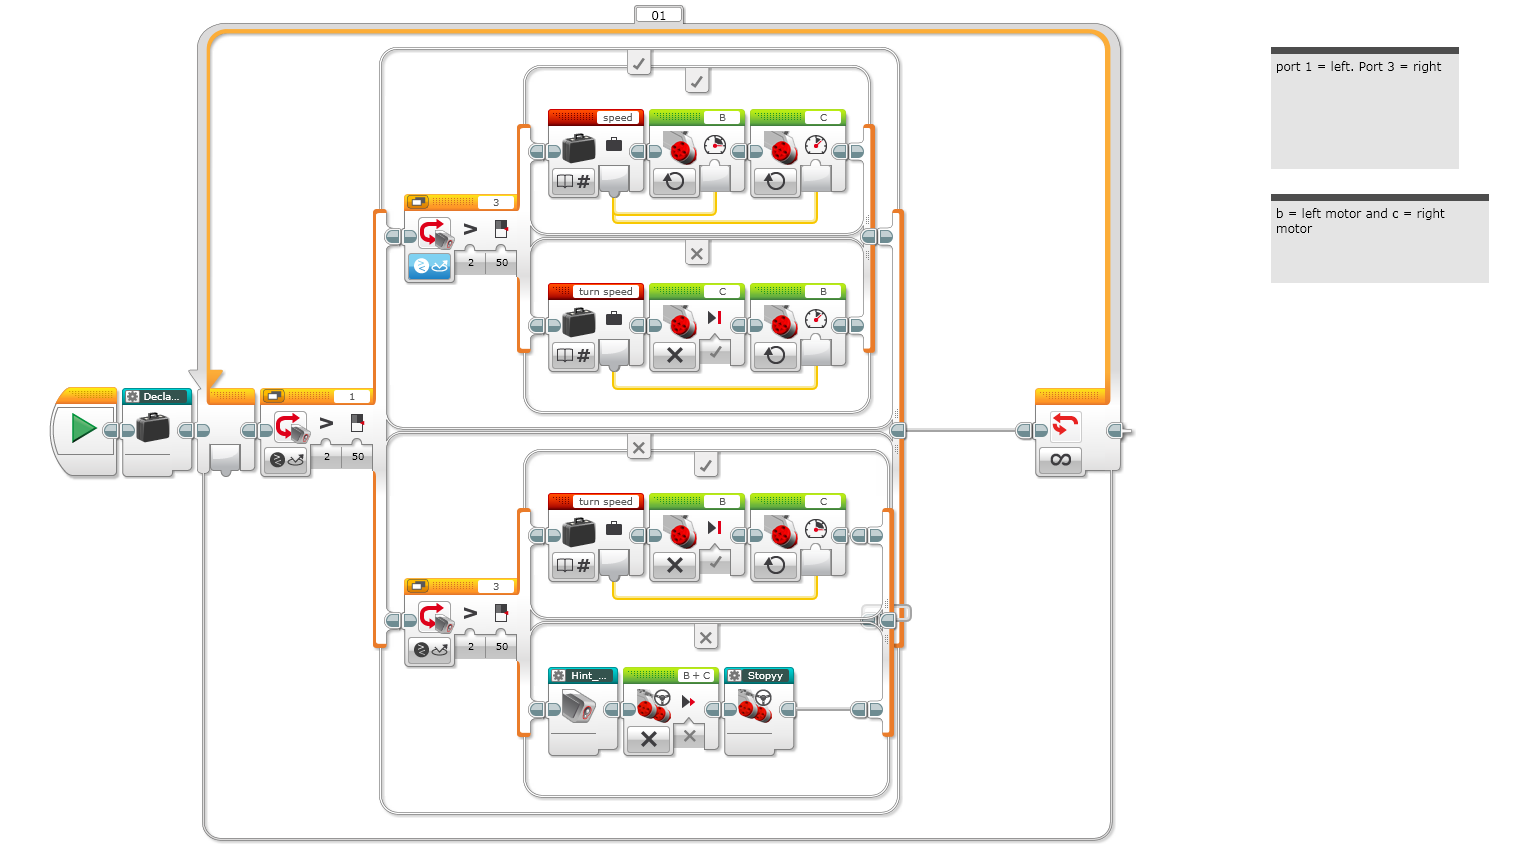
We tried to do them both with the previous code but it didn’t work. I thought that if I moved the sensors closer a bit and make the turn speed more aggressive, it might work. It sometimes went through the turns and sometimes did not. So that was the good news but the bad news is it gets up to one off the hints and goes off course and goes around in circles.

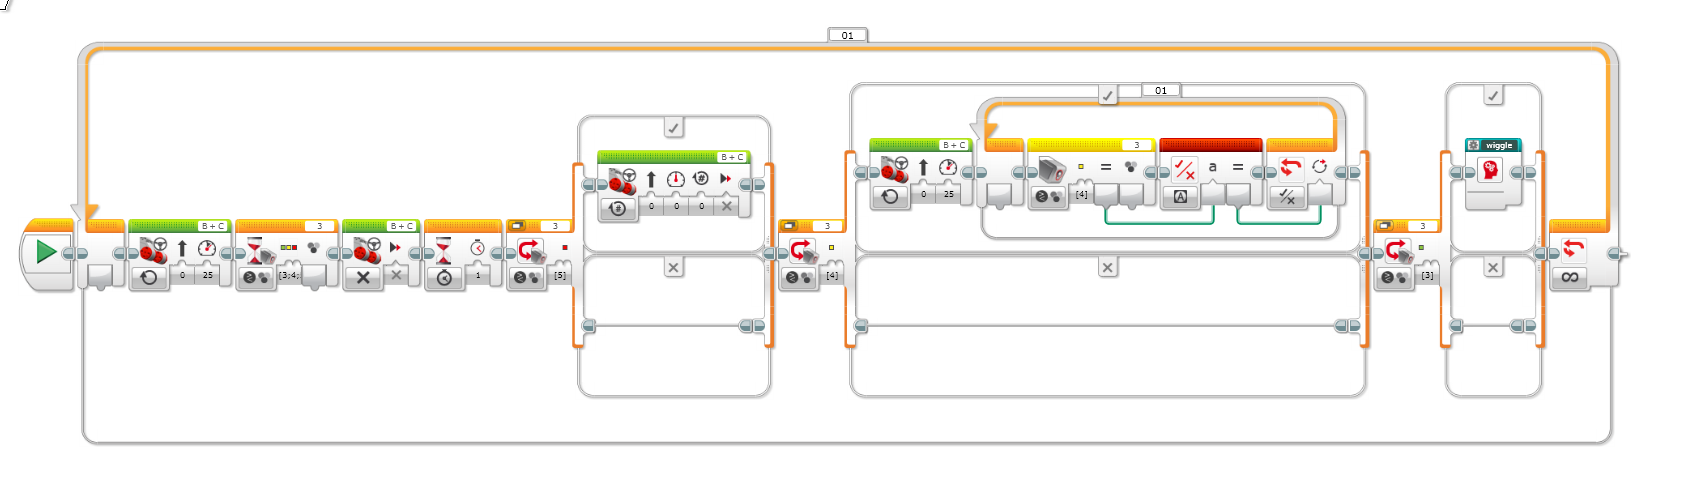
I decided to put a stop program block in the hint section but sadly, it doesn’t let you. This time I thought of making a my block because you could make one with a stop program in it and make the robot stop. (I called the block stoppy). I tried that but it also didn’t work! I thought if that didn’t work I could stop the motors and then stop the program. It didn’t work, again.

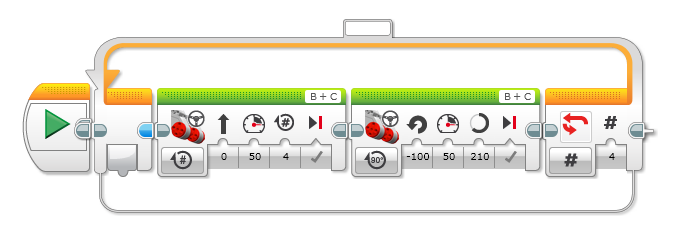
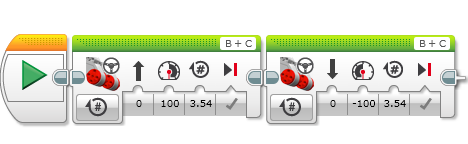
It was about time I headed back to class when dad came up with an idea. He saw that Sara and Tamsin where using one motor to go forward and one motor to go backwards and it was turning. When dad told that to me I thought that could possibly work to get around the sharp corners and complete the hints. But it might not work. You’ll just have to wait till next week I blog.

Before I go here is the word and the phrase of the day.

Perseverance: Persistence in doing something despite difficulty or delay in achieving success.

You have to be able to accept failure to get better.LeBron James

Bye…

Week 3 – 2019 – James

Hi guys. Today I finally figured out the hint bits in the senior Robocup Junior competition.

As I showed you last week, the hints looked like tiny green squares which were tucked in a certain corner. They are used for telling where the robot should go.

Sorry but my code was not uploaded but i’ll try to explain it as best as possible.

So my hint detector would run when either the left and right sensor was on the silver or when both sensors were on green or black.

If the left sensor was on green, the robot displayed on the screen “Found hint”. It would be the same if that happened to the right sensor. But if both were on silver, the robot would stop till the robot starts up his can finding algorithm.

Sometimes it incorrectly identified what it was on. To resolve that problem I made 1 as the B number in the math calculation. Next time it worked and was consistently working after that.

Next week, I’ll enhance the hint detector and finish the hint bit. (Well, maybe).

Before I go here’s the word of the day.

Mindset: The established set of attitudes held by someone.

And also, here’s the phrase of the day

You learn more in failure than you ever do in success – Jay – Z

Bye guys…

Week 2 – 2019 – James

Hi, James here again. Today I was working on the hints for the senior competition. Just saying I’m not in the senior competition but Dads asked me to have a go at it anyway. The hints look like this and they tell the robot which way to turn so they don’t turn somewhere where the line disappears.

The hints in Robocup Jr

Last year we had a table telling the robot what to when a certain event happens in our two sensor line follower. You can see this table below.

          Inputs           |         Outputs
---------------------------|--------------------------
Left Sensor | Right Sensor | Left Motor | Right Motor
------------------------------------------------------
White       | White        | Forwards   | Forwards
Black       | White        | Stop       | Forwards
White       | Black        | Forwards   | Stop
Silver      | Silver       | Stop       | Stop

Since we haven’t added green in the table, we’ll change it to see if we can try and detect a hint. The new table will look like this:

          Inputs           |         Outputs
---------------------------|--------------------------
Left Sensor | Right Sensor | Left Motor | Right Motor
------------------------------------------------------
White       | White        | Forwards   | Forwards
Black       | White        | Stop       | Forwards
White       | Black        | Forwards   | Stop
Not White   | Not White    | Stop       | Stop -> HintDetector MyBlock

If both are ‘Not White’ it is likely that the sensors are on either green and black or silver and silver.

If both sensors were on silver, they would both receive the same amount of reflected light. If one sensor was on green and the other sensor was on black, we think that green would reflect more light than black.

To compare the two sensors, we will use maths to work it out.

If we subtract the left sensor from the right sensor and take the absolute value we will get a result. If the result is close to zero, both sensors probably would be on silver. If the result is bigger than zero, the robot’s probably on a hint.

The absolute value is basically if a number is negative, just ignore the negative sign.

We can show this in a table to make things simpler.

      Reflected Light      | 
---------------------------|----------------------------
Left Sensor | Right Sensor | Difference (Absolute Value)
--------------------------------------------------------
80% (Silver)| 79% (Silver) | result = ABS (80 - 79) = 1
10% (Black) | 20% (Green)  | result = ABS(10 - 20) = 10

This approach may not work. If it doesn’t, we’ll have to think of something else. Here is my code so far. You can click on it to make it bigger.

My code for detecting the hints so far…

Next week I will keep working on it to see if the idea works.

Before I go here’s the word of the day…

Heuristic: A practical method for solving a problem that is not optimal or perfect but sufficient for the immediate goals.

Bye everyone…

Week 1 – 2019 – James

Hi, James here.

I’m back this year and with a new class! The people in this years Mindstorm class are Tamsin, Sara, Oliver and Me (Obviously). For this lesson, we just learnt stuff about the Ultrasonic Sensor and the Light Sensor to remember the important things. (Because there are two new coders). We also learnt a bit about pseudocode (Which I know about).

So we firstly looked at the line follower made by Josh last year. The line follower was really basic because the robot wiggled a lot. But when we used the 2 sensor line follower the robot didn’t wiggle as much as the basic line follower. I made a table to show the people reading how the 2 sensor line follower works.

You can look at the table here

When we were looking at the light sensor we also looked at how much light was reflecting from a certain colour. We tried it on green, black and white. White reflected about 80% of light, black reflected about 10% of light and green reflected about 20% of light. We found that out by using the Port View on the robot.

We also looked at the Ultrasonic Sensor. The Ultrasonic sensor is a sensor that sends sound waves till it hits an object and then it comes back to the sensor at a speed of 343 meters per second! We’ll use that sensor for locating the can (AKA the person who needs to be rescued). Last year Oliver, Josh, and Brayden used variables to find the can and push it out. By, locating the can, seeing how many degrees to spin till the sensor can’t detect the can then dividing that number of degrees by 2, the robot will turn back that many degrees to push the can out. I did the Can Finder challenge a different way. I used the turn motor block to spin the robot in only one direction then when it locates the can, the robot will push it out of the “Chemical Spill”.

For the new kids joining this year they had to do a challenge on Scratch. To do it you had to use variables. The meaning of a variable is:

A container with a name that stores important information. ( e.g The score in a game of Pac Man)

Sara said, “That there were different variable types”, “one is an ordinary variable (Like the one I gave the meaning on), another one could be a list, and another could be a collection”.

Before I go, I will always put a word of the day in. Today’s word of the day is…

Ascetic – Extreme self discipline and abstention from all forms of indulgence, typically for religious reasons.

Bye. See you next time I blog about my newest Mindstorm adventures…

Week 11 – James

Hi, James here (again)

If you are wondering why this is named week 11. It’s because we didn’t write  for 2 weeks, except for Oliver, so that’s why.

Today we were making a 2 sensor line follower.  We used 2 colour sensors to detect reflected light of a certain colour like black, white and silver.

We are using 2 sensors because there is a silver line at the green chemical spill blob so we need to stop there.

This is how the 2 sensor line follower will work.

          Inputs           |         Outputs
---------------------------|--------------------------
Left Sensor | Right Sensor | Left Motor | Right Motor
------------------------------------------------------
White       | White        | Forwards   | Forwards
Black       | White        | Stop       | Forwards
White       | Black        | Forwards   | Stop
Silver      | Silver       | Stop       | Stop

Note:
Black reflects about 12% of the light
White reflects about 72% of the light
Silver reflects about 30% of the light

For our inputs we used greater than 50% to detect white and less than 50% to detect black and silver.

For this post I think this won’t need pseudocode because my table describes it perfectly.

Here is my code for the 2 sensor line follower.

We used variables to set the speed for how fast the robot turns around corners and for its forward speed.  We used variables so we didn’t have to change speed values in many blocks of code.

We tuned it by experimenting with different speeds to see if it would follow the line on our mat and not run off.

There was a thing very interesting.  I couldn’t use a turn speed of 70 but I could use a turn speed of 75.

The two sensor line follower didn’t jiggle around like our original one sensor follower.  The two sensor follower behaved more like the 1 sensor PID line follower which was made by Richard.

Week 7 – James


Hi its James here.  This week we started looking at the ultrasonic sensor and what it does. This is what an ultrasonic sensor looks like:

An ultrasonic sensor is an instrument that measures the distance to an object using ultrasonic sound waves.

An ultrasonic sensor uses a transducer to send and receive ultrasonic pulses that relay back information about an object’s proximity.

High-frequency sound waves reflect from boundaries to produce distinct echo patterns.

Our first challenge was to stop at a wall with the ultrasonic sensor. All of us (excluding Josh because wasn’t here) had troubles at the start like how we had to change the code for the port for the ultrasonic sensor from port 4 to port 1 because that is where we had plugged the sensor into but we agreed to change the plug the sensor was plugged into port from port 1 to port 4. This is my solution.

Our second challenge was to control the robot with The Force! (that’s in Star Wars). I would have thought that if you didn’t know about Star Wars I would think I’m magic. But this is the code I wrote to do it.

But if you truly want to master the force, this is my code.
As you can see I have used comments to tell you what the block does. For example you can see that in every coding bit (except for the first one) that I have used comments to tell you what one or many blocks do.

We found discrepancies in the teaching booklet because the code to Truly Master the Force had the wrong comment in 2 places. (They where in <15 cm move backward and >20cm move forward).  It should have been the other way around like you can see in my code.

When we learned about the mini sounds that the ultrasonic sensor can hear we looked up how well can a human can hear. This is the information on it.

While 20 to 20,000 Hz forms the absolute borders of the human hearing range, our hearing is most sensitive in the 2000 to 5000 Hz frequency range. As far as loudness is concerned, humans can typically hear starting at 0 dB.

Before I go the word of the day is

Eschew Deliberately avoid using

This is the end of my post so I’m over and out. Goodbye!

Week 6 – James

Hi it’s James here. This week we started our goal which is doing a line – following challenge like the one in Robocup Junior ( Our course looks like this).

This is basically what the course looks like at Robocup Junior. ( It’s only missing a ramp)

We looked an algorithm on how to make the robot follow a line. We followed a section of the course going the opposite direction of where the robot is facing in the picture, above.  The robot can’t follow the middle of the line because it can’t see the black line ahead of itself like a human can.  If you look at the code below it is coded to follow one side of the line. (mine was the right side).

If the robot is placed on the left side of the line it turns around and goes the wrong way. When it follows the right side, it jiggles side to side like this.

The algorithm is repeating forever moving away from the black line and when the color sensor is on the color white, it moves back towards the black line.

To make the code work I adjusted the speed to 35 and then I made several adjustments to the turning starting from 45 and -45 and going to 70 and -70.

I had several problems like with the switch block and other things in the code  but here are the main problems I had…

  • My speed was too fast to get around some corners.
  • I turned too much when doing the jiggle.

I could make my code better by adding some more comments.


Week 5 – James

Hi, its James here. We didn’t write last week because we only had 2 people here last week ): . (Oliver and Josh were away). Anyway, this week we finished a challenge that I did last week. Dad helped me because you can see that there is a yellow and red block is in the code. (We haven’t used those blocks yet). It took us 2 weeks to get it to work properly. If you’re wondering what the yellow and red blocks do it does this…


Week 3 – James


Hi – it’s James again. This is what happend in robotics class this week.

We discussed what pseudocode means and it means detailed steps that can be used to write actual code.  It could be written in a different language like French or Spanish or any other language in the world and is a helpful guide to not forget steps. Click here to see the others

After that, we looked at a PB+J sample of what to do to make a PB+J sandwich. ( PB+J means Peanut butter and Jelly incase you were wondering). There were 3 students and they wrote some pseudocode of how to make a PB+J sandwich. All there students were wrong but this is a solution below.

  1. Take exactly two pieces of bread.
  2. Take one piece of bread that is not covered with peanut butter on any side and use a knife to spread peanut butter on one side
  3. Take a second piece of bread that is not covered with jelly on any side and use a knife to spread jelly on one side
  4. Place the jelly side of the second piece of bread against the peanut butter side of the first piece of bread
  5. Place the combined pieces of bread on plate

Next, we had a challenge using pseudocode to get around a square going left around the square. Richard said that I had the best code. I also was the first one to do it. The code I wrote is down below.


The pseudocode challenge was very hard because it took like 15 times to make it work. Thats how hard it was. So now, our adventure continues.

Week 2 – James

For this week we had a challenge of moving between a black and green line using time, rotations and degrees. The one which was most accurate was the rotations one because we looked at a special rotation measurer on the Mindstorm and found out it was 1273 degrees between the black line and the green line. Next we divided that by 360 because there are 360 degrees in a circle and we got 3.54 rotations.  You can see that in my code below.

My Code for the line distance challenge

After that we looked at the colour sensor. We coded it to stop at the green square on the special line following mat.  But there was one question I asked Richard. Would it stop at a green of any shade? So, we experimented with it and it stopped only once on the line following  mat because it wasn’t the actual green shown on the color picker. We tried again but this time with a green bit of Lego and it stopped all the time at the place it should stop at. So, it appears that it only stops at a certain shade of green.